
Graph 是 Agent Framework 的底层运行时。我们建议开发者使用Agent Framework,但直接使用Graph API也是完全可行的。
Graph 是一个低级工作流和多智能体编排框架,使开发者能够实现复杂的应用程序编排。
Agent 编排的核心引擎
Spring AI Alibaba Graph 是 Agent 编排背后的核心引擎,在底层,Spring AI Alibaba 框架会将 Agent 编排为 Graph,组成一个由节点串联而成的 DAG 图。
Graph 引擎核心概念与定义
Spring AI Alibaba Graph 有以下三个核心概念:
-
状态(State):定义了在 Node 与 Edge 之间传递的数据结构,是整个 Agent 上下文传递的核心载体,具体实现上是一个
Map<String, Object>。 -
节点(Node):Graph 中的每个 Node 是执行逻辑单元,接受当前 State 作为输入,执行某些操作(如调用 LLM 或自定义逻辑),并返回对 State 的更新。
-
边(Edge):定义 Node 间的控制流,可为固定连接,也可依据状态条件动态决定下一步执行路径,实现分支逻辑
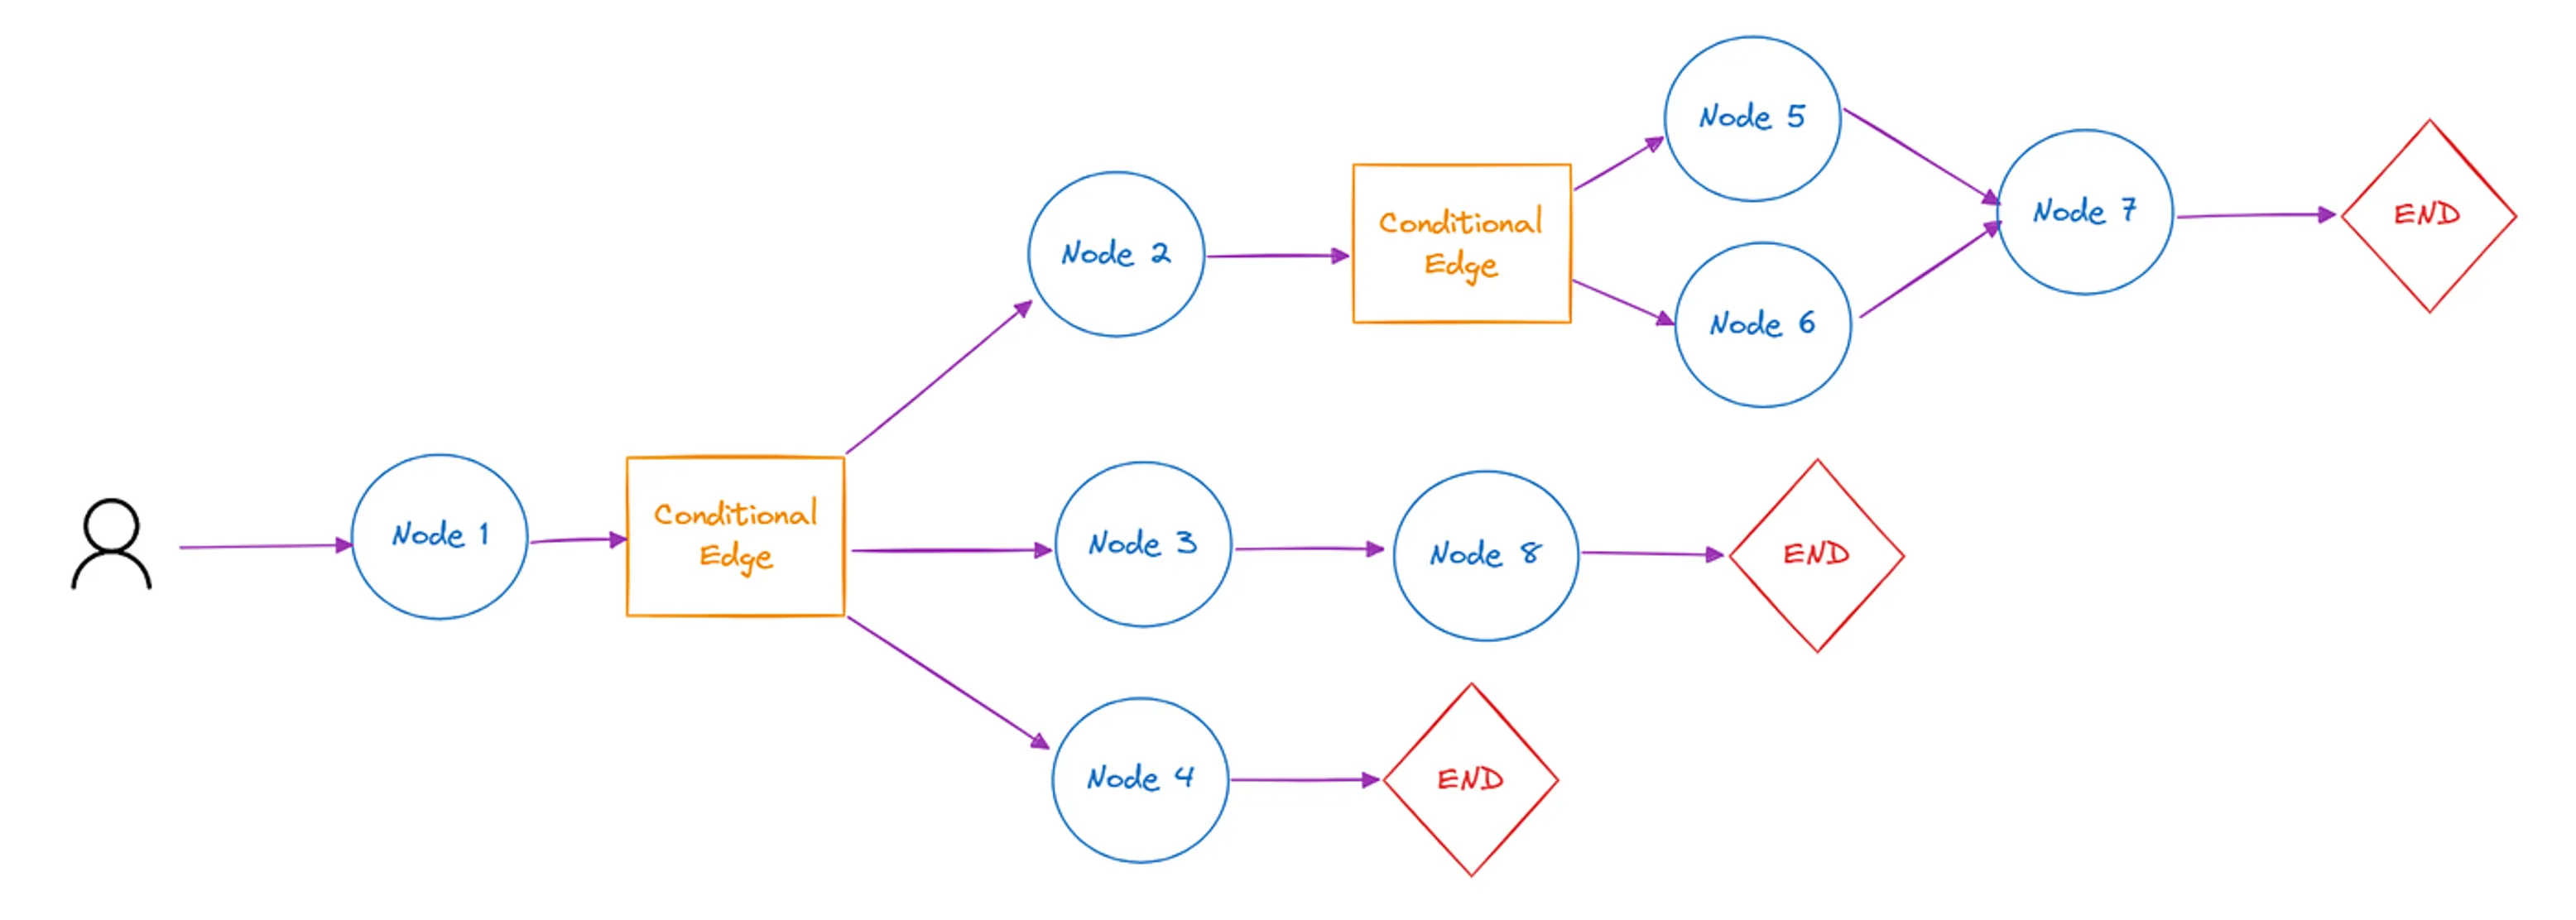
通过组合 Node 和 Edge,开发者可以创建复杂的循环工作流,随着时间的推移不断更新 State 状态。然而,真正的力量来自 Spring AI Alibaba 如何管理这种 State 状态。
简而言之:Node 完成工作,Edge 告诉下一步该做什么。
Graph 引擎提供的 Low-level API
Spring AI Alibaba 同时提供了声明式的 Agentic API 与底层原子化的 Graph API,两种模式都对开发者开发,**Agentic API vs Graph API **应该怎么选?前文我们已经重点介绍了 Agentic API 的开发模式,相比于 Agentic API,Graph API 可以让开发者对流程有更全面的控制,开发者可以独立定义每个 Node 的逻辑、每条边的逻辑,最终按照业务需要编排成完成的流程图。
以下是 Spring AI Alibaba 项目中使用 Graph API 实现 DeepResearch 的流程图定义,演示了 Graph API 的具体使用方法:
Graph 引擎提供更多运行时特性
整个 Spring AI Alibaba 框架底层基于 Spring AI 实现(下图绿色部分),因此在 Augmented LLM 层次提供了 Model、Tool Calling、MCP、RAG 等原子能力的完善定义,具备厂商无关、易用性高、可扩展性强的特点。
在 Agentic Framework 这一层(下图蓝色部分),是 Spring AI Alibaba 框架提供的核心抽象。定义了 Graph 引擎将以及面向开发者的 Agentic API、Graph API 来实现智能体流程编排。
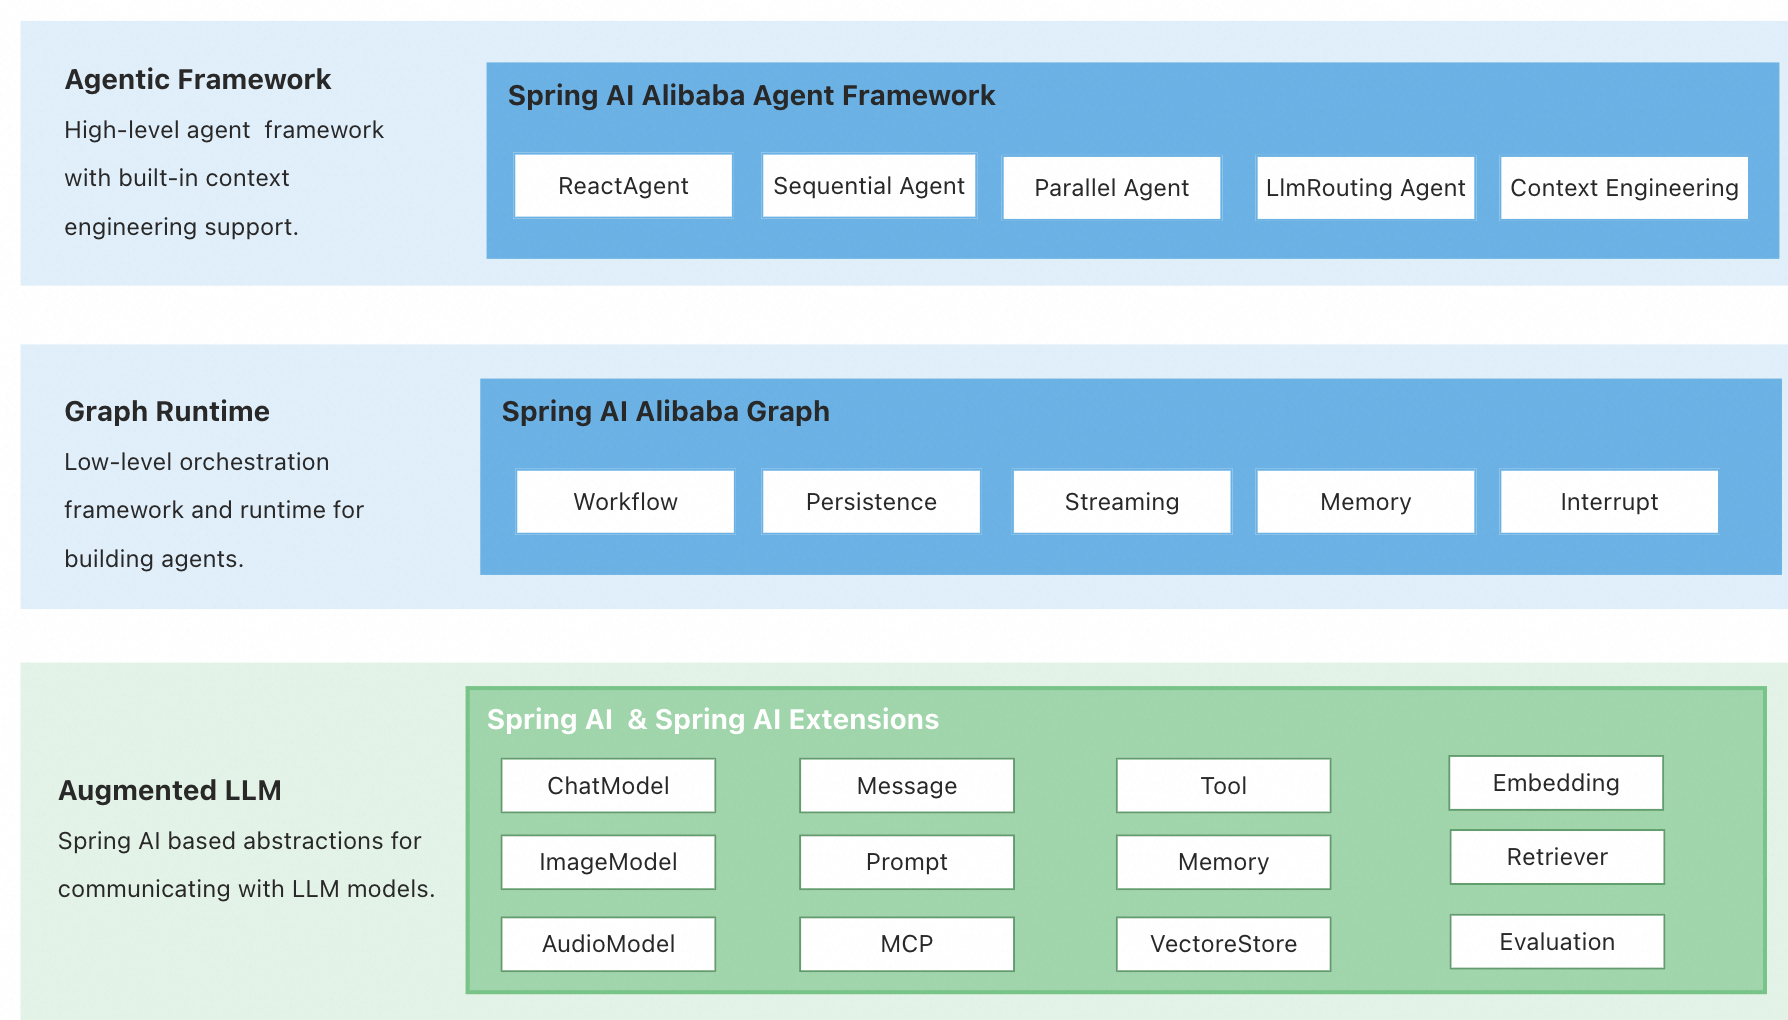
除了流程编排之外,Graph 引擎还原生支持 Streaming、Human In the Loop、Memory & Context 等智能体核心能力。
-
**Streaming:**流式响应对于 Agent 交互非常关键,同时与模型生成式的特性非常契合,框架可以将每个 Node 节点的运行情况、LLM Token 实时的发送到用户端。
-
**Human In the Loop:**允许对 Agent 运行过程中的工具调用进行评估、修改、批准。在模型驱动的应用中特别有用,让用户具备为 Agent 验证有效性、纠正错误、增加上下文的能力。
-
**Memory & Context:**框架可以处理Agent应用运行期的 短期记忆 与 长期记忆。短期记忆是指一个会话周期内的数据、历史消息传递;长期记忆指跨多个会话时,Agent 可以了解历史用户偏好与信息。
定义自己的Node
在 Spring AI Alibaba Graph 中,Node 是工作流的基本执行单元。每个 Node 负责处理特定的业务逻辑,接收状态(State)作为输入,并返回更新后的状态。
Node 接口
自定义 Node 需要实现 NodeAction 或 NodeActionWithConfig 接口:
public interface NodeAction {

    Map<String, Object> apply(OverAllState state) throws Exception;

}


public interface NodeActionWithConfig {

    Map<String, Object> apply(OverAllState state, RunnableConfig config) throws Exception;

}
主要区别:
-
NodeAction:只接收状态作为参数,适用于简单的业务逻辑 -
NodeActionWithConfig:额外接收运行配置,可以访问元数据、线程ID等信息,适用于需要上下文信息的场景
基础 Node 示例
以下是一个简单的文本处理 Node:
import com.alibaba.cloud.ai.graph.OverAllState;

import com.alibaba.cloud.ai.graph.action.NodeAction;

import java.util.HashMap;

import java.util.Map;


public class TextProcessorNode implements NodeAction {


    @Override

    public Map<String, Object> apply(OverAllState state) throws Exception {

        // 1. 从状态中获取输入

        String input = state.value("query", "").toString();


        // 2. 执行业务逻辑

        String processedText = input.toUpperCase().trim();


        // 3. 返回更新后的状态

        Map<String, Object> result = new HashMap<>();

        result.put("processed_text", processedText);

        return result;

    }

}
高级 Node 示例:带配置的 AI Node
以下示例展示如何创建一个调用 LLM 的 Node:
import com.alibaba.cloud.ai.graph.OverAllState;

import com.alibaba.cloud.ai.graph.RunnableConfig;

import com.alibaba.cloud.ai.graph.action.NodeActionWithConfig;

import org.springframework.ai.chat.client.ChatClient;

import org.springframework.ai.chat.prompt.PromptTemplate;


import java.util.Arrays;

import java.util.HashMap;

import java.util.List;

import java.util.Map;


public class QueryExpanderNode implements NodeActionWithConfig {


    private final ChatClient chatClient;

    private final PromptTemplate promptTemplate;


    public QueryExpanderNode(ChatClient.Builder chatClientBuilder) {

        this.chatClient = chatClientBuilder.build();

        this.promptTemplate = new PromptTemplate(

            "你是一个搜索优化专家。请为以下查询生成 {number} 个不同的变体。\n" +

            "原始查询:{query}\n\n" +

            "查询变体:\n"

        );

    }


    @Override

    public Map<String, Object> apply(OverAllState state, RunnableConfig config) throws Exception {

        // 获取输入参数

        String query = state.value("query", "").toString();

        Integer number = state.value("expanderNumber", 3);


        // 调用 LLM

        String result = chatClient.prompt()

            .user(user -> user

                .text(promptTemplate.getTemplate())

                .param("query", query)

                .param("number", number))

            .call()

            .content();


        // 处理结果

        String[] variants = result.split("\n");


        // 返回更新的状态

        Map<String, Object> output = new HashMap<>();

        output.put("queryVariants", Arrays.asList(variants));

        return output;

    }

}
条件评估 Node
用于工作流中的条件分支判断:
import com.alibaba.cloud.ai.graph.OverAllState;

import com.alibaba.cloud.ai.graph.action.NodeAction;


import java.util.HashMap;

import java.util.Map;


public class ConditionEvaluatorNode implements NodeAction {


    @Override

    public Map<String, Object> apply(OverAllState state) throws Exception {

        String input = state.value("input", "").toString().toLowerCase();


        // 根据输入内容决定路由

        String route;

        if (input.contains("错误") || input.contains("异常")) {

            route = "error_handling";

        } else if (input.contains("数据") || input.contains("分析")) {

            route = "data_processing";

        } else if (input.contains("报告") || input.contains("总结")) {

            route = "report_generation";

        } else {

            route = "default";

        }


        Map<String, Object> result = new HashMap<>();

        result.put("_condition_result", route);

        return result;

    }

}
并行结果聚合 Node
用于收集和聚合并行执行的多个 Node 的结果:
import com.alibaba.cloud.ai.graph.OverAllState;

import com.alibaba.cloud.ai.graph.action.NodeAction;


import java.util.*;


public class ParallelResultAggregatorNode implements NodeAction {


    private final String outputKey;


    public ParallelResultAggregatorNode(String outputKey) {

        this.outputKey = outputKey;

    }


    @Override

    public Map<String, Object> apply(OverAllState state) throws Exception {

        // 收集所有并行任务的结果

        List<String> results = new ArrayList<>();


        // 假设并行任务将结果存储在不同的键中

        state.value("result_1").ifPresent(r -> results.add(r.toString()));

        state.value("result_2").ifPresent(r -> results.add(r.toString()));

        state.value("result_3").ifPresent(r -> results.add(r.toString()));


        // 聚合结果

        String aggregatedResult = String.join("\n---\n", results);


        Map<String, Object> output = new HashMap<>();

        output.put(outputKey, aggregatedResult);

        return output;

    }

}
集成自定义 Node 到 StateGraph
import com.alibaba.cloud.ai.graph.StateGraph;

import com.alibaba.cloud.ai.graph.KeyStrategyFactory;

import com.alibaba.cloud.ai.graph.KeyStrategy;

import com.alibaba.cloud.ai.graph.state.strategy.ReplaceStrategy;

import org.springframework.context.annotation.Bean;

import org.springframework.context.annotation.Configuration;


import java.util.HashMap;

import java.util.Map;


import static com.alibaba.cloud.ai.graph.action.AsyncNodeAction.node_async;

import static com.alibaba.cloud.ai.graph.action.AsyncEdgeAction.edge_async;


@Configuration

public class WorkflowConfiguration {


    @Bean

    public StateGraph customWorkflowGraph(ChatClient.Builder chatClientBuilder) {

        // 定义状态管理策略

        KeyStrategyFactory keyStrategyFactory = () -> {

            HashMap<String, KeyStrategy> strategies = new HashMap<>();

            strategies.put("query", new ReplaceStrategy());

            strategies.put("processed_text", new ReplaceStrategy());

            strategies.put("queryVariants", new ReplaceStrategy());

            strategies.put("final_result", new ReplaceStrategy());

            return strategies;

        };


        // 构建 StateGraph

        StateGraph graph = new StateGraph(keyStrategyFactory);


        // 添加自定义 Node

        graph.addNode("processor", node_async(new TextProcessorNode()));

        graph.addNode("condition", node_async(new ConditionNode()));


        // 定义边(流程连接)

        graph.addEdge(StateGraph.START, "processor");

        graph.addEdge("processor", "condition");


        // 条件边:根据 condition node 的结果路由

        graph.addConditionalEdges(

            "condition",

            edge_async(state -> state.value("_condition_result", "short").toString()),

            Map.of(

                "long", "processor",  // 长文本重新处理

                "short", StateGraph.END  // 短文本结束

            )

        );


        return graph;

    }

}
Node 开发最佳实践
-
单一职责:每个 Node 应该只负责一个明确的任务
-
状态不可变:不要直接修改输入的 state,而是返回新的状态更新
-
异常处理:在 Node 内部处理可预见的异常,避免中断整个流程
-
日志记录:添加适当的日志以便调试和监控
-
参数验证:在处理前验证从状态中获取的参数
public class RobustNode implements NodeAction {

    private static final Logger logger = LoggerFactory.getLogger(RobustNode.class);


    @Override

    public Map<String, Object> apply(OverAllState state) throws Exception {

        try {

            // 参数验证

            String input = state.value("input")

                .orElseThrow(() -> new IllegalArgumentException("Missing 'input' in state"));


            logger.info("Processing input: {}", input);


            // 业务逻辑

            String result = processInput(input);


            // 返回结果

            Map<String, Object> output = new HashMap<>();

            output.put("output", result);

            return output;


        } catch (Exception e) {

            logger.error("Error in RobustNode", e);

            // 返回错误信息而不是抛出异常

            Map<String, Object> errorOutput = new HashMap<>();

            errorOutput.put("error", e.getMessage());

            return errorOutput;

        }

    }


    private String processInput(String input) {

        // 具体业务逻辑

        return input;

    }

}
Agent作为Node
在复杂的工作流场景中,可以将 ReactAgent 作为 Node 集成到 StateGraph 中,实现更强大的组合能力。Agent 作为 Node 可以利用其推理和工具调用能力,处理需要多步骤推理的任务。
ReactAgent 作为 SubGraph Node
ReactAgent 可以通过 asNode() 方法转换为可以嵌入到父 Graph 中的 Node:
import com.alibaba.cloud.ai.graph.agent.ReactAgent;

import com.alibaba.cloud.ai.graph.StateGraph;

import com.alibaba.cloud.ai.graph.KeyStrategyFactory;

import com.alibaba.cloud.ai.graph.state.strategy.ReplaceStrategy;

import com.alibaba.cloud.ai.graph.CompileConfig;

import com.alibaba.cloud.ai.graph.CompiledGraph;

import com.alibaba.cloud.ai.graph.NodeOutput;

import com.alibaba.cloud.ai.graph.streaming.StreamingOutput;

import org.springframework.ai.chat.model.ChatModel;


import java.util.HashMap;

import java.util.Map;


public class AgentWorkflowExample {


    public void buildWorkflowWithAgent(ChatModel chatModel) throws Exception {

        // 创建专门的数据分析 Agent

        ReactAgent analysisAgent = ReactAgent.builder()

            .name("data_analyzer")

            .model(chatModel)

            .instruction("你是一个数据分析专家,负责分析数据并提供洞察,请分析以下输入数据:\n {input}")

            .outputKey("analysis_result")

            .build();


        // 创建报告生成 Agent

        ReactAgent reportAgent = ReactAgent.builder()

            .name("report_generator")

            .model(chatModel)

            .instruction("你是一个报告生成专家,负责将分析结果 "{analysis_result}" 转化为专业报告")

            .outputKey("final_report")

            .build();


        // 定义状态管理策略

        KeyStrategyFactory keyStrategyFactory = () -> {

            HashMap<String, KeyStrategy> strategies = new HashMap<>();

            strategies.put("input", new ReplaceStrategy());

            return strategies;

        };


        // 构建包含 Agent 的工作流

        StateGraph workflow = new StateGraph(keyStrategyFactory);


        // 将 Agent 作为 SubGraph Node 添加

        workflow.addNode(analysisAgent.name(), analysisAgent.asNode(

            true,                     // includeContents: 是否传递父图的消息历史

            false                     // returnReasoningContents: 是否返回推理过程

        ));


        workflow.addNode(reportAgent.name(), reportAgent.asNode(

            true,

            false

        ));


        // 定义流程

        workflow.addEdge(StateGraph.START, analysisAgent.name());

        workflow.addEdge(analysisAgent.name(), reportAgent.name());

        workflow.addEdge(reportAgent.name(), StateGraph.END);


        // 编译并执行工作流

        CompiledGraph compiledGraph = workflow.compile(CompileConfig.builder().build());

        NodeOutput lastOutput = compiledGraph.stream(Map.of("input", "2025年全年销量100亿,毛利率 23%,净利率 13%。2024年全年销量80亿,毛利率 20%,净利率 8%。"))

            .doOnNext(output -> {

                if (output instanceof StreamingOutput<?> streamingOutput) {

                    System.out.println("Output from node " + streamingOutput.node() + ": " + streamingOutput.message().getText());

                }

            })

            .blockLast();


        System.out.println("\n\n最终结果,包含所有节点状态:\n" + lastOutput.state().data());

    }

}
SubGraph Node 参数说明
asNode() 方法支持以下参数配置:
| 参数 | 类型 | 说明 |
|------|------|------|
| includeContents | boolean | 是否将父图的 messages 传递给子 Agent(默认 true) |
| returnReasoningContents | boolean | 是否返回完整的推理过程,false 则只返回最终结果(默认 false) |
注意:outputKey 是在创建 ReactAgent 时通过 ReactAgent.builder().outputKey() 设置的,用于指定 Agent 输出结果在状态中的键名。
多 Agent 协作工作流示例
以下示例展示了一个完整的多 Agent 协作场景:
import com.alibaba.cloud.ai.graph.StateGraph;

import com.alibaba.cloud.ai.graph.agent.ReactAgent;

import com.alibaba.cloud.ai.graph.CompileConfig;

import com.alibaba.cloud.ai.graph.CompiledGraph;

import com.alibaba.cloud.ai.graph.NodeOutput;

import com.alibaba.cloud.ai.graph.streaming.StreamingOutput;

import com.alibaba.cloud.ai.graph.KeyStrategyFactory;

import com.alibaba.cloud.ai.graph.state.strategy.ReplaceStrategy;

import org.springframework.ai.chat.model.ChatModel;

import org.springframework.ai.tool.ToolCallback;

import org.springframework.ai.tool.function.FunctionToolCallback;


import java.util.HashMap;

import java.util.Map;


public class MultiAgentWorkflow {


    public void buildResearchWorkflow(

            ChatModel chatModel,

            ToolCallback searchTool,

            ToolCallback analysisTool,

            ToolCallback summaryTool) throws Exception {


        // 1. 创建信息收集 Agent

        ReactAgent researchAgent = ReactAgent.builder()

            .name("researcher")

            .model(chatModel)

            .instruction("你是一个研究专家,负责收集和整理相关信息,请研究主题: {input}")

            .tools(searchTool)

            .outputKey("research_data")

            .enableLogging(true)

            .build();


        // 2. 创建数据分析 Agent

        ReactAgent analysisAgent = ReactAgent.builder()

            .name("analyst")

            .model(chatModel)

            .instruction("你是一个分析专家,负责深入分析关于主题 "{input}" 的研究数据。数据如下: \n\n {research_data}")

            .tools(analysisTool)

            .outputKey("analysis_result")

            .enableLogging(true)

            .build();


        // 3. 创建总结 Agent

        ReactAgent summaryAgent = ReactAgent.builder()

            .name("summarizer")

            .model(chatModel)

            .instruction("你是一个总结专家,负责将分析结果提炼为简洁的结论,结果:\n\n {analysis_result}")

            .tools(summaryTool)

            .outputKey("final_summary")

            .enableLogging(true)

            .build();


        // 定义状态管理策略

        KeyStrategyFactory keyStrategyFactory = () -> {

            HashMap<String, KeyStrategy> strategies = new HashMap<>();

            strategies.put("input", new ReplaceStrategy());

            return strategies;

        };


        // 4. 构建工作流

        StateGraph workflow = new StateGraph(keyStrategyFactory);


        // 添加 Agent 节点

        workflow.addNode(researchAgent.name(), researchAgent.asNode(

            true,    // 包含历史消息

            false    // 不返回推理过程

        ));


        workflow.addNode(analysisAgent.name(), analysisAgent.asNode(

            true,

            false

        ));


        workflow.addNode(summaryAgent.name(), summaryAgent.asNode(

            true,

            true     // 返回完整推理过程

        ));


        // 定义顺序执行流程

        workflow.addEdge(StateGraph.START, researchAgent.name());

        workflow.addEdge(researchAgent.name(), analysisAgent.name());

        workflow.addEdge(analysisAgent.name(), summaryAgent.name());

        workflow.addEdge(summaryAgent.name(), StateGraph.END);


        // 编译并执行工作流

        CompiledGraph compiledGraph = workflow.compile(CompileConfig.builder().build());

        NodeOutput finalOutput = compiledGraph.stream(Map.of("input", "帮我做一份关于AI Agent的研究报告"))

            .doOnNext(output -> {

                if (output instanceof StreamingOutput<?> streamingOutput) {

                    System.out.println("Output from node " + streamingOutput.node() + ": " + streamingOutput.message().getText());

                }

            })

            .blockLast();


        System.out.println("多Agent研究工作流构建完成");

        System.out.println("最终输出: " + finalOutput.state().value("final_summary").orElse("无"));

    }

}
Agent Node 与普通 Node 混合使用
在实际应用中,可以将 Agent Node 和自定义 Node 混合使用,充分发挥各自优势:
import com.alibaba.cloud.ai.graph.StateGraph;

import com.alibaba.cloud.ai.graph.agent.ReactAgent;

import com.alibaba.cloud.ai.graph.CompileConfig;

import com.alibaba.cloud.ai.graph.CompiledGraph;

import com.alibaba.cloud.ai.graph.NodeOutput;

import com.alibaba.cloud.ai.graph.streaming.StreamingOutput;

import com.alibaba.cloud.ai.graph.OverAllState;

import com.alibaba.cloud.ai.graph.action.NodeAction;

import com.alibaba.cloud.ai.graph.KeyStrategyFactory;

import com.alibaba.cloud.ai.graph.state.strategy.ReplaceStrategy;

import org.springframework.ai.chat.model.ChatModel;

import org.springframework.ai.chat.messages.Message;


import java.util.HashMap;

import java.util.Map;


import static com.alibaba.cloud.ai.graph.action.AsyncNodeAction.node_async;

import static com.alibaba.cloud.ai.graph.action.AsyncEdgeAction.edge_async;


public class HybridWorkflow {


    public void buildHybridWorkflow(ChatModel chatModel) throws Exception {

        // 创建 Agent

        ReactAgent qaAgent = ReactAgent.builder()

            .name("qa_agent")

            .model(chatModel)

            .instruction("你是一个问答专家,负责回答用户的问题:\n {cleaned_input}")

            .outputKey("qa_result")

            .enableLogging(true)

            .build();


        // 创建自定义 Node

        class PreprocessorNode implements NodeAction {

            @Override

            public Map<String, Object> apply(OverAllState state) throws Exception {

                String input = state.value("input", "").toString();

                String cleaned = input.trim().toLowerCase();

                return Map.of("cleaned_input", cleaned);

            }

        }


        class ValidatorNode implements NodeAction {

            @Override

            public Map<String, Object> apply(OverAllState state) throws Exception {

                Message message = (Message) state.value("qa_result").get();

                boolean isValid = message.getText().length() > 50; // 简单验证

                return Map.of("is_valid", isValid);

            }

        }


        // 定义状态管理策略

        KeyStrategyFactory keyStrategyFactory = () -> {

            HashMap<String, KeyStrategy> strategies = new HashMap<>();

            strategies.put("input", new ReplaceStrategy());

            strategies.put("cleaned_input", new ReplaceStrategy());

            strategies.put("qa_result", new ReplaceStrategy());

            strategies.put("is_valid", new ReplaceStrategy());

            return strategies;

        };


        // 构建混合工作流

        StateGraph workflow = new StateGraph(keyStrategyFactory);


        // 添加普通 Node

        workflow.addNode("preprocess", node_async(new PreprocessorNode()));

        workflow.addNode("validate", node_async(new ValidatorNode()));


        // 添加 Agent Node

        workflow.addNode(qaAgent.name(), qaAgent.asNode(

            true,

            false

        ));


        // 定义流程:预处理 -> Agent处理 -> 验证

        workflow.addEdge(StateGraph.START, "preprocess");

        workflow.addEdge("preprocess", qaAgent.name());

        workflow.addEdge(qaAgent.name(), "validate");


        // 条件边:验证通过则结束,否则重新处理

        workflow.addConditionalEdges(

            "validate",

            edge_async(state -> (Boolean) state.value("is_valid", false) ? "end" : qaAgent.name()),

            Map.of("end", StateGraph.END, qaAgent.name(), qaAgent.name())

        );


        // 编译并执行工作流

        CompiledGraph compiledGraph = workflow.compile(CompileConfig.builder().build());

        NodeOutput lastOutput = compiledGraph.stream(Map.of("input", "请解释量子计算的基本原理"))

            .doOnNext(output -> {

                if (output instanceof StreamingOutput<?> streamingOutput) {

                    if (streamingOutput.message() != null) {

                        // streaming output from streaming llm node

                        System.out.println("Streaming output from node " + streamingOutput.node() + ": " + streamingOutput.message().getText());

                    } else {

                        // output from normal node, investigate the state to get the node data

                        System.out.println("Output from node " + streamingOutput.node() + ": " + streamingOutput.state().data());

                    }

                }

            })

            .blockLast();


        System.out.println("\n\n\n最终结果,包含所有节点状态:\n" + lastOutput.state().data());

    }

}
执行工作流
Spring AI Alibaba Graph 支持两种执行方式:
-
流式执行:使用
compiledGraph.stream()方法,实时获取每个节点的输出,适合需要实时反馈的场景 -
同步执行:使用
compiledGraph.invoke()方法,等待整个工作流执行完成后返回最终结果
流式执行示例
import com.alibaba.cloud.ai.graph.CompiledGraph;

import com.alibaba.cloud.ai.graph.CompileConfig;

import com.alibaba.cloud.ai.graph.NodeOutput;

import com.alibaba.cloud.ai.graph.streaming.StreamingOutput;


import java.util.Map;


// 编译工作流

CompiledGraph compiledGraph = workflow.compile(CompileConfig.builder().build());


// 流式执行,实时获取每个节点的输出

NodeOutput lastOutput = compiledGraph.stream(Map.of("input", "请分析2024年AI行业发展趋势"))

    .doOnNext(output -> {

        if (output instanceof StreamingOutput<?> streamingOutput) {

            if (streamingOutput.message() != null) {

                // streaming output from streaming llm node

                System.out.println("Streaming output from node " + streamingOutput.node() + ": " + streamingOutput.message().getText());

            } else {

                // output from normal node, investigate the state to get the node data

                System.out.println("Output from node " + streamingOutput.node() + ": " + streamingOutput.state().data());

            }

        }

    })

    .blockLast();


// 获取最终状态

System.out.println("最终结果: " + lastOutput.state().data());
同步执行示例
import com.alibaba.cloud.ai.graph.CompiledGraph;

import com.alibaba.cloud.ai.graph.CompileConfig;

import com.alibaba.cloud.ai.graph.OverAllState;

import com.alibaba.cloud.ai.graph.RunnableConfig;

import com.alibaba.cloud.ai.graph.StateGraph;

import com.alibaba.cloud.ai.graph.KeyStrategyFactory;

import com.alibaba.cloud.ai.graph.KeyStrategy;

import com.alibaba.cloud.ai.graph.state.strategy.ReplaceStrategy;

import com.alibaba.cloud.ai.graph.action.NodeAction;


import java.util.HashMap;

import java.util.Map;

import java.util.Optional;


import static com.alibaba.cloud.ai.graph.action.AsyncNodeAction.node_async;


public class WorkflowExecutor {


    public void executeWorkflow() throws Exception {

        // 创建简单的工作流

        KeyStrategyFactory keyStrategyFactory = () -> {

            HashMap<String, KeyStrategy> strategies = new HashMap<>();

            strategies.put("input", new ReplaceStrategy());

            strategies.put("output", new ReplaceStrategy());

            return strategies;

        };


        StateGraph workflow = new StateGraph(keyStrategyFactory);


        class SimpleNode implements NodeAction {

            @Override

            public Map<String, Object> apply(OverAllState state) throws Exception {

                String input = state.value("input", "").toString();

                return Map.of("output", "Processed: " + input);

            }

        }


        workflow.addNode("process", node_async(new SimpleNode()));

        workflow.addEdge(StateGraph.START, "process");

        workflow.addEdge("process", StateGraph.END);


        // 编译工作流

        CompileConfig compileConfig = CompileConfig.builder().build();

        CompiledGraph compiledGraph = workflow.compile(compileConfig);


        // 准备输入

        Map<String, Object> input = Map.of(

            "input", "请分析2024年AI行业发展趋势"

        );


        // 配置运行参数

        RunnableConfig runnableConfig = RunnableConfig.builder()

            .threadId("workflow-001")

            .build();


        // 执行工作流(同步调用)

        Optional<OverAllState> result = compiledGraph.invoke(input, runnableConfig);


        // 处理结果

        result.ifPresent(state -> {

            System.out.println("输入: " + state.value("input").orElse("无"));

            System.out.println("输出: " + state.value("output").orElse("无"));

        });


        System.out.println("工作流执行完成");

    }

}
Agent Node 最佳实践
-
明确角色定位:为每个 Agent 设置清晰的职责和指令,使用
.instruction()方法定义 Agent 的角色 -
合理配置工具:只为 Agent 提供其角色所需的工具,避免工具过多导致选择困难
-
设置输出键名:使用
.outputKey()方法为 Agent 设置输出键名,便于在工作流中访问结果 -
控制上下文传递:根据需要配置
includeContents参数,避免不必要的上下文传递 -
优化输出格式:使用
returnReasoningContents控制返回内容的详细程度 -
启用日志记录:使用
.enableLogging(true)启用日志,便于调试和监控 -
错误处理:在 Agent 外层添加错误处理 Node,确保流程的健壮性
-
流式处理:使用
compiledGraph.stream()进行流式处理,实时获取节点输出;使用compiledGraph.invoke()进行同步调用
性能优化建议
对于包含多个 Agent 的复杂工作流:
-
并行执行:对于相互独立的 Agent,使用并行节点提高效率
-
缓存结果:对于重复计算,考虑使用状态缓存
-
超时控制:为每个 Agent 设置合理的超时时间
-
资源管理:合理配置 ChatModel 的连接池和并发参数
// 并行执行示例

workflow.addNode("parallel_start", node_async(new TransparentNode()));


// 添加多个并行 Agent(注意:outputKey 在 builder 中设置)

ReactAgent agent1 = ReactAgent.builder()

    .name("agent1")

    .model(chatModel)

    .instruction("Agent 1 的指令")

    .outputKey("result1")

    .build();


ReactAgent agent2 = ReactAgent.builder()

    .name("agent2")

    .model(chatModel)

    .instruction("Agent 2 的指令")

    .outputKey("result2")

    .build();


ReactAgent agent3 = ReactAgent.builder()

    .name("agent3")

    .model(chatModel)

    .instruction("Agent 3 的指令")

    .outputKey("result3")

    .build();


workflow.addNode("agent1", agent1.asNode(true, false));

workflow.addNode("agent2", agent2.asNode(true, false));

workflow.addNode("agent3", agent3.asNode(true, false));


// 聚合结果

workflow.addNode("aggregator", node_async(new ParallelResultAggregatorNode("merged_result")));


// 设置并行执行

workflow.addEdge(StateGraph.START, "parallel_start");

workflow.addEdge("parallel_start", List.of("agent1", "agent2", "agent3"));

workflow.addEdge(List.of("agent1", "agent2", "agent3"), "aggregator");

workflow.addEdge("aggregator", StateGraph.END);
与Dify低代码平台集成
使用 Spring AI Alibaba Admin 平台,可以实现 Dify DSL 到 Spring AI Alibaba 高代码工程的导出。
压测数据
压测集群规格
-
Spring AI Alibaba 工程,独立部署的容器,保持默认线程池等配置参数,2个POD,POD 规格 2C4G
-
Dify 平台,官方部署方式,保持默认配置参数,每个组件都拉起2个POD,POD 规格 2C4G
有效并发处理上限
-
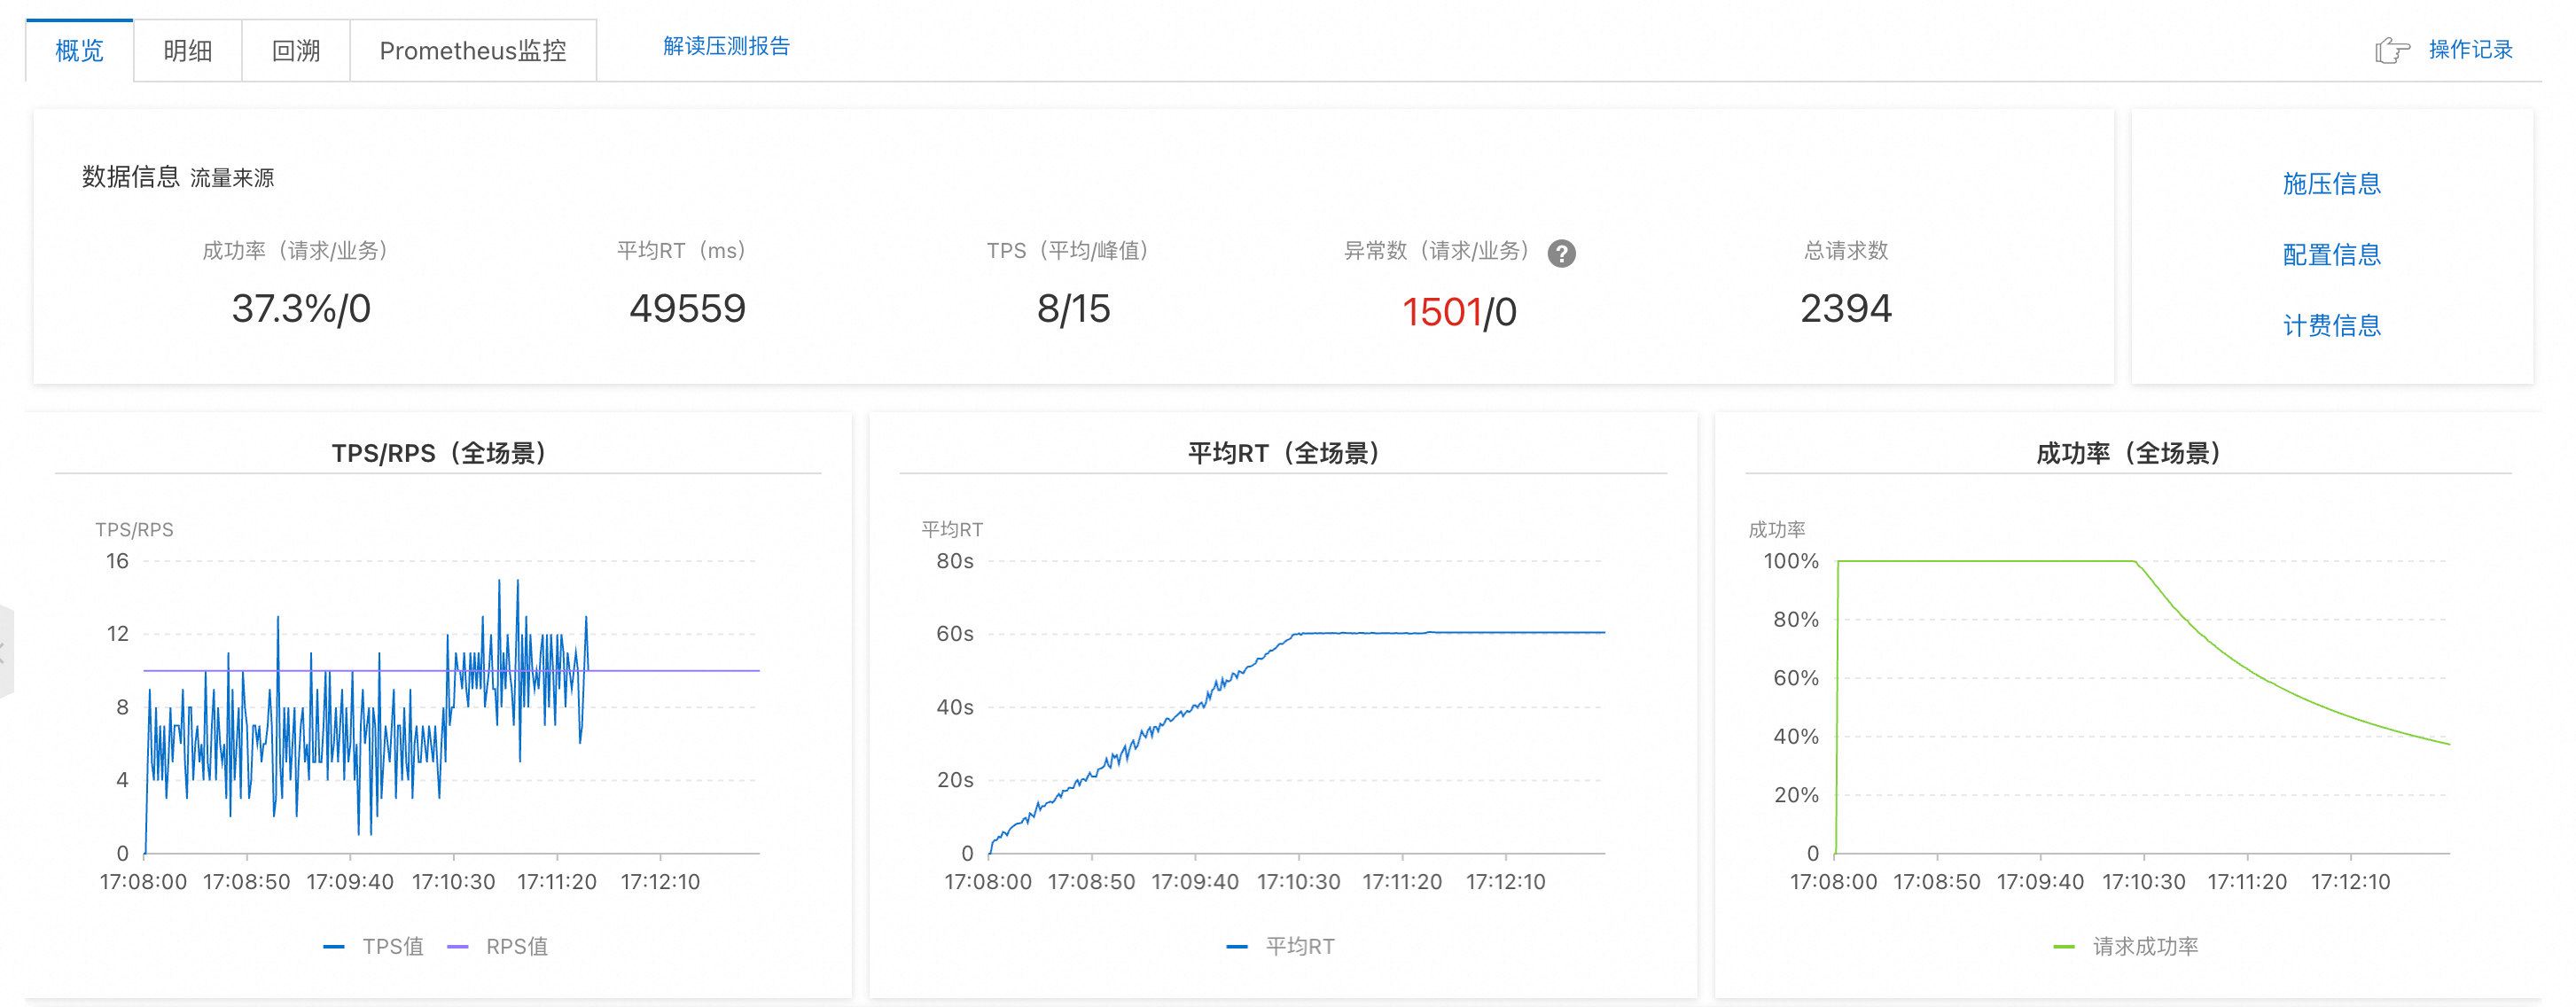
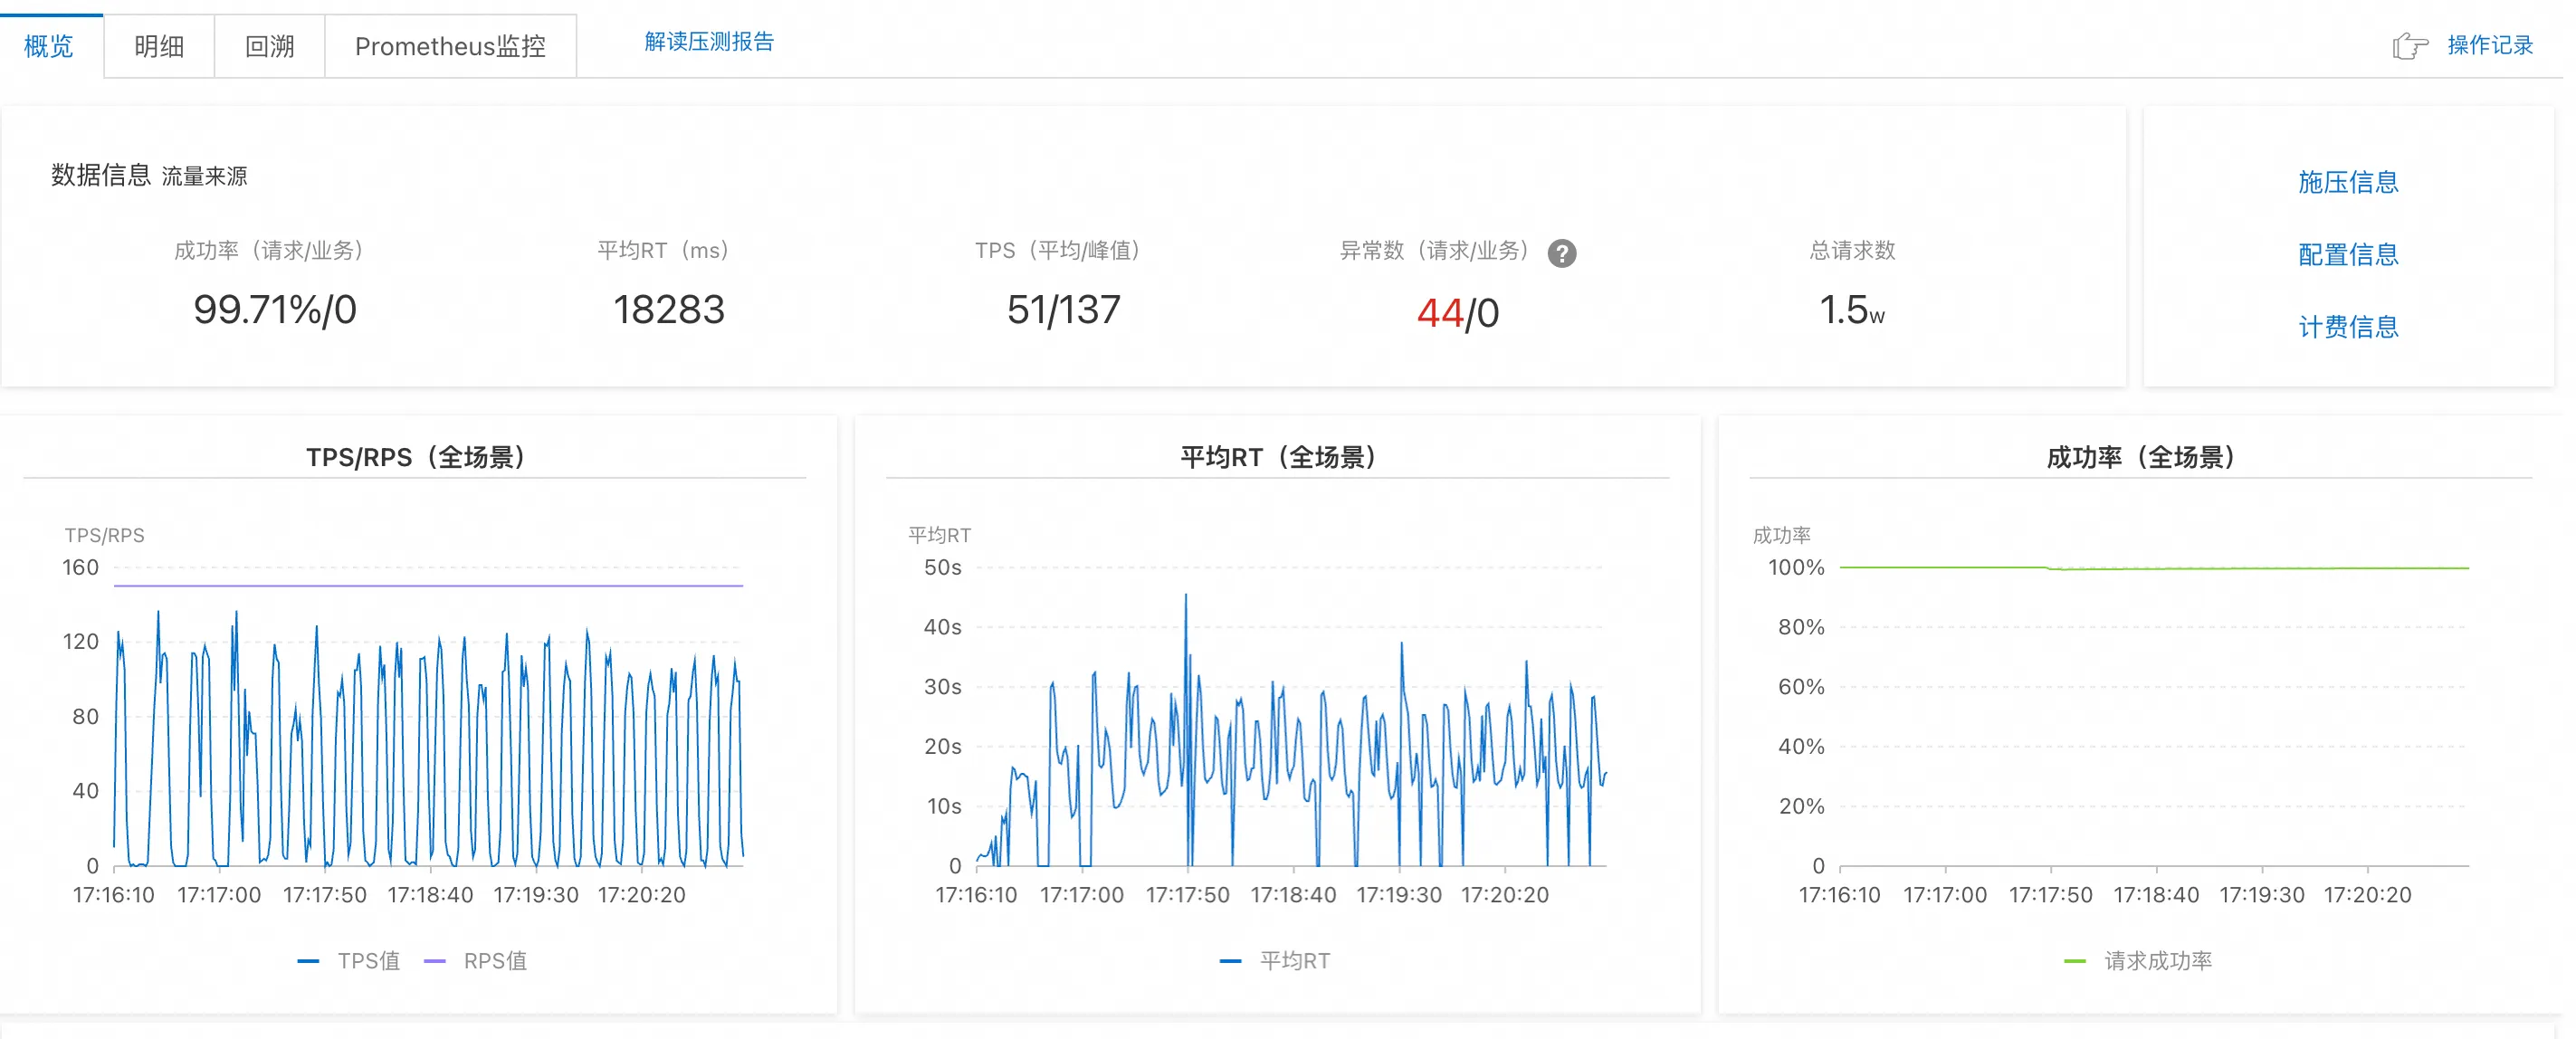
压测方式: 每个场景从 10 个 RPS(Request Per Second)开始,逐步提升,直到提升 RPS 值并不能带来 TPS 提升、成功率答复下降。
-
结论: Dify 能处理的上限 RPS < 10;Spring AI Alibaba 能处理的上限 RPS 约 150。
Dify 压测截图:
Spring AI Alibaba 压测截图:
极限场景下的吞吐量
-
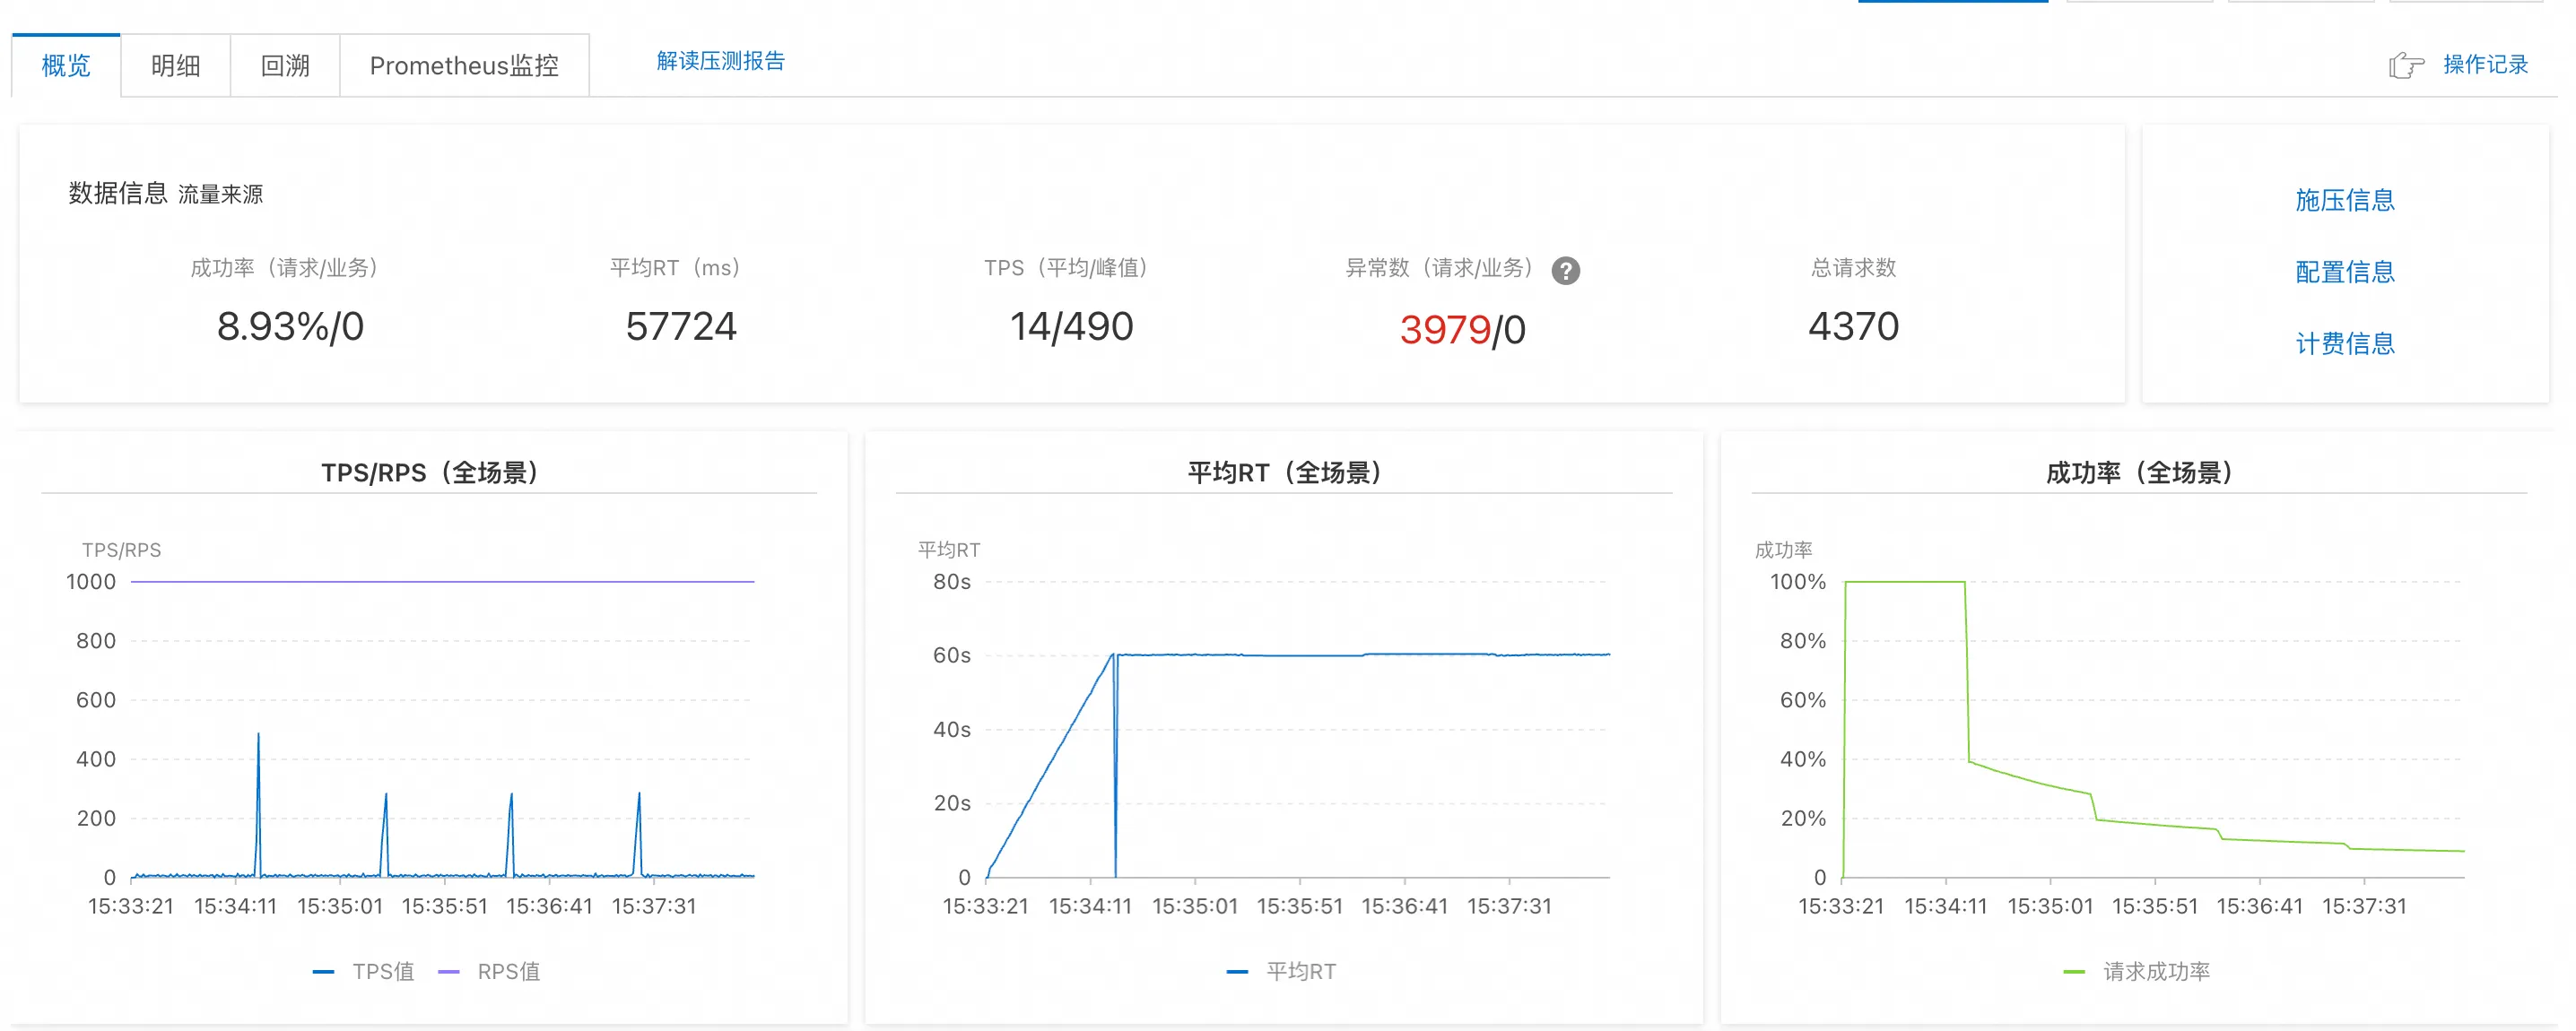
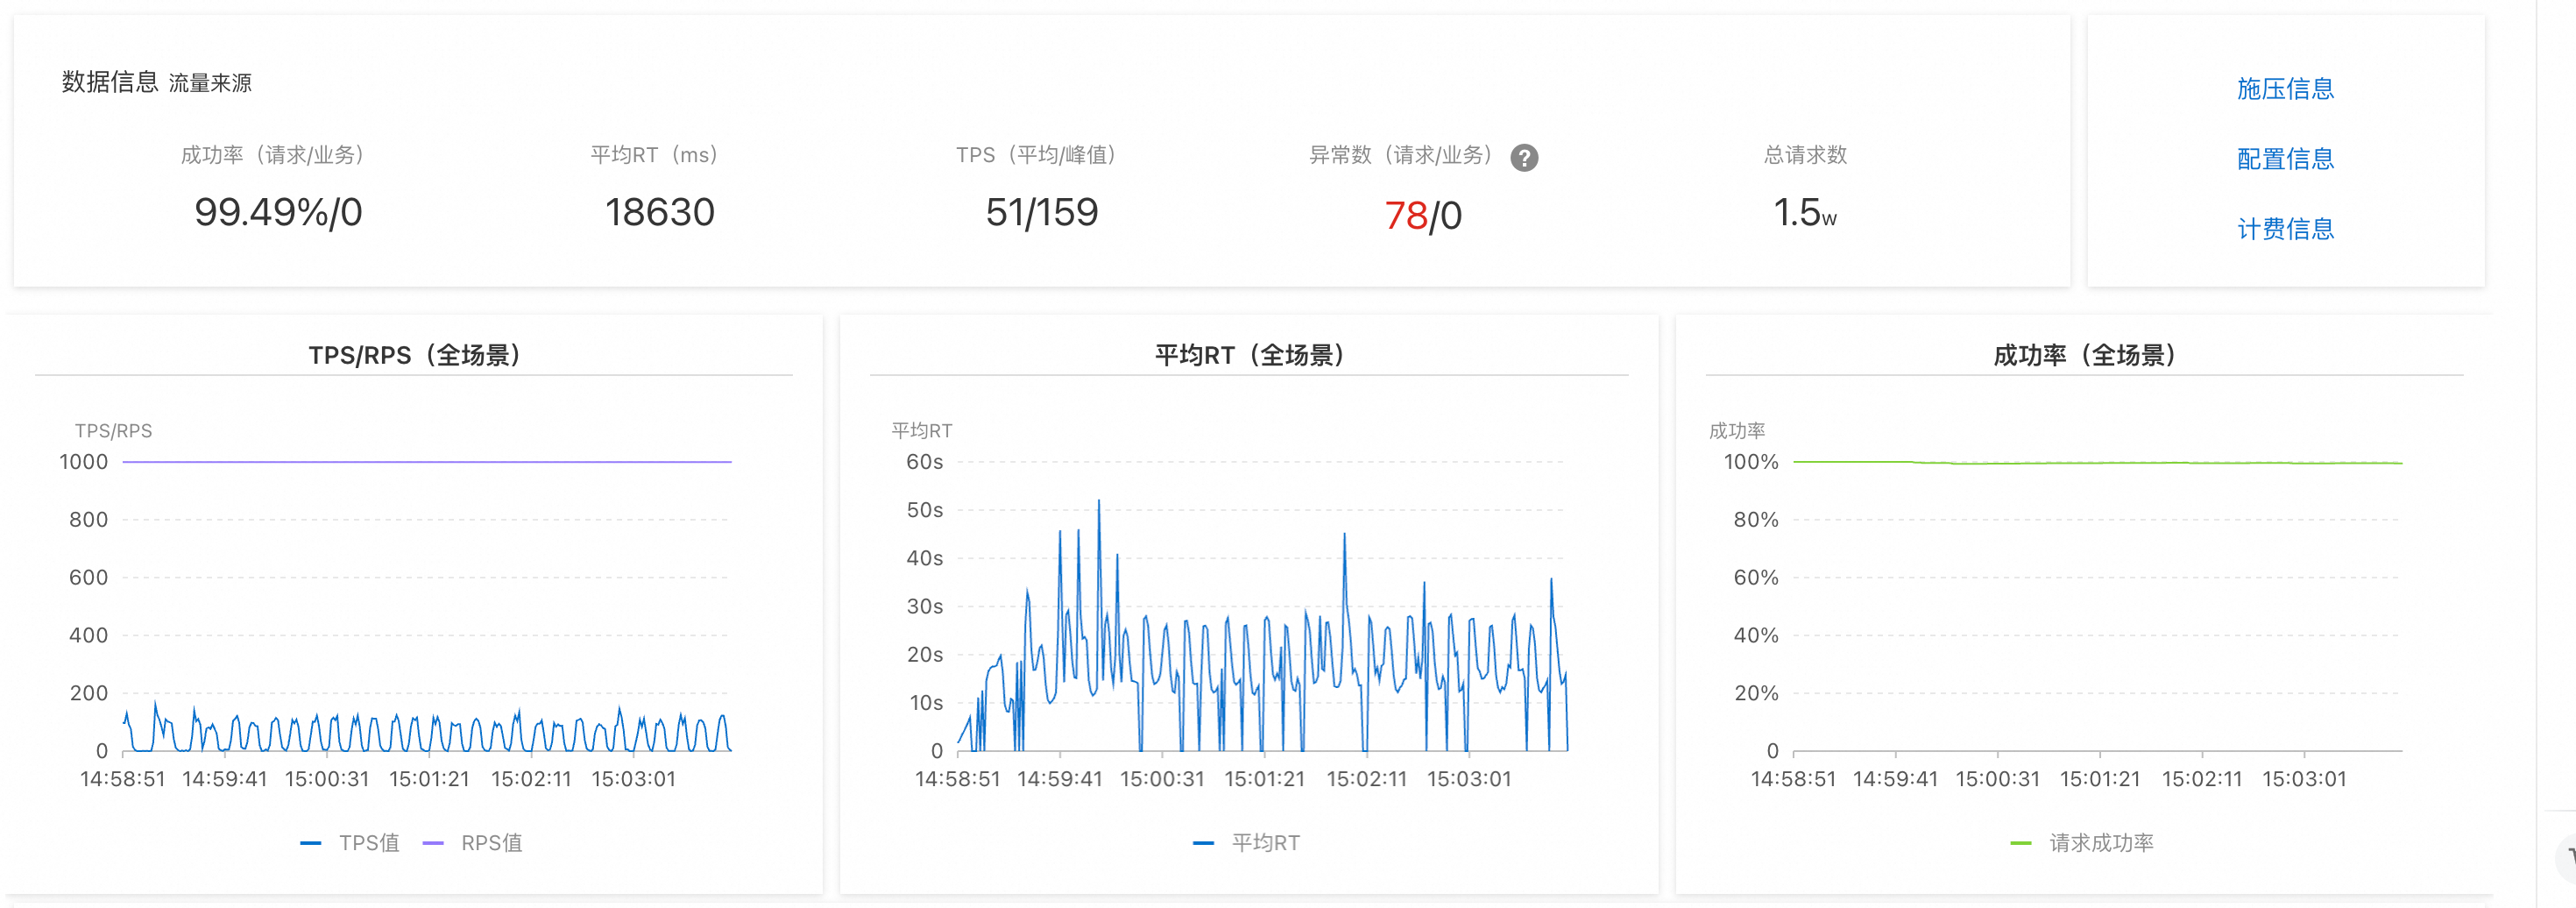
压测方式: 给集群远高于合理并发的压测请求量(测试场景为 1000 RPS),看集群的吞吐量、成功率变化。
-
结论: Dify 在此场景下成功率小于 10%,平均 RT 接近 60s,大部分请求出现超时(响应大于 60s);Spring AI Alibaba 成功率变化不大,维持 99% 以上,平均 RT 也在 18s 左右。
Dify 压测截图:
Spring AI Alibaba 压测截图:
相关资源
- Graph 框架文档