


LlamaIndex 框架应用实战教程
版本信息:本教程基于 LlamaIndex v0.14.x(2025-2026 年最新版本)编写
最后更新:2026 年 6 月
代码仓库:教程中所有代码示例均经过完整测试,可直接运行
官方文档:https://docs.llamaindex.ai
前言
教程目标与适合人群
本教程旨在帮助开发者从零开始系统掌握 LlamaIndex 框架,并能够独立构建生产级的 RAG(检索增强生成)应用和基于 LLM 的智能 Agent 系统。
适合人群:
- AI 应用开发者:希望将大语言模型(LLM)集成到实际业务系统中的工程师
- 数据工程师:需要构建智能文档处理管道、知识库系统的技术人员
- 产品经理/技术负责人:需要了解 LlamaIndex 技术栈以做技术选型决策的管理者
- AI 爱好者:对 RAG、Agent、知识图谱等前沿技术感兴趣的学习者
- 已有 LangChain 经验的开发者:希望扩展技术栈,掌握更专业的数据框架的工程师
学习前提:
- 具备 Python 基础编程能力(了解异步编程更佳)
- 对大语言模型(LLM)有基本认知(了解什么是 Prompt、Token、Embedding)
- 有基础的 API 调用经验
环境要求
Python:        3.12 或更高版本(推荐 3.12+)
操作系统:      Windows / macOS / Linux
内存:          建议 8GB+(运行本地模型时建议 16GB+)
IDE:           推荐使用 VS Code 或 PyCharm
包管理工具:    pip 或 poetry / uv(推荐)
核心依赖包:
# 核心框架
pip install llama-index>=0.14.0

# LLM 提供商(按需选择)
pip install llama-index-llms-openai
pip install llama-index-llms-anthropic
pip install llama-index-llms-deepseek

# Embedding 模型
pip install llama-index-embeddings-openai
pip install llama-index-embeddings-huggingface

# 向量数据库(按需选择)
pip install llama-index-vector-stores-chroma
pip install llama-index-vector-stores-qdrant
pip install llama-index-vector-stores-milvus

# 文档解析
pip install llama-index-readers-file
pip install llama-parse
如何阅读本教程
本教程按照**“概念认知 → 快速上手 → 深入核心 → 实战应用”**的递进结构组织:
- 先通读概念:每章开头会有技术原理和概念讲解,建议先理解再动手
- 跟着代码跑:所有代码示例都是完整可运行的,建议亲手在本地执行一遍
- 关注注释:代码中的注释包含了大量关键细节和易错点
- 实验参数:尝试修改代码中的参数(如 chunk_size、模型选择等),观察效果变化
- 结合项目练:建议准备一个自己的数据集,边学边做,效果最佳
提示:如果你已经熟悉 LlamaIndex 的基本概念,可以直接跳到第二章开始阅读。
本教程你将学到的核心技能:
- 如何从零搭建一个企业级 RAG 知识库问答系统
- 如何接入多种数据源(PDF、Word、数据库、API、网页等)并统一处理
- 如何选择合适的文本分割策略,优化检索质量
- 如何使用不同类型的索引(向量索引、知识图谱索引、摘要索引)满足不同业务需求
- 如何构建带元数据提取和质量过滤的完整数据摄取管道
- 如何利用外部向量数据库(Chroma、Qdrant、Milvus)实现生产级部署
- 如何管理索引的全生命周期(创建、增量更新、持久化、删除)
阅读本教程的建议时间规划:
| 章节 | 预计阅读时间 | 核心内容 |
|---|---|---|
| 前言 | 10 分钟 | 环境准备、学习方法 |
| 第一章 | 30 分钟 | 技术认知、快速入门、核心流程 |
| 第二章(2.1节) | 60 分钟 | 数据加载、文档模型、文本分割、摄取管道 |
| 第二章(2.2节) | 45 分钟 | 索引类型、向量存储、知识图谱、索引优化 |
第一章:LlamaIndex 技术认知与快速入门
1.1 技术定位与生态价值
1.1.1 LlamaIndex 在 LLM 应用开发中的核心定位
在大语言模型(LLM)应用开发的生态系统中,LlamaIndex 扮演着**“数据中间层”(Data Framework)的关键角色。它的核心使命是在外部数据与 LLM 之间搭建一座高效、可靠的桥梁**,让 LLM 能够安全、准确地利用私有数据和领域知识来回答问题。
LLM 的三大核心痛点与 LlamaIndex 的解决方案:
| 痛点 | 具体表现 | LlamaIndex 解决方案 |
|---|---|---|
| 上下文窗口限制 | 即使最先进的模型,上下文窗口也有限(如 128K/200K tokens),无法一次性输入海量文档 | 通过智能分块(Chunking)和检索(Retrieval),只将最相关的少量文本片段送入 LLM |
| 知识时效性 | LLM 的训练数据有截止日期,无法获取最新信息 | 通过 RAG 管道实时接入最新数据源,保证回答的时效性 |
| 数据私有性 | 企业的内部文档、数据库、知识库等无法直接用于 LLM 训练 | 提供 160+ 数据连接器,安全接入私有数据,数据无需离开本地 |
LlamaIndex 核心能力矩阵:
RAG(检索增强生成)的核心支撑框架:
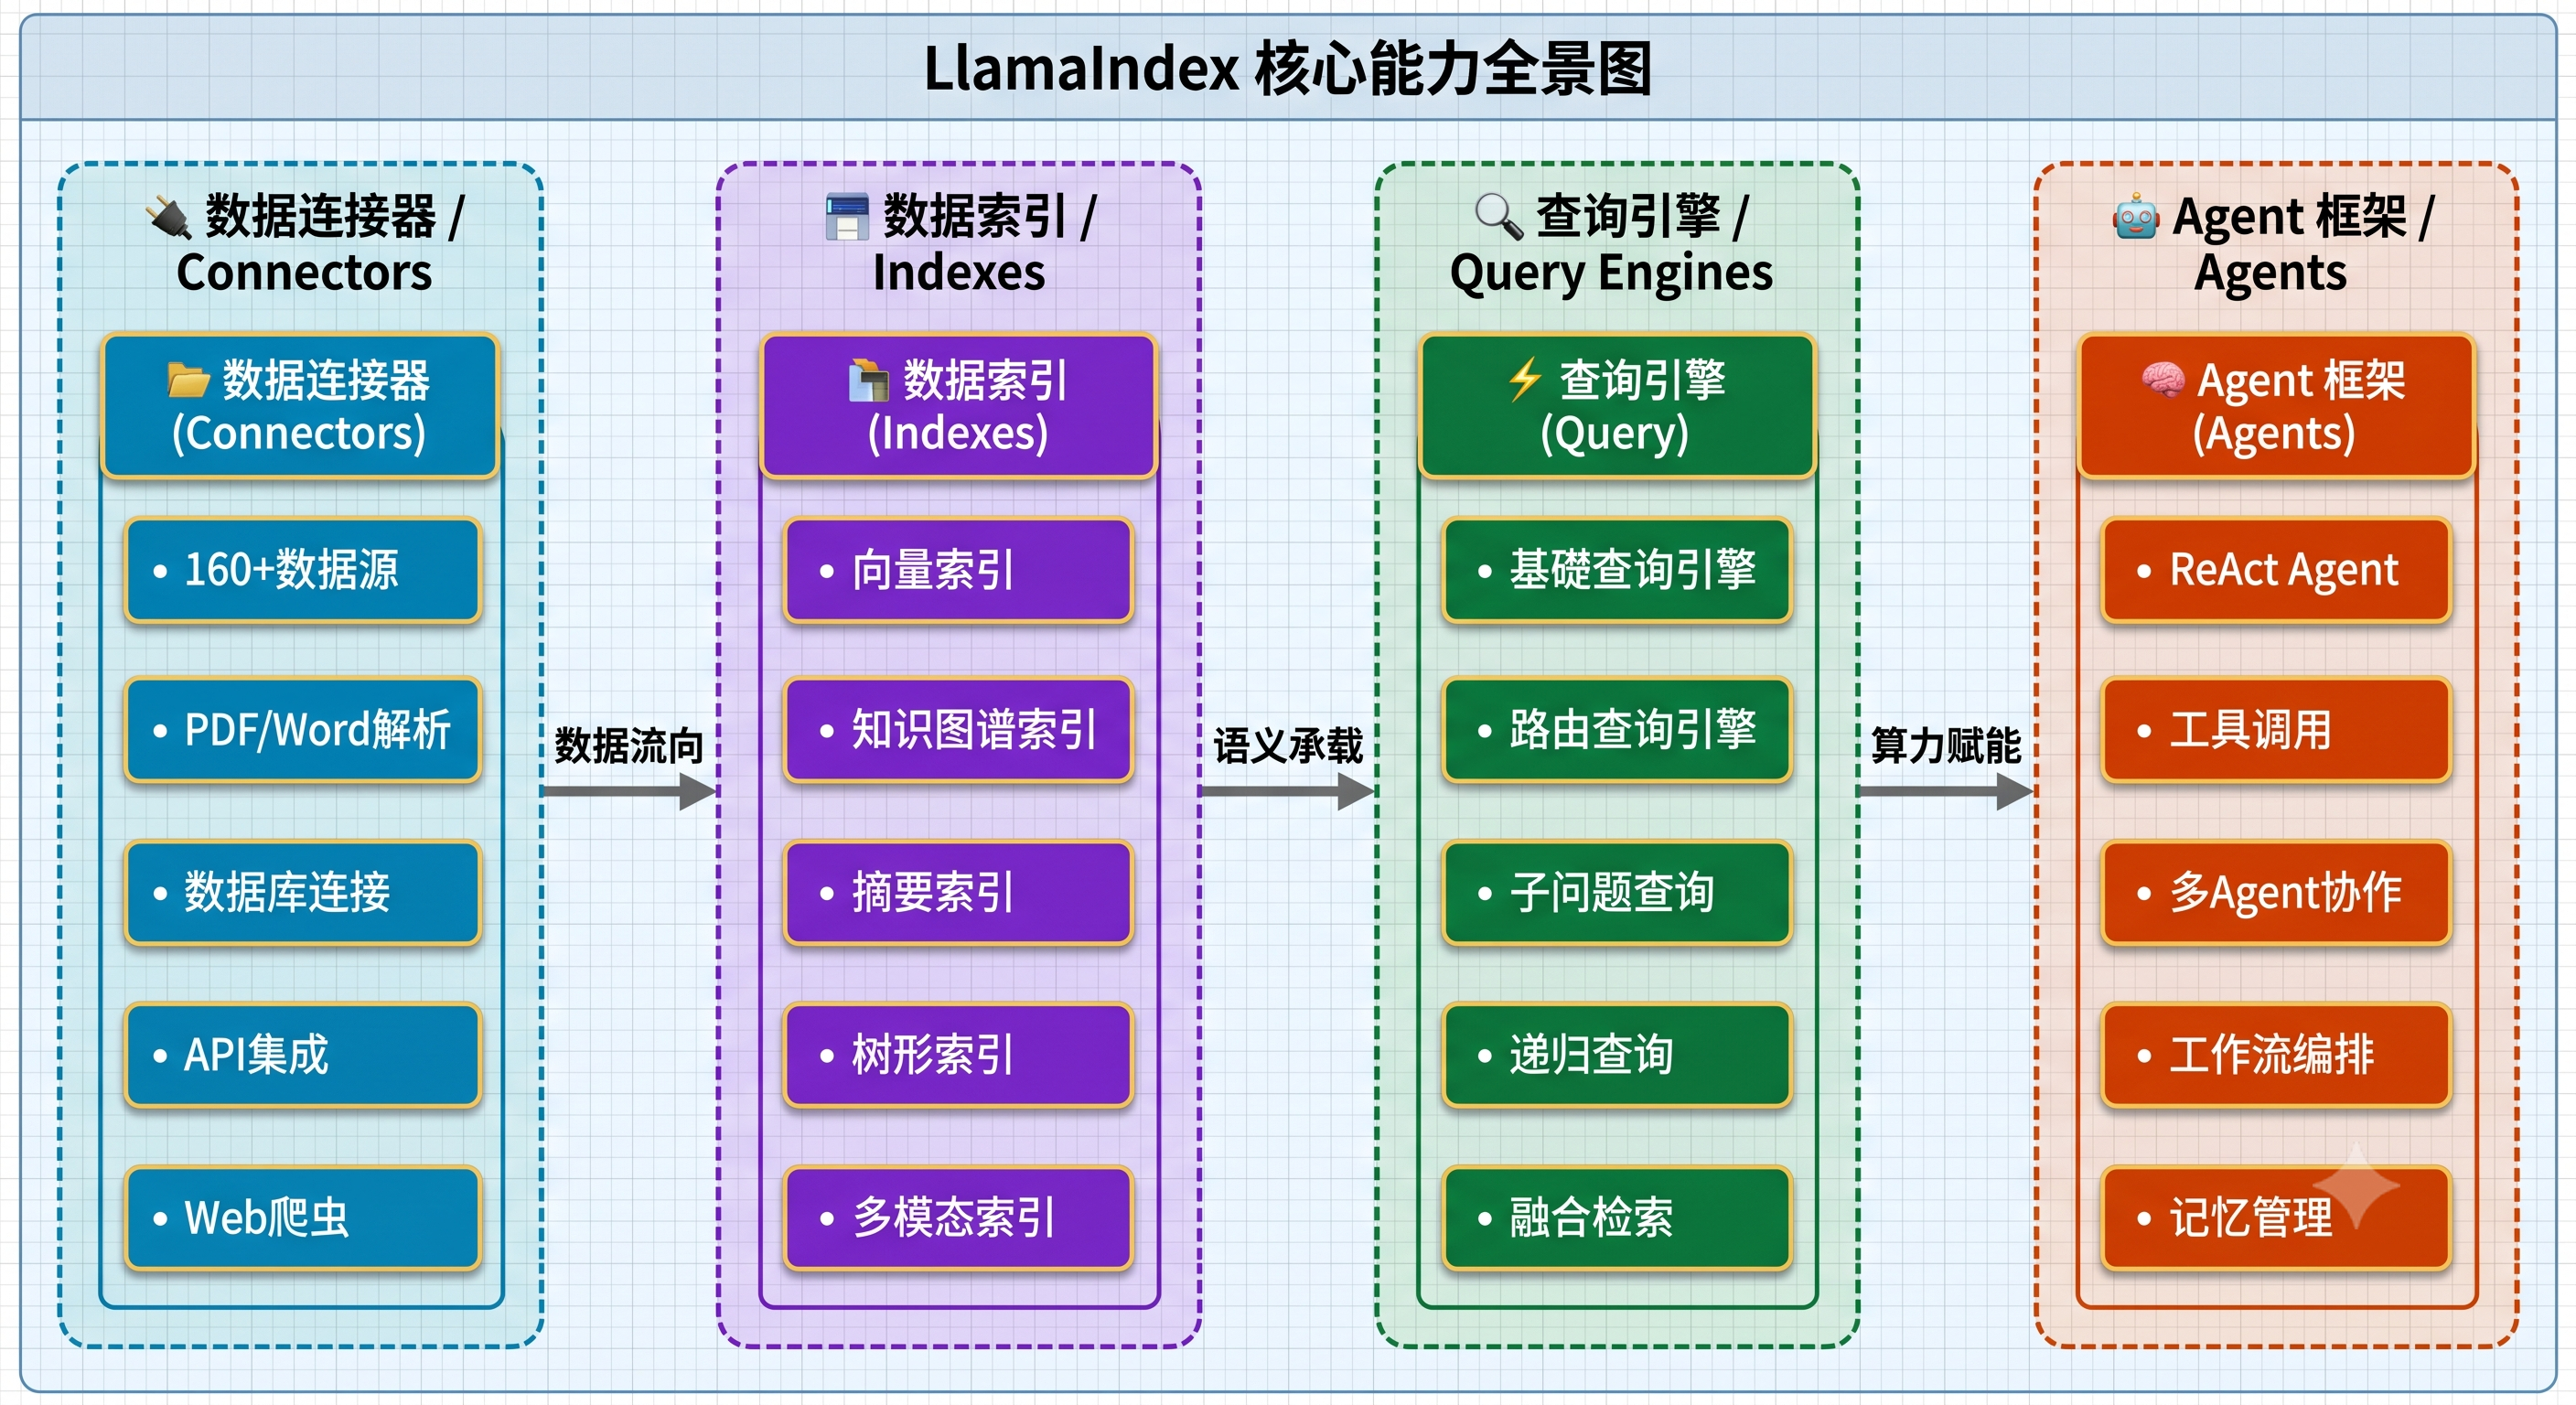
RAG 是当前 LLM 应用中最主流的技术范式,其核心思想是:先从知识库中检索相关文档,再将检索结果作为上下文提供给 LLM 生成回答。LlamaIndex 正是围绕这一范式从零开始设计的框架,它提供了 RAG 全链路所需的全部组件:
---
title: RAG (检索增强生成) 全生命周期流水线
---
graph LR
    %% ==================== 样式与色彩矩阵 (大框透明,小框带底色+纯白字) ====================
    classDef startEndStyle fill:#666666,stroke:#444444,stroke-width:2px,color:#ffffff;
    classDef ingestStyle fill:#0078d4,stroke:#005a9e,stroke-width:2px,color:#ffffff;
    classDef queryStyle fill:#107c41,stroke:#0b5930,stroke-width:2px,color:#ffffff;

    %% ==================== 1. 离线数据管道 (Data Ingestion Pipeline) ====================
    subgraph Pipeline_Ingest["📥 离线数据管道 / Data Ingestion Pipeline"]
        direction LR
        P_Start["数据源"]:::startEndStyle
        P1["数据连接器"]:::ingestStyle
        P2["文档预处理"]:::ingestStyle
        P3["文本分块"]:::ingestStyle
        P4["向量化"]:::ingestStyle
        P_End["向量存储"]:::ingestStyle

        %% 内部完全横向一字长蛇阵
        P_Start ===> P1 ===> P2 ===> P3 ===> P4 ===> P_End
    end

    %% ==================== 2. 在线检索生成 (Retrieval & Generation) ====================
    subgraph Pipeline_Query["⚡ 在线检索生成 / Retrieval & Generation"]
        direction LR
        Q_Start["用户提问"]:::startEndStyle
        Q1["问题向量化"]:::queryStyle
        Q2["语义检索"]:::queryStyle
        Q3["重排序"]:::queryStyle
        Q4["上下文组装"]:::queryStyle
        Q5["LLM生成"]:::queryStyle
        Q_End["最终回答"]:::startEndStyle

        %% 内部完全横向一字长蛇阵
        Q_Start ===> Q1 ===> Q2 ===> Q3 ===> Q4 ===> Q5 ===> Q_End
    end

    %% ==================== 上下两层管道的逻辑关联 ====================
    P_End -.-> |"提供索引支撑"| Q2

    %% ==================== 容器边框与色彩自适应 (大框强制 fill:none 无背景) ====================
    style Pipeline_Ingest fill:none,stroke:#0078d4,stroke-width:2px,stroke-dasharray: 5 5
    style Pipeline_Query fill:none,stroke:#107c41,stroke-width:2px,stroke-dasharray: 5 5

    %% 全局连线颜色自适应
    linkStyle default stroke:#888888,stroke-width:2px;
在整个 RAG 流程中,LlamaIndex 不仅提供了每个环节的标准实现,还提供了丰富的自定义和扩展能力,让开发者能够针对自己的业务场景进行深度优化。
为什么选择 LlamaIndex 来构建 RAG 系统?
很多初学者会问:我能不能直接用 OpenAI 的 API 来构建 RAG,为什么需要 LlamaIndex?答案是:可以,但成本极高、效率极低。
想象一下,如果你有 1000 份技术文档,每份文档平均 5000 字。如果不用框架,你需要:
- 自己编写 PDF/Word 解析代码(处理各种格式兼容问题)
- 自己实现文本分块逻辑(需要处理句子边界、重叠等问题)
- 自己调用 Embedding API 并管理向量(需要理解向量数据库的各种算法)
- 自己实现相似度检索(需要理解余弦相似度、ANN 算法等)
- 自己构造 Prompt 模板(需要考虑上下文长度、回答格式等)
- 自己处理增量更新、去重、持久化等工程问题
而使用 LlamaIndex,这一切被封装为几行简洁的代码,同时保证了工业级的质量和性能。LlamaIndex 的创始人 Jerry Liu 在创建这个框架时,就明确了"让 LLM 能高效利用外部数据"这一核心目标,所有的设计都围绕这个目标展开。
LlamaIndex 的版本演进(了解历史有助于理解设计决策):
| 版本 | 发布时间 | 重要变化 |
|---|---|---|
| v0.5-v0.8 | 2022年末 | 最初名为 GPT Index,专注于简单的索引和查询 |
| v0.9 | 2023年中 | 更名为 LlamaIndex,引入 Agent 概念 |
| v0.10 | 2024年初 | 重大架构重构,模块化设计,独立发布生态包 |
| v0.11-v0.12 | 2024年中 | 引入 Workflow 事件驱动编排、PropertyGraphIndex |
| v0.13-v0.14 | 2025年 | 持续优化 Agent 框架、增强多模态支持 |
从 v0.10 开始的模块化架构意味着,你不再需要安装一个庞大的单体包,而是可以根据需要选择安装对应的组件包。例如,如果你只需要使用 OpenAI 和 Chroma,只需要安装 llama-index-llms-openai、llama-index-embeddings-openai 和 llama-index-vector-stores-chroma 三个扩展包即可。
1.1.2 与 LangChain 的技术差异与场景互补
LlamaIndex 和 LangChain 是 LLM 应用开发领域最知名的两大框架,它们各有侧重,互为补充。
架构哲学差异:
- LlamaIndex:专注于数据管道和检索增强。它的核心优势在于数据加载、索引构建、检索优化等"数据侧"的能力。可以理解为:LlamaIndex 是一个**"让你的数据能被 LLM 高效利用"的专业框架**。
- LangChain:专注于链式编排和通用 LLM 交互。它的核心优势在于 Prompt 模板、Chain 编排、工具调用等"逻辑侧"的能力。可以理解为:LangChain 是一个**"让 LLM 能执行复杂任务流程"的通用框架**。
核心能力对比:
| 能力维度 | LlamaIndex | LangChain |
|---|---|---|
| 核心定位 | 数据框架(Data Framework) | 编排框架(Orchestration Framework) |
| 数据连接 | 160+ 原生连接器,LlamaParse 智能解析 | 通过 Document Loaders 提供,但数量和质量不如 LlamaIndex |
| 索引构建 | 向量索引、知识图谱索引、摘要索引等多种专业索引 | 主要依赖向量存储,索引类型较少 |
| 检索能力 | 专业级检索优化(混合检索、重排序、子问题分解) | 基础检索能力,复杂检索需要额外配置 |
| Agent 框架 | 内置 ReAct Agent、Workflow 编排 | AgentExecutor、LCEL 链式编排 |
| 链式编排 | Workflow 事件驱动模型 | LCEL(LangChain Expression Language) |
| 可观测性 | 内置追踪回调 | LangSmith 平台(付费) |
| 学习曲线 | 对 RAG 场景更友好,上手更快 | 概念较多,学习曲线较陡 |
| 生态成熟度 | 在 RAG/数据索引领域更成熟 | 在通用 LLM 应用编排领域更成熟 |
场景选型建议:
选择 LlamaIndex 的场景:
├── 企业知识库问答系统(RAG 为核心)
├── 文档智能解析与检索
├── 知识图谱构建与多跳推理
├── 大规模文档处理管道
└── 需要高质量语义检索的应用

选择 LangChain 的场景:
├── 复杂的多步骤任务自动化
├── 需要大量工具调用的 Agent 系统
├── 多 LLM 协作的链式推理
├── 复杂的 Prompt 管理和模板系统
└── 需要高度自定义的 LLM 交互流程

联合使用的场景:
├── 使用 LlamaIndex 构建 RAG 数据管道
│   └── 将 LlamaIndex 的 QueryEngine 作为 LangChain 的 Retriever
├── 使用 LangChain 编排复杂 Agent 逻辑
│   └── Agent 的"知识检索工具"由 LlamaIndex 提供
└── LlamaIndex 处理数据索引,LangChain 处理对话管理
互操作示例(概念代码):
# LlamaIndex 与 LangChain 的互操作
# LlamaIndex 的 QueryEngine 可以作为 LangChain 的检索工具使用

from llama_index.core import VectorStoreIndex, SimpleDirectoryReader
from langchain.agents import AgentExecutor, create_openai_tools_agent

# 用 LlamaIndex 构建 RAG 引擎
documents = SimpleDirectoryReader("./data").load_data()
index = VectorStoreIndex.from_documents(documents)
query_engine = index.as_query_engine()

# 将 LlamaIndex 的查询能力封装为 LangChain 工具
from llama_index.core.tools import QueryEngineTool

rag_tool = QueryEngineTool.from_defaults(
    query_engine=query_engine,
    name="knowledge_base",
    description="用于查询企业内部知识库的工具",
)

# 在 LangChain Agent 中使用该工具
# (具体集成方式详见后续章节)
1.2 核心概念与快速上手
1.2.1 代理(Agent)与工作流(Workflow)的本质
在 LlamaIndex 的架构中,**Agent(代理)和Workflow(工作流)**是两个核心的高层抽象,代表了两种不同的任务执行模式。
Agent:LLM 驱动的知识助手
Agent 是一个由 LLM 驱动的智能体,它能够自主决定使用哪些工具、以什么顺序来完成任务。Agent 的核心特点是"LLM 做决策"——你只需要告诉它目标,它会自己规划并执行。
LlamaIndex 中最核心的 Agent 模式是 ReAct Agent(Reasoning + Acting),其工作原理是一个"推理→行动→观察"的循环:
用户提问:"北京今天的天气如何?如果适合户外活动,推荐几个公园"

Agent 内部循环:
┌─────────────────────────────────────────────────────────┐
│ 思考 (Thought): 我需要先查询北京的天气                    │
│ 行动 (Action):  调用天气查询工具                          │
│ 观察 (Observe): 北京今天晴,25°C,空气质量优              │
│                                                         │
│ 思考 (Thought): 天气很好,适合户外活动,我需要推荐公园     │
│ 行动 (Action):  调用公园推荐工具                          │
│ 观察 (Observe): 推荐:颐和园、奥森公园、朝阳公园           │
│                                                         │
│ 思考 (Thought): 我已经有了所有需要的信息,可以回答了       │
│ 回答 (Answer):  北京今天天气很好,推荐以下公园...          │
└─────────────────────────────────────────────────────────┘
Agent 的关键组件:
- 工具(Tool):Agent 可以调用的外部能力。每个工具有名称、描述和执行函数。例如:搜索引擎工具、数据库查询工具、计算器工具等
- 记忆(Memory):Agent 可以记住之前的对话和交互历史。包括短期记忆(当前对话上下文)和长期记忆(跨对话的持久化记忆)
- LLM(大脑):Agent 的核心决策引擎,负责推理和规划
Workflow:事件驱动的任务编排引擎
Workflow 是 LlamaIndex 提供的事件驱动(Event-Driven)任务编排框架。与 Agent 的"LLM 自主决策"不同,Workflow 是开发者预定义好执行流程的,更适合需要精确控制执行步骤的复杂任务。
Workflow 的核心概念:
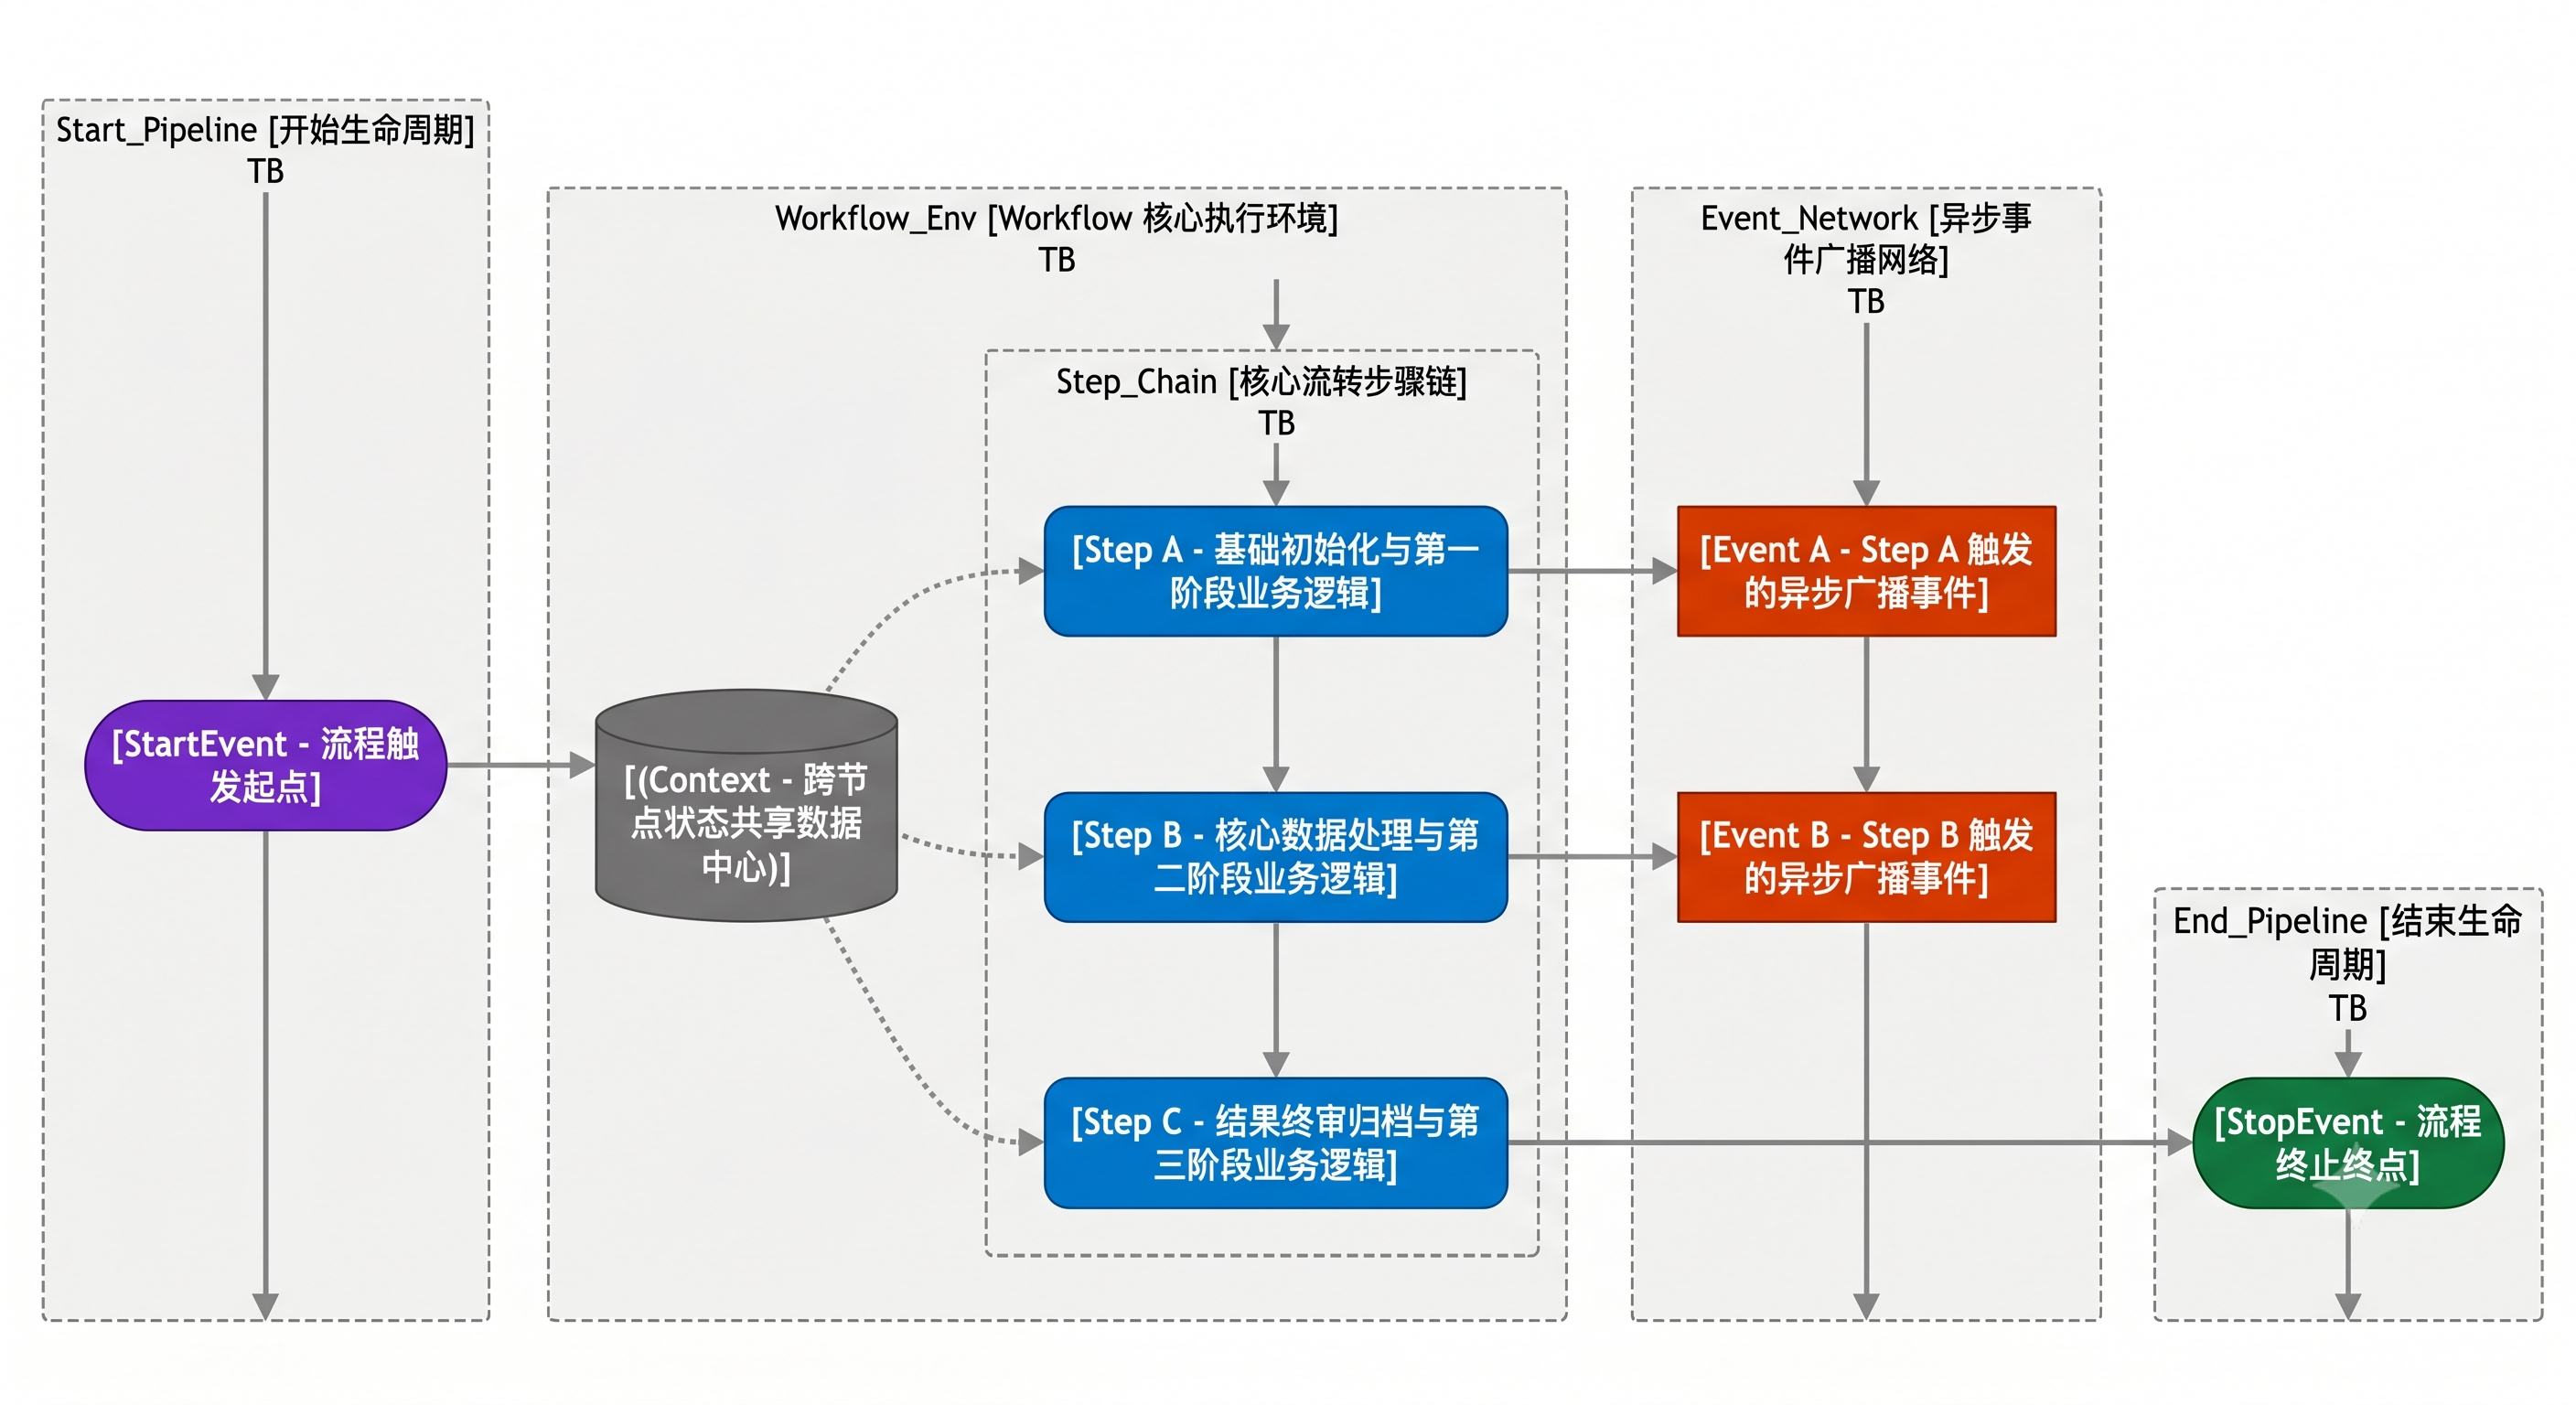
- 事件(Event):Workflow 中的信号,用于触发下一步操作。
StartEvent启动流程,StopEvent结束流程,自定义事件用于步骤间通信 - 步骤(Step):Workflow 中的处理单元,每个 Step 监听特定事件并执行对应逻辑
- 上下文(Context):Workflow 运行时的共享状态,所有 Step 都可以读写 Context 中的数据
Agent vs Workflow 选择策略:
| 维度 | Agent | Workflow |
|---|---|---|
| 控制权 | LLM 自主决策执行顺序 | 开发者预定义执行流程 |
| 灵活性 | 高,可动态调整策略 | 中,流程相对固定 |
| 可预测性 | 低,LLM 行为有一定随机性 | 高,流程确定性强 |
| 适用场景 | 开放式问答、探索性任务 | 固定流程、数据处理管道 |
| 调试难度 | 较高 | 较低 |
| 典型应用 | 智能客服、知识助手 | ETL 管道、多步骤审批流程 |
最佳实践:在实际项目中,Agent 和 Workflow 经常组合使用。用 Workflow 编排确定性的数据处理流程,在需要 LLM 推理的节点中嵌入 Agent 来处理不确定性任务。
深入理解 Agent 的工具(Tool)系统:
在 LlamaIndex 中,工具(Tool)是 Agent 能力的延伸。每个工具本质上是一个 Python 函数,包装了某种特定能力(如搜索网页、查询数据库、调用 API 等)。Agent 通过工具的"名称"和"描述"来理解该工具的用途,并在需要时自主决定是否调用它。
一个良好的工具描述对 Agent 的决策至关重要。如果工具描述不清晰,Agent 可能会在错误的时机调用工具,或者完全忽略该工具。这就好比你在一个陌生城市,如果地图标注不清楚,你就很难找到正确的路。
工具的设计原则:
- 单一职责:每个工具只做一件事,不要试图在一个工具里处理多种任务
- 描述清晰:工具的名称和描述应该准确说明其功能和使用场景
- 输入简单:工具的输入参数应该尽可能简单明确,避免复杂的嵌套结构
- 输出规范:工具应该返回结构化的结果,便于 Agent 理解和使用
深入理解 Workflow 的事件驱动模型:
Workflow 的事件驱动模型与传统的过程式编程有本质区别。在传统编程中,你通过函数调用来控制执行流程(A 调用 B,B 调用 C);而在事件驱动模型中,每个步骤通过发送事件来触发下一个步骤,步骤之间是松耦合的。
这种设计的好处在于:
- 可扩展性:你可以随时添加新的步骤来监听某个事件,而不需要修改已有步骤的代码
- 可观测性:事件的流转路径清晰可追踪,便于调试和监控
- 错误处理:某个步骤失败时,可以发送"错误事件"触发专门的错误处理步骤
- 并行执行:多个步骤可以监听同一个事件,实现并行处理
1.2.2 环境搭建与第一个 LlamaIndex 应用
第一步:安装核心依赖
# 创建虚拟环境(推荐)
python -m venv llamaindex-env
# Windows:
llamaindex-env\Scripts\activate
# macOS/Linux:
# source llamaindex-env/bin/activate

# 安装 LlamaIndex 核心框架
pip install llama-index

# 安装 OpenAI LLM 和 Embedding 适配器
pip install llama-index-llms-openai
pip install llama-index-embeddings-openai

# 安装文件读取器
pip install llama-index-readers-file
重要说明:从 LlamaIndex v0.10+ 开始,框架采用了模块化架构。核心包
llama-index包含基础功能,而 LLM 适配器、Embedding 模型、向量数据库等都以独立包的形式发布。这样做的好处是你只需要安装自己需要的组件,避免引入不必要的依赖。
第二步:配置 API Key
import os

# 方式一:直接设置(仅用于开发环境,不要提交到代码仓库)
os.environ["OPENAI_API_KEY"] = "sk-your-api-key-here"

# 方式二:从 .env 文件加载(推荐用于生产环境)
# 首先安装 python-dotenv: pip install python-dotenv
from dotenv import load_dotenv
load_dotenv()  # 自动加载 .env 文件中的环境变量

# .env 文件示例:
# OPENAI_API_KEY=sk-your-api-key-here
第三步:准备测试数据
在项目根目录下创建 data 文件夹,并创建一个测试文件:
mkdir data
在 data 文件夹中创建 sample.txt:
LlamaIndex 是一个用于构建 LLM 应用的数据框架。
它提供了数据连接器,可以从各种数据源(PDF、Word、数据库、API等)加载数据。
LlamaIndex 的核心功能是 RAG(检索增强生成),它将文档分割成小块,转化为向量,存储在向量数据库中。
当用户提问时,系统会检索最相关的文档片段,将其作为上下文提供给 LLM,从而生成准确的回答。
LlamaIndex 支持多种索引类型,包括向量索引、知识图谱索引和摘要索引。
向量索引适合语义搜索场景,知识图谱索引适合多跳推理,摘要索引适合全局概览。
LlamaIndex 还提供了 Agent 框架,允许 LLM 自主调用工具完成复杂任务。
第四步:5 行代码实现 RAG 系统
# quickstart.py - 你的第一个 LlamaIndex 应用
import os
os.environ["OPENAI_API_KEY"] = "sk-your-api-key-here"

from llama_index.core import VectorStoreIndex, SimpleDirectoryReader

# 第 1 步:加载 data 目录下的所有文档
documents = SimpleDirectoryReader("data").load_data()

# 第 2 步:构建向量索引(自动完成:文本分块 → Embedding 向量化 → 存入内存向量库)
index = VectorStoreIndex.from_documents(documents)

# 第 3 步:创建查询引擎
query_engine = index.as_query_engine()

# 第 4 步:向你的知识库提问!
response = query_engine.query("LlamaIndex 支持哪些索引类型?")
print(response)
运行这段代码:
python quickstart.py
预期输出(内容可能略有不同):
LlamaIndex 支持多种索引类型,包括向量索引、知识图谱索引和摘要索引。
向量索引适合语义搜索场景,知识图谱索引适合多跳推理,摘要索引适合全局概览。
逐行深入解析:
让我们仔细分析上面每一行代码背后到底发生了什么:
# ===== 第 1 步:文档加载 =====
documents = SimpleDirectoryReader("data").load_data()

# 这一行做了什么:
# 1. SimpleDirectoryReader 扫描 "data" 目录下的所有文件
# 2. 根据文件扩展名自动选择对应的解析器(.txt, .pdf, .docx, .csv 等)
# 3. 将每个文件解析为一个 Document 对象
# 4. Document 对象包含:文本内容(text)、元数据(metadata,如文件名、创建时间)
#
# documents 是一个列表,每个元素是一个 Document 对象
# 例如:documents[0].text = "LlamaIndex 是一个用于构建 LLM 应用的数据框架..."
#       documents[0].metadata = {"file_name": "sample.txt", "file_size": 512, ...}


# ===== 第 2 步:构建向量索引 =====
index = VectorStoreIndex.from_documents(documents)

# 这一行背后发生了很多事情:
# 1. 文本分块(Chunking):将每个 Document 按句子边界分割成多个 Node
#    - 默认使用 SentenceSplitter
#    - 默认 chunk_size=1024 tokens, chunk_overlap=20 tokens
#    - 例如原始文档被拆分成 3-4 个 Node
#
# 2. 向量化(Embedding):将每个 Node 的文本转化为高维向量
#    - 默认使用 OpenAI 的 text-embedding-ada-002 模型
#    - 每个文本被转化为 1536 维的浮点数向量
#    - 语义相近的文本,其向量在空间中的距离也更近
#
# 3. 存储(Storage):将向量和原始文本存入向量数据库
#    - 默认使用内存向量库(SimpleVectorStore)
#    - 生产环境中通常会换成 Chroma、Qdrant、Milvus 等持久化向量库


# ===== 第 3 步:创建查询引擎 =====
query_engine = index.as_query_engine()

# 这一行做了什么:
# 1. 创建一个默认的查询引擎,它内部包含完整的 RAG 管道
# 2. 查询引擎默认配置:
#    - 检索器(Retriever):从索引中检索 top-k 最相关的 Node(默认 k=2)
#    - 响应合成器(Response Synthesizer):将检索到的 Node 作为上下文,
#      结合用户问题,构造 Prompt 发送给 LLM 生成最终回答
#
# 内部流程:用户问题 → 问题向量化 → 在向量库中相似度检索 →
#           取回最相关的文本块 → 组装 Prompt → 发送给 GPT → 返回回答


# ===== 第 4 步:执行查询 =====
response = query_engine.query("LlamaIndex 支持哪些索引类型?")

# 这一行做了什么:
# 1. 将问题 "LlamaIndex 支持哪些索引类型?" 转化为向量
# 2. 在向量库中计算余弦相似度,找到最相关的 2 个文本块
# 3. 构造 Prompt:
#    "根据以下上下文信息回答问题:
#     上下文:LlamaIndex 支持多种索引类型,包括向量索引、知识图谱索引和摘要索引...
#     问题:LlamaIndex 支持哪些索引类型?"
# 4. 将 Prompt 发送给 GPT(默认使用 gpt-4o-mini)
# 5. 返回 LLM 生成的回答


print(response)
# response 是一个 Response 对象,包含:
# - response.response: 回答文本
# - response.source_nodes: 引用的源文档节点列表
# - response.metadata: 其他元数据
核心流程图解:
进阶示例:查看检索过程细节
# advanced_quickstart.py - 查看 RAG 过程的详细信息
import os
os.environ["OPENAI_API_KEY"] = "sk-your-api-key-here"

from llama_index.core import VectorStoreIndex, SimpleDirectoryReader

# 加载文档并构建索引
documents = SimpleDirectoryReader("data").load_data()
index = VectorStoreIndex.from_documents(documents)

# 查看索引中的节点信息
print(f"=== 索引中共有 {len(index.docstore.docs)} 个文档节点 ===\n")
for i, (node_id, node) in enumerate(index.docstore.docs.items()):
    print(f"节点 {i + 1}:")
    print(f"  ID: {node_id}")
    print(f"  内容前100字: {node.get_content()[:100]}...")
    print(f"  元数据: {node.metadata}")
    print()

# 使用 retriever 查看检索结果(不经过 LLM)
retriever = index.as_retriever(similarity_top_k=3)
retrieved_nodes = retriever.retrieve("LlamaIndex 的核心功能是什么?")

print("=== 检索结果(未经 LLM 处理) ===\n")
for i, node_with_score in enumerate(retrieved_nodes):
    print(f"检索结果 {i + 1}(相似度得分: {node_with_score.score:.4f}):")
    print(f"  内容: {node_with_score.node.get_content()[:150]}...")
    print()

# 使用查询引擎获取完整回答
query_engine = index.as_query_engine()
response = query_engine.query("LlamaIndex 的核心功能是什么?")

print("=== LLM 生成的回答 ===")
print(response.response)

print("\n=== 引用的源节点 ===")
for i, source_node in enumerate(response.source_nodes):
    print(f"来源 {i + 1}(得分: {source_node.score:.4f}):")
    print(f"  {source_node.node.get_content()[:100]}...")
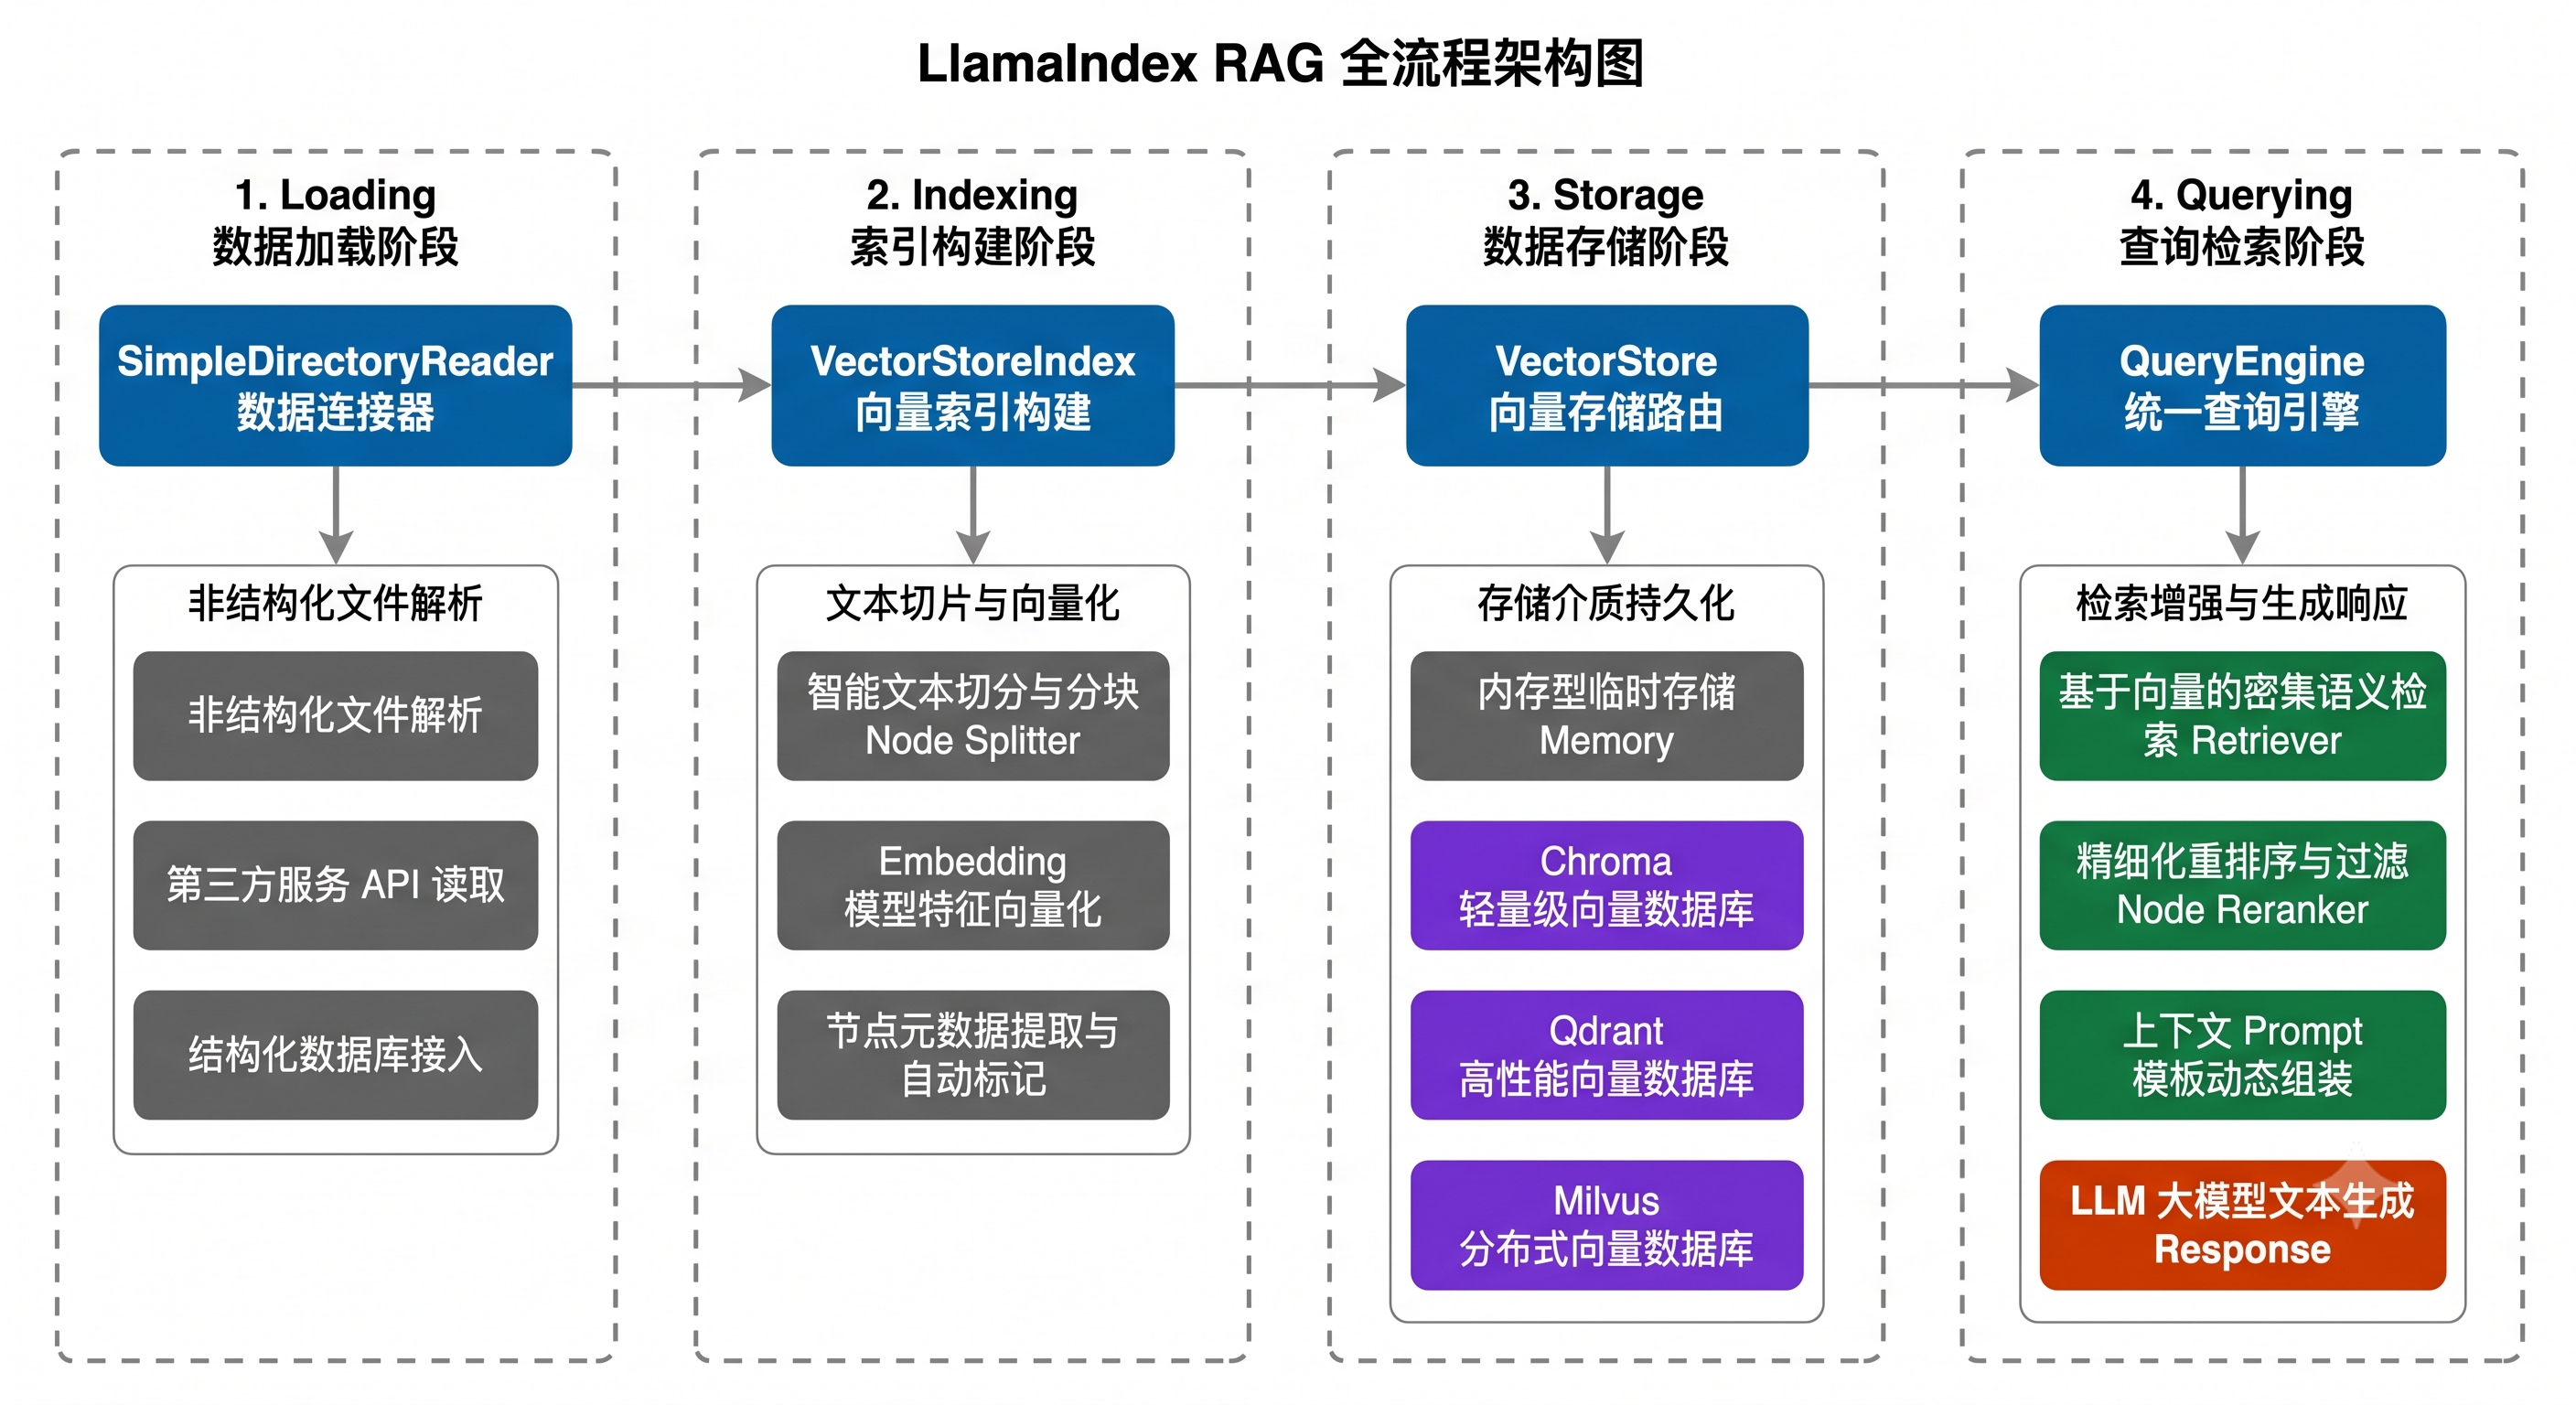
第二章:LlamaIndex 核心技术体系
2.1 数据加载与预处理(Loading & Ingestion)
数据加载与预处理是构建高质量 RAG 系统的基石。在 LlamaIndex 的架构中,这一阶段负责将各种格式的原始数据转化为框架内部统一的数据结构,为后续的索引构建和检索查询打下基础。
为什么数据预处理如此重要?
在 RAG 系统中,有一句广为流传的话:“垃圾进,垃圾出”(Garbage In, Garbage Out)。即使你使用了最先进的 LLM 和最精确的检索算法,如果输入的数据质量不高(如包含大量噪音、格式混乱、结构不清晰),最终的问答效果也不可能好。
数据预处理阶段的核心任务包括:
- 格式统一化:将 PDF、Word、HTML、数据库等不同来源的数据统一转化为纯文本格式
- 文本清洗:去除无效字符、重复内容、页眉页脚等噪音数据
- 智能分割:将长文档按语义边界切分为合适大小的文本块,确保每个块既包含足够的上下文信息,又足够精确以供检索
- 元数据提取:自动或手动为每个文本块添加描述性标签,提升检索的准确度
- 质量过滤:识别并过滤掉低质量的、重复的或无意义的内容
这些步骤看似简单,但它们对最终系统效果的影响可能占到整体效果的 70% 以上。很多开发者把精力全部放在选择更好的 LLM 或更复杂的检索算法上,却忽视了数据预处理这一最基础也最重要的环节。
数据预处理中常见的错误与避坑指南:
- 错误一:不分割直接索引。有些开发者将整个 PDF 文件直接作为一条 Document 索引,导致检索时只能返回整个文件级别的结果,无法精确定位到具体段落。正确的做法是使用 NodeParser 将文档拆分为合适大小的文本块。
- 错误二:分割过于激进。chunk_size 设置过小(如 32 tokens),导致每个文本块只有一两句话,丧失了足够的上下文信息,LLM 无法仅凭这些碎片化的内容生成有意义的回答。
- 错误三:忽略元数据。不为文档添加任何元数据(如来源、分类、时间),导致检索结果缺乏可解释性,也无法通过元数据过滤来缩小检索范围、提升精确度。
- 错误四:不做质量过滤。将原始数据中的目录页、空白页、页眉页脚、版权声明等无意义内容也一并索引,这些噪音数据会干扰检索算法,降低检索质量。
- 错误五:PDF 解析质量差。使用简单的文本提取库解析复杂排版的 PDF,导致表格结构丢失、多栏文本顺序混乱、图片信息完全缺失。对于复杂 PDF,应该使用 LlamaParse 等专业解析工具。
2.1.1 文档与节点(Documents & Nodes)
Document 和 Node 是 LlamaIndex 中最基础的两个数据结构,理解它们的关系是掌握整个框架的前提。
Document 对象详解:
Document 代表一个完整的原始文档,它是数据进入 LlamaIndex 后的第一个载体。
from llama_index.core import Document

# 手动创建一个 Document 对象
doc = Document(
    text="LlamaIndex 是一个强大的 RAG 框架,它帮助开发者将私有数据与 LLM 结合使用。",
    metadata={
        "source": "官方文档",
        "author": "技术团队",
        "category": "技术介绍",
        "version": "2025",
    },
    # doc_id 如果不指定,会自动生成一个 UUID
    doc_id="llamaindex-intro-001",
)

# Document 的核心属性
print(f"文档ID: {doc.doc_id}")
print(f"文本内容: {doc.text}")
print(f"元数据: {doc.metadata}")

# 修改元数据(这在后续处理中很有用)
doc.metadata["updated_at"] = "2026-06-01"
print(f"更新后元数据: {doc.metadata}")

# 获取文档内容(等同于 .text)
print(f"获取内容: {doc.get_content()}")
Document 的核心属性:
| 属性 | 类型 | 说明 |
|---|---|---|
text |
str |
文档的文本内容 |
metadata |
dict |
文档的元数据(如来源、作者、时间等) |
doc_id |
str |
文档的唯一标识符(自动生成 UUID 或手动指定) |
relationships |
dict |
文档与其他文档/节点的关系映射 |
excluded_embed_metadata_keys |
list |
生成 Embedding 时排除的元数据键 |
excluded_llm_metadata_keys |
list |
发送给 LLM 时排除的元数据键 |
关于元数据的重要细节:
元数据(metadata)在 RAG 系统中扮演着远比想象中重要的角色。它不仅仅是"附加信息",而是可以被主动利用来提升检索质量的有力工具。
常见的元数据类型及其用途:
- 文件级元数据:文件名、路径、大小、创建时间、修改时间 —— 用于来源追溯和版本管理
- 内容级元数据:章节标题、作者、分类标签 —— 用于过滤检索和结果展示
- 质量级元数据:内容评分、语言类型、是否包含图片/表格 —— 用于质量过滤和排序
- 自动提取元数据:关键词、摘要、可回答问题 —— 由 LLM 自动提取,用于增强检索
特别需要注意的是 excluded_embed_metadata_keys 和 excluded_llm_metadata_keys 这两个属性。它们控制哪些元数据不会被包含在向量化过程和发送给 LLM 的 Prompt 中。例如,你可能希望把"文件路径"排除在 Embedding 之外(因为文件路径对语义检索没有意义),但保留在 LLM 上下文中(让 LLM 知道信息来源)。
from llama_index.core import Document

# 合理配置元数据的排除策略
doc = Document(
    text="向量数据库是 RAG 系统的核心存储组件。",
    metadata={
        "file_path": "/data/technical/vector_db.md",  # 对语义无意义
        "file_size": 2048,                              # 对语义无意义
        "author": "张三",                                # 可能对检索有用
        "category": "向量数据库",                         # 对检索很有用
        "keywords": "向量,数据库,RAG,存储",              # 对检索非常有用
    },
)

# 排除对 Embedding 无意义的元数据
doc.excluded_embed_metadata_keys = ["file_path", "file_size"]
# 这样在生成文本的向量表示时,不会把文件路径和大小信息编入向量

# 排除对 LLM 生成回答无意义的元数据
doc.excluded_llm_metadata_keys = ["file_size"]
# 这样在将文本发送给 LLM 时,仍然会包含文件路径(方便引用来源)
# 但不会包含文件大小(对回答问题没有帮助)
Node 对象详解:
Node 是 Document 经过分块处理后的产物,是索引和检索的最小单元。LlamaIndex 提供了多种 Node 类型:
from llama_index.core.schema import TextNode, ImageNode, NodeRelationship, RelatedNodeInfo

# ---- TextNode:最常用的节点类型 ----
node1 = TextNode(
    text="LlamaIndex 提供了向量索引,用于语义搜索场景。",
    metadata={"source": "索引文档", "section": "向量索引"},
    id_="node-vector-index-001",  # 节点ID
)

node2 = TextNode(
    text="知识图谱索引适用于需要多跳推理的复杂查询场景。",
    metadata={"source": "索引文档", "section": "知识图谱"},
    id_="node-kg-index-002",
)

# ---- 建立节点之间的关系 ----
# NodeRelationship 定义了节点之间的关系类型:
# - SOURCE: 该节点来自的源文档
# - NEXT: 下一个节点(顺序关系)
# - PREVIOUS: 上一个节点(顺序关系)
# - PARENT: 父节点
# - CHILD: 子节点

# 设置 node1 和 node2 的前后顺序关系
node1.relationships[NodeRelationship.NEXT] = RelatedNodeInfo(
    node_id=node2.node_id
)
node2.relationships[NodeRelationship.PREVIOUS] = RelatedNodeInfo(
    node_id=node1.node_id
)

print(f"node1 的下一个节点: {node1.relationships[NodeRelationship.NEXT]}")
print(f"node2 的上一个节点: {node2.relationships[NodeRelationship.PREVIOUS]}")

# ---- ImageNode:图片类型的节点 ----
image_node = ImageNode(
    image_path="./diagrams/architecture.png",  # 图片路径
    text="LlamaIndex 架构图",  # 图片的文字描述(用于检索)
    metadata={"type": "架构图", "format": "png"},
    id_="node-image-001",
)

print(f"图片节点路径: {image_node.image_path}")
print(f"图片节点描述: {image_node.text}")
Document 与 Node 的关系总结:
一个 Document(完整文档)
    │
    ├──→ Node 1(第 1-3 段)     ← 索引和检索的最小单元
    ├──→ Node 2(第 4-6 段)
    ├──→ Node 3(第 7-9 段)
    └──→ Node 4(第 10-12 段)

关系:
- Document 是 "原始数据",Node 是 "处理后的数据块"
- 一个 Document 会被拆分为多个 Node
- Node 保留了指向源 Document 的 SOURCE 关系
- Node 之间可以建立 NEXT/PREVIOUS 顺序关系
- Node 之间也可以建立 PARENT/CHILD 层级关系
完整示例:手动构建文档和节点体系
from llama_index.core import Document
from llama_index.core.schema import (
    TextNode,
    NodeRelationship,
    RelatedNodeInfo,
)

# 创建源文档
source_doc = Document(
    text="""Python 是一种高级编程语言,由 Guido van Rossum 于 1991 年首次发布。
Python 的设计哲学强调代码的可读性和简洁性。
Python 支持多种编程范式,包括面向对象、命令式、函数式编程。
Python 拥有丰富的标准库和活跃的社区,是目前最流行的编程语言之一。
Python 广泛应用于 Web 开发、数据科学、人工智能、自动化等领域。""",
    metadata={"language": "Chinese", "topic": "Python"},
    doc_id="python-intro",
)

# 将文档手动拆分为节点
node_a = TextNode(
    text="Python 是一种高级编程语言,由 Guido van Rossum 于 1991 年首次发布。Python 的设计哲学强调代码的可读性和简洁性。",
    metadata={"section": "简介"},
    id_="python-node-1",
)

node_b = TextNode(
    text="Python 支持多种编程范式,包括面向对象、命令式、函数式编程。",
    metadata={"section": "编程范式"},
    id_="python-node-2",
)

node_c = TextNode(
    text="Python 拥有丰富的标准库和活跃的社区,是目前最流行的编程语言之一。Python 广泛应用于 Web 开发、数据科学、人工智能、自动化等领域。",
    metadata={"section": "应用"},
    id_="python-node-3",
)

# 建立节点与源文档的关系
for node in [node_a, node_b, node_c]:
    node.relationships[NodeRelationship.SOURCE] = RelatedNodeInfo(
        node_id=source_doc.doc_id
    )

# 建立节点之间的顺序关系
node_a.relationships[NodeRelationship.NEXT] = RelatedNodeInfo(node_id=node_b.node_id)
node_b.relationships[NodeRelationship.PREVIOUS] = RelatedNodeInfo(node_id=node_a.node_id)
node_b.relationships[NodeRelationship.NEXT] = RelatedNodeInfo(node_id=node_c.node_id)
node_c.relationships[NodeRelationship.PREVIOUS] = RelatedNodeInfo(node_id=node_b.node_id)

# 验证关系
print(f"节点A来源: {node_a.relationships[NodeRelationship.SOURCE].node_id}")
print(f"节点A下一个: {node_a.relationships[NodeRelationship.NEXT].node_id}")
print(f"节点B上一个: {node_b.relationships[NodeRelationship.PREVIOUS].node_id}")
print(f"节点B下一个: {node_b.relationships[NodeRelationship.NEXT].node_id}")
print(f"节点C上一个: {node_c.relationships[NodeRelationship.PREVIOUS].node_id}")
2.1.2 数据连接器(Data Connectors)
LlamaIndex 提供了丰富的数据连接器,能够从各种数据源加载数据并转化为 Document 对象。
SimpleDirectoryReader:本地文件加载器
SimpleDirectoryReader 是最常用的数据加载器,它支持多种文件格式,是入门和原型开发的首选。
from llama_index.core import SimpleDirectoryReader

# ===== 基本用法:加载目录下所有文件 =====
reader = SimpleDirectoryReader(input_dir="./data")
documents = reader.load_data()
print(f"共加载 {len(documents)} 个文档")

# ===== 加载指定文件 =====
reader = SimpleDirectoryReader(input_files=["./data/report.pdf", "./data/notes.md"])
documents = reader.load_data()

# ===== 递归加载子目录 =====
reader = SimpleDirectoryReader(
    input_dir="./data",
    recursive=True,           # 递归扫描子目录
    required_exts=[".pdf", ".md", ".txt"],  # 只加载指定扩展名的文件
)
documents = reader.load_data()

# ===== 排除特定文件 =====
reader = SimpleDirectoryReader(
    input_dir="./data",
    exclude=["*.tmp", "draft_*"],  # 排除临时文件和草稿文件
)
documents = reader.load_data()

# ===== 查看加载文档的元数据 =====
for doc in documents:
    print(f"文件: {doc.metadata.get('file_name', 'unknown')}")
    print(f"  路径: {doc.metadata.get('file_path', 'unknown')}")
    print(f"  大小: {doc.metadata.get('file_size', 0)} bytes")
    print(f"  类型: {doc.metadata.get('file_type', 'unknown')}")
    print(f"  文本长度: {len(doc.text)} 字符")
    print()
SimpleDirectoryReader 支持的文件格式:
| 格式 | 扩展名 | 说明 |
|---|---|---|
| 纯文本 | .txt |
直接读取 |
| Markdown | .md |
保留结构信息 |
| CSV | .csv |
逐行解析 |
| JSON | .json |
JSON 解析 |
.pdf |
需要额外依赖(pypdf) | |
| Word | .docx |
需要 python-docx |
| HTML | .html |
解析 HTML 结构 |
| 图片 | .png, .jpg |
多模态处理(需要额外配置) |
| Excel | .xlsx |
需要 openpyxl |
| PowerPoint | .pptx |
需要 python-pptx |
LlamaParse:智能文档解析引擎
LlamaParse 是 LlamaIndex 官方提供的高级文档解析服务,特别擅长处理复杂排版的文档,如包含表格、图片、多栏布局的 PDF 文件。
# 安装 LlamaParse
# pip install llama-parse

# 获取 API Key:访问 https://cloud.llamaindex.ai 注册获取
import os
os.environ["LLAMA_CLOUD_API_KEY"] = "llx-your-llama-parse-api-key"

from llama_parse import LlamaParse

# ===== 基本用法 =====
parser = LlamaParse(
    result_type="markdown",  # 输出格式:markdown 或 text
    language="chinese",       # 文档语言
    verbose=True,             # 打印解析过程
)

# 解析 PDF 文件
documents = parser.load_data("./data/complex_report.pdf")

# ===== 高级配置 =====
parser = LlamaParse(
    result_type="markdown",
    language="chinese",
    # 使用 GPT-4o 进行视觉解析(处理图片和复杂表格)
    use_vendor_multimodal_model=True,
    vendor_multimodal_model_name="openai-gpt4o",
    # 处理多页文档时合并相关内容
    page_separator="\n---\n",
    # 提取图片
    take_screenshot=True,
)

documents = parser.load_data("./data/financial_report.pdf")

# LlamaParse 对比 SimpleDirectoryReader 的优势
# SimpleDirectoryReader 解析 PDF 时:
# - 只能提取纯文本,表格结构丢失
# - 多栏布局可能导致文本顺序混乱
# - 图片和图表信息完全丢失
#
# LlamaParse 解析 PDF 时:
# - 保留表格结构(转为 Markdown 表格)
# - 正确处理多栏布局
# - 使用多模态模型理解图片和图表
# - 输出结构化的 Markdown 格式
LlamaHub:160+ 数据连接器生态
LlamaHub 是 LlamaIndex 的数据连接器市场,提供 160+ 官方和社区维护的数据连接器。每个连接器都是一个独立的 Python 包。
# ===== 数据库连接器示例 =====

# --- PostgreSQL 连接器 ---
# pip install llama-index-readers-database
from llama_index.readers.database import DatabaseReader

db_reader = DatabaseReader(uri="postgresql://user:password@localhost:5432/mydb")

# 通过 SQL 查询加载数据
documents = db_reader.load_data(
    query="SELECT id, title, content, created_at FROM articles WHERE status = 'published'"
)

# 每个查询结果行会被转化为一个 Document
for doc in documents:
    print(f"文章: {doc.text[:100]}...")


# --- MongoDB 连接器 ---
# pip install llama-index-readers-mongodb
from llama_index.readers.mongodb import SimpleMongoReader

mongo_reader = SimpleMongoReader(
    host="localhost",
    port=27017,
)

documents = mongo_reader.load_data(
    db_name="knowledge_base",
    collection_name="articles",
    field_names=["title", "content"],  # 要提取的字段
    query_dict={"status": "published"},  # 查询过滤条件
)


# ===== API 连接器示例 =====

# --- Notion 连接器 ---
# pip install llama-index-readers-notion
from llama_index.readers.notion import NotionPageReader

notion_reader = NotionPageReader(
    integration_token="ntn_your_notion_integration_token"
)

# 加载指定 Notion 页面
documents = notion_reader.load_data(
    page_ids=["your-page-id-1", "your-page-id-2"]
)

# 加载整个 Notion 数据库
documents = notion_reader.load_data(
    database_id="your-database-id"
)


# --- Google Drive 连接器 ---
# pip install llama-index-readers-google
from llama_index.readers.google import GoogleDocsReader

gdoc_reader = GoogleDocsReader()

documents = gdoc_reader.load_data(
    document_ids=["your-google-doc-id-1", "your-google-doc-id-2"]
)


# ===== Web 连接器示例 =====

# --- 网页爬虫连接器 ---
# pip install llama-index-readers-web
from llama_index.readers.web import SimpleWebPageReader

web_reader = SimpleWebPageReader(html_to_text=True)

documents = web_reader.load_data([
    "https://docs.llamaindex.ai/en/stable/",
    "https://docs.llamaindex.ai/en/stable/getting_started/",
])

for doc in documents:
    print(f"URL: {doc.metadata.get('url', 'unknown')}")
    print(f"内容长度: {len(doc.text)} 字符")
    print()
2.1.3 节点解析器与文本分割器
节点解析器(NodeParser)的作用是将 Document 拆分为更小的 Node 单元。文本分割的质量直接影响后续检索和生成的效果——切分太大,检索不精确;切分太小,上下文信息不完整。
SentenceSplitter:按句子边界分割(默认推荐)
from llama_index.core import Document
from llama_index.core.node_parser import SentenceSplitter

# 创建示例文档
doc = Document(text="""
LlamaIndex 是一个用于构建 LLM 应用的数据框架。它提供了丰富的数据连接器,
可以从 PDF、Word、数据库、API 等多种数据源加载数据。框架的核心功能是 RAG
(检索增强生成),它将文档分割成小块,转化为向量表示,存储在向量数据库中。

当用户提出问题时,系统首先将问题转化为向量,然后在向量数据库中执行相似度搜索,
找到与问题最相关的文档片段。这些片段被作为上下文信息,与用户问题一起发送给 LLM,
由 LLM 生成最终的回答。这种方式既保证了回答的准确性,又解决了 LLM 上下文
窗口有限的限制。

LlamaIndex 支持多种索引类型。向量索引适合通用语义搜索场景。知识图谱索引适合
需要多跳推理的复杂查询。摘要索引适合需要对大量文档生成全局概览的场景。
""")

# 使用 SentenceSplitter 进行分割
splitter = SentenceSplitter(
    chunk_size=256,         # 每个块的目标大小(token 数),默认 1024
    chunk_overlap=32,       # 相邻块之间的重叠 token 数,默认 20
    # chunk_size 和 chunk_overlap 的平衡:
    # - chunk_size 越大,每个块包含的信息越多,但检索精度可能下降
    # - chunk_overlap 越大,块之间的上下文连续性越好,但会产生更多冗余
)

nodes = splitter.get_nodes_from_documents([doc])

print(f"原文档被分割为 {len(nodes)} 个节点:\n")
for i, node in enumerate(nodes):
    print(f"--- 节点 {i + 1} (长度: {len(node.text)} 字符) ---")
    print(node.text.strip())
    print()
TokenTextSplitter:按 Token 数分割
from llama_index.core.node_parser import TokenTextSplitter

# TokenTextSplitter 基于 tiktoken(OpenAI 的 tokenizer)计算 token 数
# 适合需要精确控制 token 数量的场景(如适配 LLM 的上下文窗口)
token_splitter = TokenTextSplitter(
    chunk_size=512,              # 每个块的目标 token 数
    chunk_overlap=50,            # 重叠 token 数
    separator=" ",               # 分割分隔符
    # 默认使用 OpenAI 的 cl100k_base tokenizer
    # 可以指定其他 tokenizer: tokenizer_name="gpt2"
)

nodes = token_splitter.get_nodes_from_documents([doc])

for i, node in enumerate(nodes):
    print(f"节点 {i + 1}: {len(node.text)} 字符")
SentenceWindowNodeParser:保留上下文窗口
from llama_index.core.node_parser import SentenceWindowNodeParser

# SentenceWindowNodeParser 的特殊之处:
# 每个 Node 不仅包含自身的文本(window),还包含周围句子的上下文(window_metadata)
# 这解决了"块太小导致上下文丢失"的问题

window_parser = SentenceWindowNodeParser(
    window_size=3,           # 每个节点包含前后各 3 个句子作为上下文窗口
    # 例如:Node B 的实际内容只有 B 的文本,
    # 但 metadata 中包含了 A、B、C 的完整文本(窗口)
)

nodes = window_parser.get_nodes_from_documents([doc])

print(f"共 {len(nodes)} 个节点\n")
for i, node in enumerate(nodes):
    print(f"--- 节点 {i + 1} ---")
    print(f"  核心文本: {node.text[:80]}...")
    # 窗口文本存储在 metadata 中
    window_text = node.metadata.get("window", "")
    print(f"  窗口文本: {window_text[:120]}...")
    print()

# 使用场景:
# 检索时只匹配核心文本(精确度高)
# 生成时使用窗口文本(上下文丰富)
HierarchicalNodeParser:层级分割(父→子)
from llama_index.core.node_parser import HierarchicalNodeParser

# HierarchicalNodeParser 创建多层级的节点:
# 第 1 层:大块(父节点),包含完整段落
# 第 2 层:中块(子节点),包含句子组
# 第 3 层:小块(孙节点),包含单个句子

hierarchical_parser = HierarchicalNodeParser(
    chunk_sizes=[2048, 512, 128],  # 三个层级的块大小
    # 2048 tokens → 第 1 层(粗略但全面)
    # 512 tokens  → 第 2 层(平衡)
    # 128 tokens  → 第 3 层(精确但片段化)
)

nodes = hierarchical_parser.get_nodes_from_documents([doc])

# 统计各层级的节点数
level_counts = {}
for node in nodes:
    level = node.metadata.get("chunk_size", "unknown")
    level_counts[level] = level_counts.get(level, 0) + 1

print("层级节点分布:")
for level, count in sorted(level_counts.items(), reverse=True):
    print(f"  块大小 {level} tokens: {count} 个节点")

# 使用场景:
# 配合 HierarchicalRetriever 实现"先粗后精"的检索策略
# 先在大块中定位相关区域,再在小块中精确匹配
MarkdownNodeParser:按 Markdown 结构分割
from llama_index.core.node_parser import MarkdownNodeParser

# MarkdownNodeParser 按照 Markdown 的标题层级进行分割
# 特别适合处理有良好结构的 Markdown 文档

markdown_doc = Document(text="""
# LlamaIndex 使用指南

## 1. 安装

使用 pip 安装 LlamaIndex:
```bash
pip install llama-index
2. 快速开始
2.1 加载数据
使用 SimpleDirectoryReader 加载本地文件。
2.2 构建索引
使用 VectorStoreIndex 构建向量索引。
3. 高级功能
3.1 自定义检索器
可以自定义 Retriever 来控制检索逻辑。
3.2 Agent 框架
使用 Agent 实现自主任务执行。
“”")
md_parser = MarkdownNodeParser()
nodes = md_parser.get_nodes_from_documents([markdown_doc])
print(f"Markdown 文档被分割为 {len(nodes)} 个节点:\n")
for i, node in enumerate(nodes):
print(f"— 节点 {i + 1} —“)
print(f” 文本: {node.text.strip()[:100]}…“)
# MarkdownNodeParser 会保留标题层级信息
print(f” 元数据: {node.metadata}")
print()
**CodeSplitter:按代码语法分割**

```python
from llama_index.core.node_parser import CodeSplitter

# CodeSplitter 基于 tree-sitter 理解代码语法,按函数/类等语义单元分割
# 支持 Python、JavaScript、TypeScript、Java 等多种编程语言

code_doc = Document(text="""
import os
from typing import List

class DataProcessor:
    def __init__(self, config: dict):
        self.config = config
        self.data = []

    def load_data(self, path: str) -> None:
        with open(path, 'r') as f:
            self.data = f.readlines()

    def process(self) -> List[str]:
        results = []
        for line in self.data:
            cleaned = line.strip().lower()
            results.append(cleaned)
        return results

    def save(self, output_path: str) -> None:
        processed = self.process()
        with open(output_path, 'w') as f:
            f.writelines(processed)

def main():
    processor = DataProcessor({"mode": "default"})
    processor.load_data("input.txt")
    processor.save("output.txt")

if __name__ == "__main__":
    main()
""")

# 按 Python 语法分割
python_splitter = CodeSplitter(
    language="python",      # 编程语言
    chunk_lines=30,         # 每个块的目标行数
    chunk_lines_overlap=5,  # 重叠行数
    max_chars=1000,         # 每个块的最大字符数
)

nodes = python_splitter.get_nodes_from_documents([code_doc])

print(f"代码被分割为 {len(nodes)} 个节点:\n")
for i, node in enumerate(nodes):
    print(f"--- 代码块 {i + 1} ---")
    print(node.text)
    print()
不同分割策略的对比总结:
| 分割器 | 分割依据 | 最佳场景 | 特点 |
|---|---|---|---|
| SentenceSplitter | 句子边界 | 通用文本(默认推荐) | 保持句子完整性 |
| TokenTextSplitter | Token 数量 | 需要精确控制 token 数 | 适配 LLM 上下文窗口 |
| SentenceWindowNodeParser | 句子 + 上下文窗口 | 需要精确检索 + 丰富上下文 | 检索和生成使用不同文本 |
| HierarchicalNodeParser | 多层级分块 | 大规模文档的层次检索 | 父→子多层结构 |
| MarkdownNodeParser | Markdown 标题层级 | 结构化 Markdown 文档 | 保留文档结构 |
| CodeSplitter | 代码语法(函数/类) | 代码文档 | 基于语义单元分割 |
2.1.4 摄取管道(Ingestion Pipeline)
IngestionPipeline 是 LlamaIndex 提供的链式数据处理管道,它将多个数据转换步骤(Transformation)串联起来,形成一个完整的数据预处理流水线。
from llama_index.core import Document
from llama_index.core.ingestion import IngestionPipeline
from llama_index.core.node_parser import SentenceSplitter
from llama_index.core.schema import TransformComponent

# ===== 基本用法:构建简单的摄取管道 =====

# 准备示例文档
documents = [
    Document(text="LlamaIndex 是一个数据框架,专注于 RAG 应用的构建。",
             metadata={"source": "doc1"}),
    Document(text="向量索引是 LlamaIndex 中最常用的索引类型。",
             metadata={"source": "doc2"}),
    Document(text="Agent 可以自主使用工具来完成复杂的任务。",
             metadata={"source": "doc3"}),
]

# 创建摄取管道
pipeline = IngestionPipeline(
    transformations=[
        # 第 1 步:文本分割
        SentenceSplitter(chunk_size=256, chunk_overlap=20),
        # 可以在这里添加更多 Transformation(如 Embedding、元数据提取等)
    ],
)

# 执行管道
nodes = pipeline.run(documents=documents)

print(f"管道处理完成,共生成 {len(nodes)} 个节点")
for i, node in enumerate(nodes):
    print(f"节点 {i + 1}: {node.text[:60]}...")
带 Embedding 的完整摄取管道:
import os
os.environ["OPENAI_API_KEY"] = "sk-your-api-key-here"

from llama_index.core import Document
from llama_index.core.ingestion import IngestionPipeline
from llama_index.core.node_parser import SentenceSplitter
from llama_index.embeddings.openai import OpenAIEmbedding
from llama_index.core.schema import MetadataMode

# 准备较长的文档
long_doc = Document(text="""
LlamaIndex 框架的设计理念是围绕数据展开的。它的核心目标是让开发者能够方便地将
各种格式的外部数据与大语言模型(LLM)进行连接。在当今的 AI 应用开发中,数据是
最宝贵的资产,而如何高效地组织、索引和检索这些数据,是构建高质量 AI 应用的关键。

RAG(Retrieval-Augmented Generation,检索增强生成)是 LlamaIndex 支持的核心
技术范式。RAG 的基本流程是:首先将文档进行预处理和分块,然后通过 Embedding 模型
将每个文本块转化为高维向量,存储在向量数据库中。当用户提出问题时,系统将问题也
转化为向量,在向量数据库中执行相似度搜索,找到最相关的文本块,最后将这些文本块
作为上下文与问题一起发送给 LLM 生成回答。

向量数据库的选择对 RAG 系统的性能有重要影响。常见的向量数据库包括 Chroma、
Qdrant、Milvus、Pinecone 等。Chroma 轻量级,适合开发和原型阶段;Qdrant 性能
优秀,适合中等规模的生产环境;Milvus 支持大规模分布式部署,适合海量数据场景。
""", metadata={"category": "技术文档"})

# 构建完整的摄取管道
pipeline = IngestionPipeline(
    transformations=[
        # 第 1 步:文本分割
        SentenceSplitter(chunk_size=256, chunk_overlap=30),
        # 第 2 步:生成 Embedding 向量
        OpenAIEmbedding(
            model="text-embedding-3-small",  # 使用 OpenAI 最新的小模型
            # model="text-embedding-3-large"  # 更高质量,但更贵更慢
        ),
    ],
)

# 执行管道
nodes = pipeline.run(documents=[long_doc])

print(f"共生成 {len(nodes)} 个节点\n")
for i, node in enumerate(nodes):
    print(f"节点 {i + 1}:")
    print(f"  文本: {node.text[:80]}...")
    print(f"  是否有 Embedding: {node.embedding is not None}")
    if node.embedding:
        print(f"  Embedding 维度: {len(node.embedding)}")
    print()
向量去重与增量摄取:
import os
os.environ["OPENAI_API_KEY"] = "sk-your-api-key-here"

from llama_index.core import Document, VectorStoreIndex
from llama_index.core.ingestion import IngestionPipeline, IngestionCache
from llama_index.core.storage.docstore import SimpleDocumentStore
from llama_index.core.node_parser import SentenceSplitter

# 使用 docstore 实现增量摄取和去重
# 核心思想:记录已处理过的文档,只处理新增或变化的文档

docstore = SimpleDocumentStore()

pipeline = IngestionPipeline(
    transformations=[
        SentenceSplitter(chunk_size=256, chunk_overlap=20),
    ],
    docstore=docstore,           # 文档存储(用于去重)
    cache=IngestionCache(),      # 缓存(加速重复处理)
)

# 第一次运行:处理所有文档
documents_v1 = [
    Document(text="Python 是一种流行的编程语言。", doc_id="doc-1"),
    Document(text="JavaScript 主要用于 Web 开发。", doc_id="doc-2"),
]
nodes_v1 = pipeline.run(documents=documents_v1)
print(f"第一次运行:处理了 {len(nodes_v1)} 个节点")

# 第二次运行:只处理新增/变化的文档
documents_v2 = [
    Document(text="Python 是一种流行的编程语言。", doc_id="doc-1"),       # 未变化
    Document(text="JavaScript 主要用于 Web 开发。", doc_id="doc-2"),       # 未变化
    Document(text="Rust 是一种注重安全和性能的系统编程语言。", doc_id="doc-3"),  # 新增
]
nodes_v2 = pipeline.run(documents=documents_v2)
print(f"第二次运行:只处理了 {len(nodes_v2)} 个节点(仅新增的 doc-3)")

# 持久化 docstore(重启后仍可保持去重状态)
docstore.persist(persist_path="./docstore.json")

# 从持久化文件恢复
restored_docstore = SimpleDocumentStore.from_persist_path("./docstore.json")
2.1.5 元数据提取与低质量内容过滤
元数据是 RAG 系统中的"隐性宝藏"——丰富的元数据可以显著提升检索的精确度和 LLM 生成的质量。LlamaIndex 提供了多种内置的元数据提取器。
内置元数据提取器详解:
import os
os.environ["OPENAI_API_KEY"] = "sk-your-api-key-here"

from llama_index.core import Document
from llama_index.core.ingestion import IngestionPipeline
from llama_index.core.node_parser import SentenceSplitter
from llama_index.core.extractors import (
    TitleExtractor,
    SummaryExtractor,
    QuestionsAnsweredExtractor,
    KeywordExtractor,
)
from llama_index.llms.openai import OpenAI

# 准备示例文档
document = Document(text="""
大语言模型(LLM)是近年来人工智能领域最重要的技术突破之一。LLM 基于 Transformer
架构,通过在大规模文本语料上进行预训练,学会了理解和生成自然语言。GPT 系列、
Claude 系列、Gemini 系列等都是知名的 LLM 产品。

LLM 的一个关键特点是其"涌现能力"——当模型参数量达到一定规模后,模型会展现出
训练时未明确教授的能力,如逻辑推理、代码生成、多语言翻译等。这种能力使得 LLM
成为了通用型 AI 助手的基础。

然而,LLM 也面临一些挑战。首先是"幻觉问题",即模型可能会生成看似合理但实际上
不正确的信息。其次是"知识时效性",模型的训练数据有截止日期,无法获取最新信息。
最后是"上下文窗口限制",即使是最新的模型,其能处理的最大文本长度也是有限的。

RAG(检索增强生成)技术是解决上述问题的重要手段。通过将外部知识库与 LLM 结合,
RAG 可以为模型提供实时、准确的信息,有效减少幻觉,并突破知识时效性的限制。
""")

llm = OpenAI(model="gpt-4o-mini", temperature=0.1)

# ===== TitleExtractor:自动提取标题 =====
title_extractor = TitleExtractor(
    llm=llm,
    nodes=5,          # 从前 5 个节点中提取标题
    # 它会让 LLM 阅读文档内容,然后生成一个简洁的标题
)

# ===== SummaryExtractor:自动提取摘要 =====
summary_extractor = SummaryExtractor(
    llm=llm,
    summaries=["self"],  # 为当前节点生成摘要
    # 也可以设置 "prev"、"next" 来为相邻节点生成摘要
    prompt_template="请用一句话概括以下文本的核心内容:\n{text}",
)

# ===== QuestionsAnsweredExtractor:提取该文本能回答的问题 =====
qa_extractor = QuestionsAnsweredExtractor(
    llm=llm,
    questions=3,       # 为每个节点生成 3 个它能回答的问题
    # 这些问题会作为元数据,在检索时提供额外的匹配维度
)

# ===== KeywordExtractor:提取关键词 =====
keyword_extractor = KeywordExtractor(
    llm=llm,
    keywords=5,        # 提取 5 个关键词
    # 关键词可以用于后续的关键词过滤检索
)

# ===== 构建完整的元数据提取管道 =====
pipeline = IngestionPipeline(
    transformations=[
        # 第 1 步:文本分割
        SentenceSplitter(chunk_size=256, chunk_overlap=30),
        # 第 2-5 步:元数据提取(这些会自动调用 LLM)
        title_extractor,
        summary_extractor,
        qa_extractor,
        keyword_extractor,
    ],
)

# 执行管道(注意:元数据提取会调用 LLM API,需要消耗 token)
nodes = pipeline.run(documents=[document])

# 查看提取的元数据
print(f"共生成 {len(nodes)} 个节点\n")
for i, node in enumerate(nodes):
    print(f"=== 节点 {i + 1} ===")
    print(f"文本: {node.text[:100]}...")
    print(f"元数据:")
    for key, value in node.metadata.items():
        print(f"  {key}: {value}")
    print()

# 元数据的用途:
# 1. title(标题):在检索结果中展示,帮助用户理解来源
# 2. section_summary(摘要):可用于摘要检索(先匹配摘要,再获取全文)
# 3. questions_this_excerpt_can_answer(可回答问题):
#    将问题与原文一起索引,当用户提出类似问题时可以提高检索命中率
# 4. excerpt_keywords(关键词):可用于关键词过滤,缩小检索范围
自定义元数据提取器:
from llama_index.core.schema import TransformComponent
from llama_index.core.schema import BaseNode
from typing import Sequence

# 方式一:基于规则的自定义提取器(不调用 LLM,零成本)
class CustomMetadataExtractor(TransformComponent):
    """自定义元数据提取器:基于规则提取元数据"""

    def __call__(self, nodes: Sequence[BaseNode], **kwargs) -> Sequence[BaseNode]:
        for node in nodes:
            text = node.text

            # 提取文本长度
            node.metadata["text_length"] = len(text)

            # 提取是否包含代码块
            node.metadata["has_code"] = "```" in text or "def " in text

            # 提取是否包含数字/统计数据
            import re
            numbers = re.findall(r'\d+\.?\d*', text)
            node.metadata["has_numbers"] = len(numbers) > 0
            node.metadata["number_count"] = len(numbers)

            # 提取段落数
            paragraphs = [p for p in text.split('\n\n') if p.strip()]
            node.metadata["paragraph_count"] = len(paragraphs)

            # 提取语言标记(简单的启发式方法)
            if any('\u4e00' <= c <= '\u9fff' for c in text):
                node.metadata["language"] = "chinese"
            else:
                node.metadata["language"] = "english"

        return nodes


# 使用自定义提取器
extractor = CustomMetadataExtractor()

pipeline = IngestionPipeline(
    transformations=[
        SentenceSplitter(chunk_size=256),
        extractor,  # 在分割后应用自定义提取器
    ],
)

nodes = pipeline.run(documents=[document])

for i, node in enumerate(nodes):
    print(f"节点 {i + 1} 自定义元数据:")
    for key in ["text_length", "has_code", "has_numbers", "number_count",
                 "paragraph_count", "language"]:
        print(f"  {key}: {node.metadata.get(key)}")
    print()
低质量内容过滤策略:
from llama_index.core.schema import TransformComponent, BaseNode
from typing import Sequence

class QualityFilter(TransformComponent):
    """低质量内容过滤器"""

    def __init__(
        self,
        min_text_length: int = 50,        # 最小文本长度
        max_text_length: int = 10000,     # 最大文本长度
        min_unique_ratio: float = 0.3,    # 最小唯一字符比例
        max_special_char_ratio: float = 0.5,  # 最大特殊字符比例
    ):
        self.min_text_length = min_text_length
        self.max_text_length = max_text_length
        self.min_unique_ratio = min_unique_ratio
        self.max_special_char_ratio = max_special_char_ratio

    def __call__(self, nodes: Sequence[BaseNode], **kwargs) -> Sequence[BaseNode]:
        filtered_nodes = []

        for node in nodes:
            text = node.text

            # 过滤 1:文本太短(可能是标题、目录等无意义内容)
            if len(text) < self.min_text_length:
                print(f"[过滤] 文本过短 ({len(text)} 字符): {text[:30]}...")
                continue

            # 过滤 2:文本太长(可能是整本书未分割)
            if len(text) > self.max_text_length:
                print(f"[过滤] 文本过长 ({len(text)} 字符): {text[:30]}...")
                continue

            # 过滤 3:重复内容过多(如大量重复的分隔符)
            unique_chars = len(set(text))
            unique_ratio = unique_chars / max(len(text), 1)
            if unique_ratio < self.min_unique_ratio:
                print(f"[过滤] 重复度过高 (唯一字符比例: {unique_ratio:.2f})")
                continue

            # 过滤 4:特殊字符过多(可能是乱码或格式错误)
            import string
            special_chars = sum(1 for c in text if c not in string.printable and c not in ' \n\t')
            special_ratio = special_chars / max(len(text), 1)
            if special_ratio > self.max_special_char_ratio:
                print(f"[过滤] 特殊字符过多 (比例: {special_ratio:.2f})")
                continue

            # 通过所有过滤器
            filtered_nodes.append(node)

        print(f"\n过滤结果: {len(nodes)} → {len(filtered_nodes)} 个节点")
        return filtered_nodes


# 在管道中使用质量过滤器
from llama_index.core.ingestion import IngestionPipeline
from llama_index.core.node_parser import SentenceSplitter

pipeline = IngestionPipeline(
    transformations=[
        SentenceSplitter(chunk_size=256, chunk_overlap=20),
        QualityFilter(min_text_length=30),  # 过滤掉太短的片段
    ],
)

nodes = pipeline.run(documents=[document])
print(f"最终保留了 {len(nodes)} 个高质量节点")
2.2 索引技术(Indexing)
索引是 LlamaIndex 的核心,它决定了数据如何被组织、存储和检索。不同的索引类型适用于不同的场景,选择正确的索引类型对 RAG 系统的效果至关重要。
2.2.1 主流索引选型与场景适配
向量存储索引(VectorStoreIndex)
VectorStoreIndex 是 LlamaIndex 中最常用、最核心的索引类型,也是绝大多数 RAG 应用的首选。它的工作原理是:
graph LR
    %% 全局连线中性化样式
    linkStyle default stroke:#888888,stroke-width:2px;

    %% 外层方向:整体流转并列
    direction LR

    %% ==========================================
    %% 上路:离线数据灌库流水线 (Ingestion Flow)
    %% ==========================================
    subgraph Flow_Ingestion [离线数据写入流水线]
        direction LR
        I_Txt[文本数据] --> I_Mdl[Embedding 模型]
        I_Mdl --> I_Vec[高维向量]
    end

    %% ==========================================
    %% 中枢:向量数据库集群 (Vector Database)
    %% ==========================================
    subgraph Cluster_DB [向量数据库数据中心]
        direction TB
        DB_Store[(向量数据库存储)] --> DB_Search[近似最近邻搜索 ANN]
    end

    %% ==========================================
    %% 下路:在线查询检索流水线 (Query Search Flow)
    %% ==========================================
    subgraph Flow_Query [在线查询检索流水线]
        direction LR
        Q_Txt[查询文本] --> Q_Mdl[Embedding 模型]
        Q_Mdl --> Q_Vec[查询向量]
        Q_Search[执行最近邻搜索] --> Q_Res[返回最相似文本块]
    end

    %% ==========================================
    %% 核心跨轴数据交互连线 (精准还原您的向下箭头分支)
    %% ==========================================
    %% 1. 上路离线向量存入数据库
    I_Vec --> DB_Store

    %% 2. 下路实时查询向量送入数据库执行 ANN 搜索
    Q_Vec --> DB_Search

    %% 3. 数据库搜索结果路由回下路的响应节点
    DB_Search --> Q_Search

    %% ==========================================
    %% 视觉与排版美学硬编码样式定义 (Dual-Mode Adaptive)
    %% ==========================================
    %% 大框全透明、虚线边框样式
    classDef transparentBox fill:none,stroke:#888888,stroke-width:1.5px,stroke-dasharray: 5 5;
    class Flow_Ingestion,Cluster_DB,Flow_Query transparentBox;

    %% 流程起点与终点样式(高饱和度对比色)
    style I_Txt fill:#0078d4,stroke:#0078d4,color:#ffffff,font-weight:bold
    style Q_Txt fill:#0078d4,stroke:#0078d4,color:#ffffff,font-weight:bold
    style Q_Res fill:#107c41,stroke
完整的 VectorStoreIndex 创建与查询示例:
import os
os.environ["OPENAI_API_KEY"] = "sk-your-api-key-here"

from llama_index.core import VectorStoreIndex, SimpleDirectoryReader, Document
from llama_index.embeddings.openai import OpenAIEmbedding
from llama_index.llms.openai import OpenAI

# ===== 方式一:从 Document 列表创建 =====
documents = [
    Document(text="Python 是一种解释型、面向对象的高级编程语言。它由 Guido van Rossum 创建,首次发布于 1991 年。Python 以其简洁的语法和强大的生态系统而闻名。"),
    Document(text="JavaScript 是一种动态类型的脚本语言,主要用于 Web 开发。它可以在浏览器端运行(前端),也可以在服务器端运行(通过 Node.js)。JavaScript 是目前世界上最流行的编程语言之一。"),
    Document(text="Rust 是一种系统编程语言,由 Mozilla 主导开发。Rust 的核心设计理念是内存安全、并发安全和高性能。它通过所有权(Ownership)系统在编译时防止内存相关的错误。"),
    Document(text="Go(也称为 Golang)是 Google 开发的一种静态类型编译语言。Go 的设计目标是简洁、高效、并支持高并发编程。Go 在云原生和微服务领域非常流行。"),
    Document(text="TypeScript 是 JavaScript 的超集,由 Microsoft 开发和维护。TypeScript 添加了静态类型系统和面向对象编程特性。大型前端项目通常使用 TypeScript 来提高代码的可维护性和开发体验。"),
]

# 配置 Embedding 模型
embed_model = OpenAIEmbedding(
    model="text-embedding-3-small",   # OpenAI 最新 Embedding 模型
    # model="text-embedding-3-large"  # 更高质量(3072 维)
    # model="text-embedding-ada-002"  # 经典模型(1536 维)
)

# 配置 LLM
llm = OpenAI(model="gpt-4o-mini", temperature=0.1)

# 创建向量索引
# from_documents() 会自动完成:文本分块 → Embedding 向量化 → 存入向量库
index = VectorStoreIndex.from_documents(
    documents,
    embed_model=embed_model,  # 指定 Embedding 模型
)

# ===== 基本查询 =====
query_engine = index.as_query_engine(
    llm=llm,                    # 指定 LLM
    similarity_top_k=2,         # 检索最相关的 2 个文档块
)

response = query_engine.query("哪种编程语言最适合系统级开发?")
print(f"回答: {response.response}")
print(f"\n引用来源:")
for source in response.source_nodes:
    print(f"  - {source.node.text[:60]}... (相似度: {source.score:.4f})")


# ===== 方式二:从已有的 Node 列表创建 =====
from llama_index.core.node_parser import SentenceSplitter

# 先手动创建节点
splitter = SentenceSplitter(chunk_size=256)
nodes = splitter.get_nodes_from_documents(documents)

# 从节点创建索引
index_v2 = VectorStoreIndex(
    nodes=nodes,
    embed_model=embed_model,
)

query_engine_v2 = index_v2.as_query_engine(llm=llm)
response_v2 = query_engine_v2.query("Python 和 JavaScript 有什么共同点?")
print(f"\n回答: {response_v2.response}")


# ===== 方式三:空的索引逐步添加文档 =====
index_v3 = VectorStoreIndex(
    nodes=[],                   # 先创建空索引
    embed_model=embed_model,
)

# 逐个添加文档
for doc in documents:
    nodes = splitter.get_nodes_from_documents([doc])
    index_v3.insert_nodes(nodes)

query_engine_v3 = index_v3.as_query_engine(llm=llm)
response_v3 = query_engine_v3.query("Go 语言的优势是什么?")
print(f"\n回答: {response_v3.response}")
Embedding 模型选择指南:
# ===== 使用 HuggingFace 本地 Embedding 模型(免费、离线可用)=====
# pip install llama-index-embeddings-huggingface

from llama_index.embeddings.huggingface import HuggingFaceEmbedding

# 使用开源的 Embedding 模型(无需 API Key)
local_embed = HuggingFaceEmbedding(
    model_name="BAAI/bge-small-zh-v1.5",   # 中文优化的小模型
    # model_name="BAAI/bge-large-zh-v1.5"  # 中文优化的高质量模型
    # model_name="sentence-transformers/all-MiniLM-L6-v2"  # 英文通用模型
)

index_local = VectorStoreIndex.from_documents(
    documents,
    embed_model=local_embed,
)

query_engine_local = index_local.as_query_engine(llm=llm)
response_local = query_engine_local.query("Rust 的核心特点是什么?")
print(response_local.response)

# Embedding 模型选择建议:
# | 模型 | 维度 | 适用语言 | 特点 |
# |------|------|---------|------|
# | text-embedding-3-small | 1536 | 多语言 | OpenAI 出品,性价比高 |
# | text-embedding-3-large | 3072 | 多语言 | OpenAI 最高质量 |
# | bge-small-zh-v1.5 | 512 | 中文 | 开源免费,中文优化 |
# | bge-large-zh-v1.5 | 1024 | 中文 | 开源免费,中文高质量 |
# | e5-mistral-7b-instruct | 4096 | 英文 | 基于 LLM 的 Embedding |
使用外部向量数据库:
# ===== 使用 Chroma 作为向量数据库 =====
# pip install llama-index-vector-stores-chroma chromadb

import chromadb
from llama_index.vector_stores.chroma import ChromaVectorStore
from llama_index.core import VectorStoreIndex, StorageContext

# 创建 Chroma 客户端(持久化存储)
chroma_client = chromadb.PersistentClient(path="./chroma_db")

# 创建或获取集合
chroma_collection = chroma_client.get_or_create_collection(
    name="my_knowledge_base",
    metadata={"hnsw:space": "cosine"},  # 使用余弦相似度
)

# 将 Chroma 集合包装为 LlamaIndex 的 VectorStore
vector_store = ChromaVectorStore(chroma_collection=chroma_collection)

# 创建存储上下文
storage_context = StorageContext.from_defaults(vector_store=vector_store)

# 构建索引(数据会存入 Chroma)
index = VectorStoreIndex.from_documents(
    documents,
    storage_context=storage_context,
    embed_model=embed_model,
)

# 查询(从 Chroma 中检索)
query_engine = index.as_query_engine(llm=llm)
response = query_engine.query("TypeScript 相比 JavaScript 有什么优势?")
print(response.response)


# ===== 从已有的 Chroma 集合加载索引(不需要重新构建)=====
from llama_index.core import VectorStoreIndex

# 重新连接已有的 Chroma 数据库
chroma_client = chromadb.PersistentClient(path="./chroma_db")
chroma_collection = chroma_client.get_collection("my_knowledge_base")
vector_store = ChromaVectorStore(chroma_collection=chroma_collection)

# 从已有的向量存储中加载索引(不会重新 Embedding)
index = VectorStoreIndex.from_vector_store(
    vector_store=vector_store,
    embed_model=embed_model,
)

query_engine = index.as_query_engine(llm=llm)
response = query_engine.query("Python 的特点是什么?")
print(response.response)
属性图表索引(PropertyGraphIndex)
PropertyGraphIndex 是 LlamaIndex 在最新版本中推出的知识图谱索引,它从文本中自动提取实体和关系,构建知识图谱,支持多跳推理查询。
import os
os.environ["OPENAI_API_KEY"] = "sk-your-api-key-here"

from llama_index.core import PropertyGraphIndex, Document
from llama_index.llms.openai import OpenAI
from llama_index.embeddings.openai import OpenAIEmbedding

# 准备包含实体关系的文档
documents = [
    Document(text="""
    LlamaIndex 是由 Jerry Liu 创建的开源框架。LlamaIndex 的核心功能是 RAG。
    RAG 的全称是 Retrieval-Augmented Generation。RAG 需要三个关键组件:
    数据连接器、向量数据库和大语言模型。常用的向量数据库包括 Chroma、Qdrant 和 Milvus。
    Chroma 是一个轻量级的向量数据库。Qdrant 使用 Rust 语言编写,性能优秀。
    Milvus 支持大规模分布式部署。
    """),
    Document(text="""
    LangChain 是另一个流行的 LLM 应用框架。LangChain 的创建者是 Harrison Chase。
    LangChain 和 LlamaIndex 可以互操作。LlamaIndex 的 QueryEngine 可以作为
    LangChain 的 Retriever 使用。两者都支持 OpenAI、Anthropic 等多种 LLM。
    """),
]

llm = OpenAI(model="gpt-4o-mini", temperature=0.1)
embed_model = OpenAIEmbedding(model="text-embedding-3-small")

# ===== 创建 PropertyGraphIndex =====
# PropertyGraphIndex 会自动从文本中提取实体(节点)和关系(边)
pg_index = PropertyGraphIndex.from_documents(
    documents,
    llm=llm,
    embed_model=embed_model,
    show_progress=True,  # 显示构建进度
)

# 查看提取的知识图谱
print("=== 知识图谱中的三元组 ===\n")
for triplet in pg_index.property_graph.get_triplets():
    subject, relation, obj = triplet
    print(f"  {subject} --[{relation}]--> {obj}")

# ===== 查询知识图谱 =====
# PropertyGraphIndex 支持多跳推理:
# 例如:"Chroma 和 Qdrant 有什么关系?" → 它们都是 RAG 使用的向量数据库
query_engine = pg_index.as_query_engine(
    llm=llm,
    include_text=True,       # 同时使用原始文本(混合检索)
    similarity_top_k=2,
)

response = query_engine.query("RAG 需要哪些组件?各有什么特点?")
print(f"\n=== 查询结果 ===")
print(response.response)

# 多跳推理查询
response2 = query_engine.query("LlamaIndex 和 LangChain 之间有什么关系?")
print(f"\n=== 多跳推理结果 ===")
print(response2.response)
PropertyGraphIndex 与 Neo4j 集成:
# pip install llama-index-graph-stores-neo4j

# 使用 Neo4j 作为图数据库后端(适合大规模知识图谱)
# 需要先部署 Neo4j 数据库(可通过 Docker):
# docker run -p 7474:7474 -p 7687:7687 \
#   -e NEO4J_AUTH=neo4j/password \
#   neo4j:latest

from llama_index.graph_stores.neo4j import Neo4jPropertyGraphStore

# 连接 Neo4j
graph_store = Neo4jPropertyGraphStore(
    username="neo4j",
    password="password",
    url="bolt://localhost:7687",
)

from llama_index.core import StorageContext

# 使用 Neo4j 作为后端存储构建知识图谱
storage_context = StorageContext.from_defaults(graph_store=graph_store)

pg_index = PropertyGraphIndex.from_documents(
    documents,
    storage_context=storage_context,
    llm=llm,
    embed_model=embed_model,
)

# 查询(数据存储在 Neo4j 中,支持 Cypher 查询)
query_engine = pg_index.as_query_engine(llm=llm)
response = query_engine.query("有哪些向量数据库?")
print(response.response)
文件管理索引(SummaryIndex)
SummaryIndex 是最简单的索引类型。它的原理非常直接:在查询时,将所有文档内容拼接在一起,作为上下文传给 LLM 来生成回答。这意味着它不做任何"检索"操作,而是让 LLM 阅读全部内容。
import os
os.environ["OPENAI_API_KEY"] = "sk-your-api-key-here"

from llama_index.core import SummaryIndex, Document
from llama_index.llms.openai import OpenAI

# 准备文档
documents = [
    Document(text="Python 由 Guido van Rossum 创建,是一种高级编程语言。Python 支持面向对象和函数式编程。"),
    Document(text="JavaScript 是 Web 开发的核心语言。JavaScript 可以在浏览器和服务器端(Node.js)运行。"),
    Document(text="Rust 由 Mozilla 主导开发,注重内存安全和并发安全。Rust 使用所有权系统管理内存。"),
    Document(text="Go 语言由 Google 开发,适合云原生和微服务开发。Go 的并发模型基于 goroutine。"),
]

llm = OpenAI(model="gpt-4o-mini", temperature=0.1)

# ===== 创建 SummaryIndex =====
summary_index = SummaryIndex.from_documents(documents)

# SummaryIndex 的查询模式
query_engine = summary_index.as_query_engine(
    llm=llm,
    # response_mode 控制如何将节点内容传给 LLM:
    # "tree_summarize"(默认):递归摘要,适合大量文档
    # "compact":压缩后一次性传入
    # "refine":逐节点精化回答
    response_mode="tree_summarize",
)

# 全局概览查询(SummaryIndex 的强项)
response = query_engine.query("请对比这四种编程语言的共同点和差异。")
print(f"=== 全局对比 ===")
print(response.response)

# SummaryIndex 也可以用于普通问答
response2 = query_engine.query("哪些语言支持并发编程?")
print(f"\n=== 并发编程 ===")
print(response2.response)
SummaryIndex vs VectorStoreIndex 使用场景对比:
SummaryIndex 适合的场景:
├── 需要对全部文档进行全局概览/总结
├── 文档数量较少(总 token 数在 LLM 上下文窗口内)
├── 需要对比分析("A 和 B 有什么不同")
├── 生成报告、摘要、目录
└── 文档内容高度相关,不需要精确检索

VectorStoreIndex 适合的场景:
├── 大规模文档库(数百到数百万文档)
├── 需要精确的语义检索
├── RAG 问答系统
├── 文档内容多样化,需要按相关性检索
└── 生产环境的标准选择
其他索引类型与选型决策
# ===== TreeIndex:树形结构索引 =====
# TreeIndex 将文档构建成一棵自底向上的树形结构
# 叶子节点是原始文本块,中间节点是子节点的摘要
# 查询时从根节点向下遍历,逐步缩小范围

from llama_index.core import TreeIndex, Document

documents = [
    Document(text="Python 的 Web 框架包括 Django、Flask 和 FastAPI。Django 是全功能框架,Flask 是微框架,FastAPI 专注于高性能 API。"),
    Document(text="Python 的数据科学库包括 NumPy、Pandas 和 Matplotlib。NumPy 提供数值计算,Pandas 提供数据处理,Matplotlib 提供可视化。"),
    Document(text="JavaScript 的前端框架包括 React、Vue 和 Angular。React 由 Meta 维护,Vue 是社区驱动,Angular 由 Google 维护。"),
    Document(text="JavaScript 的后端框架包括 Express、Koa 和 Fastify。Express 最流行,Koa 最轻量,Fastify 性能最好。"),
]

# TreeIndex 构建过程(概念说明):
# 第 1 层(叶子):4 个原始文档
# 第 2 层(中间):2 个摘要节点(分别摘要 Python 和 JavaScript)
# 第 3 层(根):1 个总摘要节点

tree_index = TreeIndex.from_documents(documents)

query_engine = tree_index.as_query_engine()
response = query_engine.query("Python 有哪些数据科学相关的库?")
print(response.response)

# TreeIndex 适合场景:
# - 层次化的文档结构
# - 需要逐步缩小范围的查询
# - 注意:TreeIndex 的使用频率远低于 VectorStoreIndex
索引选型决策树:
你的核心需求是什么?
│
├── "我需要在大量文档中精确搜索" ──→ VectorStoreIndex ✓
│   (95% 的 RAG 应用场景)
│
├── "我需要总结/概览全部文档" ──→ SummaryIndex ✓
│   (文档数量少,需要全局理解)
│
├── "我需要理解实体之间的关系" ──→ PropertyGraphIndex ✓
│   (知识图谱、多跳推理)
│
├── "我需要层次化地浏览文档" ──→ TreeIndex ✓
│   (较少使用,特定场景)
│
└── "我不确定" ──→ 先用 VectorStoreIndex ✓
    (最通用,覆盖大多数场景)
2.2.2 索引优化
动态元数据增强:在 IngestionPipeline 中注入元数据
import os
os.environ["OPENAI_API_KEY"] = "sk-your-api-key-here"

from llama_index.core import Document, VectorStoreIndex
from llama_index.core.ingestion import IngestionPipeline
from llama_index.core.node_parser import SentenceSplitter
from llama_index.core.schema import TransformComponent, BaseNode
from llama_index.embeddings.openai import OpenAIEmbedding
from typing import Sequence

class MetadataEnricher(TransformComponent):
    """动态元数据增强器:为每个节点添加丰富的检索元数据"""

    def __init__(self, category: str = "general"):
        self.category = category

    def __call__(self, nodes: Sequence[BaseNode], **kwargs) -> Sequence[BaseNode]:
        for node in nodes:
            text = node.text.lower()

            # 添加内容分类
            node.metadata["category"] = self.category

            # 基于关键词的自动标签
            tags = []
            if any(kw in text for kw in ["python", "django", "flask", "fastapi"]):
                tags.append("python")
            if any(kw in text for kw in ["javascript", "react", "vue", "node"]):
                tags.append("javascript")
            if any(kw in text for kw in ["rust", "ownership", "cargo"]):
                tags.append("rust")
            if any(kw in text for kw in ["向量", "索引", "embedding", "检索"]):
                tags.append("rag-core")
            node.metadata["tags"] = ", ".join(tags) if tags else "general"

            # 内容质量评分(简单启发式)
            score = 0
            if len(text) > 100:
                score += 1
            if any(kw in text for kw in ["因此", "所以", "总结", "关键", "核心"]):
                score += 1
            if "?" in text or "?" in text:
                score += 1  # 包含问题,可能有价值
            node.metadata["quality_score"] = score

        return nodes


# 构建带元数据增强的完整管道
documents = [
    Document(text="Python 的 FastAPI 框架专注于构建高性能 REST API。FastAPI 基于类型提示自动生成 API 文档,并支持异步处理。"),
    Document(text="向量索引是 RAG 系统的核心组件。它通过 Embedding 模型将文本转化为向量,并使用近似最近邻算法进行高效检索。"),
    Document(text="React 是 Meta 开发的前端 UI 库。React 使用虚拟 DOM 和组件化架构,使 UI 开发更加高效和可维护。"),
]

pipeline = IngestionPipeline(
    transformations=[
        SentenceSplitter(chunk_size=256, chunk_overlap=30),
        MetadataEnricher(category="tech-docs"),
        OpenAIEmbedding(model="text-embedding-3-small"),
    ],
)

nodes = pipeline.run(documents=documents)

# 查看增强后的元数据
for i, node in enumerate(nodes):
    print(f"节点 {i + 1}:")
    print(f"  文本: {node.text[:60]}...")
    print(f"  分类: {node.metadata.get('category')}")
    print(f"  标签: {node.metadata.get('tags')}")
    print(f"  质量分: {node.metadata.get('quality_score')}")
    print()

# 利用元数据进行过滤检索
from llama_index.core.vector_stores import MetadataFilters, ExactMatchFilter

# 只检索 Python 相关的内容
filters = MetadataFilters(
    filters=[
        ExactMatchFilter(key="tags", value="python"),
    ]
)

index = VectorStoreIndex(nodes=nodes)
query_engine = index.as_query_engine(filters=filters)
response = query_engine.query("FastAPI 有什么特点?")
print(f"过滤检索结果: {response.response}")
索引生命周期管理:
import os
os.environ["OPENAI_API_KEY"] = "sk-your-api-key-here"

from llama_index.core import VectorStoreIndex, Document, StorageContext
from llama_index.core.node_parser import SentenceSplitter
from llama_index.embeddings.openai import OpenAIEmbedding

embed_model = OpenAIEmbedding(model="text-embedding-3-small")
splitter = SentenceSplitter(chunk_size=256)

# ===== 1. 创建索引 =====
initial_docs = [
    Document(text="Python 3.12 引入了更强大的类型系统改进。", doc_id="py-001"),
    Document(text="JavaScript ES2024 新增了 Array.groupBy 方法。", doc_id="js-001"),
]

nodes = splitter.get_nodes_from_documents(initial_docs)
index = VectorStoreIndex(nodes=nodes, embed_model=embed_model)
print(f"初始索引: {len(index.docstore.docs)} 个文档节点")


# ===== 2. 增量添加文档(insert)=====
new_doc = Document(
    text="Rust 2024 Edition 带来了改进的异步编程支持和更好的错误处理。",
    doc_id="rust-001",
)
new_nodes = splitter.get_nodes_from_documents([new_doc])
index.insert_nodes(new_nodes)
print(f"添加后: {len(index.docstore.docs)} 个文档节点")


# ===== 3. 智能增量更新(refresh)=====
# refresh() 会比较文档内容,只更新发生变化的文档
# 未变化的文档会被跳过,节省 Embedding API 调用成本

updated_docs = [
    Document(text="Python 3.12 引入了更强大的类型系统改进。", doc_id="py-001"),       # 未变
    Document(text="JavaScript ES2025 新增了多个实用 API 和语法特性。", doc_id="js-001"),   # 已更新
    Document(text="Go 1.22 版本增强了泛型支持和循环语义。", doc_id="go-001"),              # 新增
]

refreshed = index.refresh_ref_docs(updated_docs)
print(f"刷新后: {len(index.docstore.docs)} 个文档节点")
print(f"更新状态: {refreshed}")
# refreshed 是一个布尔列表,表示每个文档是否被更新
# [False, True, True] → py-001 未变,js-001 更新了,go-001 新增了


# ===== 4. 删除文档 =====
# 通过 doc_id 删除
index.delete_ref_doc("rust-001", delete_from_docstore=True)
print(f"删除后: {len(index.docstore.docs)} 个文档节点")


# ===== 5. 索引持久化与加载 =====
# 保存到磁盘
index.storage_context.persist(persist_dir="./index_storage")
print("索引已保存到磁盘")

# 从磁盘加载(避免重新 Embedding)
from llama_index.core import load_index_from_storage

storage_context = StorageContext.from_defaults(persist_dir="./index_storage")
loaded_index = load_index_from_storage(
    storage_context,
    embed_model=embed_model,  # 加载时仍需要 Embedding 模型来向量化查询
)
print(f"从磁盘加载了 {len(loaded_index.docstore.docs)} 个文档节点")

# 验证加载后的索引可用
query_engine = loaded_index.as_query_engine()
response = query_engine.query("JavaScript 有什么新特性?")
print(f"查询结果: {response.response}")
大规模数据下的索引分片策略:
"""
当文档量非常大时(如数十万份文档),可以采用以下策略:

1. 使用支持分布式的外部向量数据库(Milvus、Qdrant Cloud)
2. 分批次构建索引,避免内存溢出
3. 使用 IngestionPipeline 的缓存和去重机制
"""
import os
os.environ["OPENAI_API_KEY"] = "sk-your-api-key-here"

from llama_index.core import VectorStoreIndex, Document, StorageContext
from llama_index.core.ingestion import IngestionPipeline
from llama_index.core.node_parser import SentenceSplitter
from llama_index.embeddings.openai import OpenAIEmbedding

embed_model = OpenAIEmbedding(model="text-embedding-3-small")

# 模拟大批量文档
all_documents = []
for i in range(100):
    all_documents.append(
        Document(
            text=f"这是第 {i + 1} 份技术文档的内容。它包含了关于分布式系统设计的重要知识,包括一致性哈希、数据分片、副本策略等核心概念。",
            doc_id=f"tech-doc-{i + 1:04d}",
            metadata={"batch": i // 20, "category": "distributed-systems"},
        )
    )

# 分批处理策略
BATCH_SIZE = 20

pipeline = IngestionPipeline(
    transformations=[
        SentenceSplitter(chunk_size=256, chunk_overlap=20),
        embed_model,
    ],
)

# 创建空索引
index = VectorStoreIndex(nodes=[], embed_model=embed_model)

# 分批处理和添加
for batch_start in range(0, len(all_documents), BATCH_SIZE):
    batch = all_documents[batch_start:batch_start + BATCH_SIZE]
    print(f"处理批次 {batch_start // BATCH_SIZE + 1}: "
          f"文档 {batch_start + 1}-{batch_start + len(batch)}")

    # 使用管道处理当前批次
    nodes = pipeline.run(documents=batch)

    # 添加到索引
    index.insert_nodes(nodes)

    print(f"  完成,当前索引共 {len(index.docstore.docs)} 个节点")

print(f"\n索引构建完成,共 {len(index.docstore.docs)} 个节点")

# 验证索引
query_engine = index.as_query_engine(similarity_top_k=3)
response = query_engine.query("分布式系统的一致性哈希是什么?")
print(f"\n查询结果: {response.response}")
本章小结
在本章中,我们系统学习了 LlamaIndex 的核心技术体系:
数据加载与预处理(2.1节):
- Documents & Nodes:理解了 LlamaIndex 的两个核心数据结构及其关系
- 数据连接器:掌握了 SimpleDirectoryReader、LlamaParse、LlamaHub 等不同数据源的接入方式
- 文本分割器:对比了 SentenceSplitter、TokenTextSplitter、SentenceWindowNodeParser 等不同分割策略
- 摄取管道:学会了使用 IngestionPipeline 构建完整的数据预处理流水线
- 元数据提取:掌握了自动和自定义元数据提取,以及内容质量过滤
索引技术(2.2节):
- VectorStoreIndex:最常用的向量索引,适用于绝大多数 RAG 场景
- PropertyGraphIndex:知识图谱索引,适用于多跳推理和实体关系分析
- SummaryIndex:摘要索引,适用于全局概览和小规模文档
- 索引优化:元数据增强、增量更新、持久化、大规模数据处理
在下一篇中,我们将深入探讨 LlamaIndex 的查询引擎、高级 RAG 优化策略、Agent 框架和工作流编排,帮助你构建生产级的 LLM 应用。
附录:常见问题与实践建议
常见问题解答(FAQ)
Q1:LlamaIndex 的 from_documents() 和 from_nodes() 有什么区别?
from_documents() 是一个高层封装,它内部会依次执行三个步骤:文本分割(通过默认的 NodeParser)、Embedding 向量化、存入向量库。适合快速原型开发。
from_nodes() 则假设你已经准备好了 Node 对象(包括已经手动分割好的文本和已经生成的 Embedding),直接将它们存入向量库。适合你已经通过 IngestionPipeline 预处理过数据的情况。
选择建议:如果你需要对数据预处理过程进行精细控制(如自定义分割策略、元数据提取等),应该先用 IngestionPipeline 处理文档得到 Node,再用 from_nodes() 构建索引。如果你只是想快速跑通一个原型,直接用 from_documents() 即可。
Q2:chunk_size 应该设置为多少才合适?
这是 RAG 系统中被问得最多的问题之一。答案是:取决于你的数据特点和查询模式。
一般性建议:
- 通用问答场景:chunk_size = 512 tokens 是一个不错的起点,它在信息完整性和检索精确性之间取得了较好的平衡
- 长文档分析场景:如果你需要 LLM 理解较长的上下文(如法律条款、合同文本),可以增大到 1024-2048 tokens
- 精确定位场景:如果你需要非常精确地找到特定信息(如 API 文档中的某个参数说明),可以减小到 128-256 tokens
- chunk_overlap:通常设置为 chunk_size 的 10%-20%,如 chunk_size=512 时,chunk_overlap=50-100
实验方法:准备一组测试问题,分别使用不同的 chunk_size(如 128、256、512、1024),对比检索结果的相关性和 LLM 生成回答的质量,找到最佳平衡点。
Q3:如何评估 RAG 系统的检索质量?
评估 RAG 系统需要从两个维度入手:
-
检索质量评估(检索到的文档是否相关):
-
准备一组"问题-相关文档段落"的测试集
-
对每个问题执行检索,检查返回的文档是否包含期望的段落
-
计算命中率(Hit Rate)、平均倒数排名(MRR)等指标
-
-
生成质量评估(LLM 的回答是否正确):
-
准备一组"问题-标准答案"的测试集
-
让 RAG 系统回答问题,然后评估回答的准确性
-
可以使用另一个 LLM 作为评判者(LLM-as-Judge),评估回答的正确性、完整性和相关性
-
LlamaIndex 官方推荐使用 RAGAS(RAG Assessment)框架来进行系统化的 RAG 评估,它提供了 faithfulness(忠实度)、answer_relevancy(回答相关性)、context_precision(上下文精确度)等多个评估维度。
Q4:我的数据量很大(几十万份文档),应该怎么处理?
大规模数据的 RAG 系统需要特别注意以下几个方面:
-
使用外部向量数据库:不要使用默认的内存向量库(SimpleVectorStore),而应该使用 Chroma、Qdrant 或 Milvus 等支持持久化和高效检索的外部向量数据库。其中 Milvus 特别适合超大规模场景(百万级以上向量)。
-
分批构建索引:不要一次性加载所有文档,应该分批次处理(如每批 1000 份),避免内存溢出。
-
启用增量摄取:使用 IngestionPipeline 的 docstore 和 cache 机制,只处理新增和变化的文档,避免重复消耗 Embedding API 的费用。
-
考虑分区索引:如果数据分布在多个领域或部门,可以为每个领域创建独立的索引,查询时先路由到相关索引再检索,减少搜索空间。
-
优化 Embedding 成本:使用本地的 Embedding 模型(如 HuggingFace 的 bge 系列)可以大幅降低大规模数据的向量化成本。
Q5:VectorStoreIndex 和外部向量数据库的关系是什么?
VectorStoreIndex 是 LlamaIndex 的索引接口,它定义了"如何将文本转化为向量并存储"、"如何从索引中检索相关文本"等操作。而 Chroma、Qdrant、Milvus 等是具体的向量数据库实现,它们负责实际的向量存储和近似最近邻搜索计算。
两者的关系类似于"接口"和"实现"的关系:VectorStoreIndex 通过 StorageContext 与具体的向量数据库对接。在开发阶段,你可以使用默认的内存向量库快速原型验证;在生产环境中,切换到外部向量数据库来获得持久化、高性能的检索能力,而不需要修改其他代码。
Q6:如何选择合适的 Embedding 模型?
Embedding 模型的选择需要综合考虑以下因素:
-
语言支持:如果你的数据主要是中文,应该选择对中文优化过的模型(如 BAAI/bge-large-zh-v1.5);如果是多语言混合数据,选择多语言模型(如 OpenAI 的 text-embedding-3 系列)
-
维度大小:维度越高,表达能力越强,但存储和计算成本也越高。常见选择:
-
512 维:轻量级,适合大规模数据和预算有限的场景
-
1024-1536 维:标准选择,在质量和成本间取得平衡
-
3072 维:高质量,适合对检索精度要求极高的场景
-
-
成本考虑:OpenAI 的 Embedding API 按 token 计费,大规模数据需要考虑成本。HuggingFace 的开源模型可以在本地运行,没有额外的 API 费用
-
性能基准:可以参考 MTEB(Massive Text Embedding Benchmark)排行榜来对比不同模型在各任务上的表现
实践检查清单
在将 RAG 系统部署到生产环境之前,请逐项检查以下内容:
数据预处理阶段:
- [ ] 所有数据源的文件格式都被正确解析(特别是 PDF 中的表格和图片)
- [ ] 文本分割策略经过实验验证,chunk_size 和 chunk_overlap 设置合理
- [ ] 低质量内容(空白页、目录页、乱码等)已被过滤
- [ ] 关键元数据(来源、作者、时间、分类)已被正确提取
- [ ] 敏感信息(个人隐私、商业机密)已被脱敏处理
索引构建阶段:
- [ ] 选择了合适的 Embedding 模型(语言匹配、维度合理)
- [ ] 使用了持久化的外部向量数据库(非内存向量库)
- [ ] 建立了增量更新机制,新文档可以被自动纳入索引
- [ ] 建立了去重机制,避免重复文档导致检索结果偏向
- [ ] 索引的存储路径和备份策略已规划
查询与检索阶段:
- [ ] 检索的 top_k 参数经过调优(太小可能漏掉相关内容,太大可能引入噪音)
- [ ] 设置了合理的元数据过滤器,缩小检索范围
- [ ] Prompt 模板经过优化,能引导 LLM 生成高质量的回答
- [ ] 设置了"无法回答"的兜底机制(当检索不到相关内容时,诚实告知用户)
- [ ] 记录查询日志,便于后续分析和优化
2.3 存储系统(Storage)
LlamaIndex 的存储系统是整个 RAG 管线的核心基础设施。当你把文档切分成 Node 并生成 Embedding 向量后,这些数据需要一个高效、可靠的地方存放——这就是存储系统要解决的问题。
2.3.1 存储分层设计
LlamaIndex 的五层存储架构
LlamaIndex 采用了一种精巧的分层存储架构,将不同类型的数据交给不同的存储层管理。这种设计的好处是:每一层都可以独立替换和扩展,你可以根据业务需求自由组合。
graph LR
    %% 全局连线中性化样式
    linkStyle default stroke:#888888,stroke-width:2px;

    %% 外层方向:整体容器保持水平横向排布
    direction LR

    %% ==========================================
    %% STORAGE CONTEXT CONTAINER (外层全透明虚线大框)
    %% ==========================================
    subgraph StorageContext [StorageContext 统一存储上下文管理器]
        direction LR

        %% ==========================================
        %% 第一列:核心数据资产存储 (Vector & Doc)
        %% ==========================================
        subgraph Col_1 [数据结构层]
            direction TB
            VectorStore[VectorStore<br>向量存储]
            DocStore[DocStore<br>文档存储]
        end

        %% ==========================================
        %% 第二列:拓扑与对话状态存储 (Graph & Chat)
        %% ==========================================
        subgraph Col_2 [关系与状态层]
            direction TB
            GraphStore[GraphStore<br>图存储]
            ChatStore[ChatStore<br>聊天存储]
        end

        %% ==========================================
        %% 第三列:元数据路由存储 (Index)
        %% ==========================================
        subgraph Col_3 [索引控制层]
            direction TB
            IndexStore[IndexStore<br>索引存储]
        end

    end

    %% ==========================================
    %% 视觉与排版美学硬编码样式定义 (Dual-Mode Adaptive)
    %% ==========================================
    %% 外部大框:优雅的透明度与无底色虚线框
    classDef transparentBox fill:none,stroke:#888888,stroke-width:1.5px,stroke-dasharray: 5 5;
    class StorageContext,Col_1,Col_2,Col_3 transparentBox;

    %% 内部实体节点:移除冗长描述,采用对称的高饱和度极客色块(文字强制纯白)
    style VectorStore fill:#0078d4,stroke:#0078d4,color:#ffffff,font-weight:bold;
    style DocStore fill:#7a24db,stroke:#7a24db,color:#ffffff,font-weight:bold;

    style GraphStore fill:#d83b01,stroke:#d83b01,color:#ffffff,font-weight:bold;
    style ChatStore fill:#666666,stroke:#666666,color:#ffffff,font-weight:bold;

    style IndexStore fill:#107c41,stroke:#107c41,color:#ffffff,font-weight:bold;
| 存储层 | 存储内容 | 典型后端 |
|---|---|---|
| VectorStore | Node 的 Embedding 向量 | Chroma、Milvus、Pinecone、Qdrant |
| DocStore | 原始 Document 和 Node 对象 | SimpleDocumentStore、MongoDB、Redis |
| IndexStore | 索引结构元数据(如树的节点关系) | SimpleIndexStore |
| GraphStore | 知识图谱数据(实体与关系) | NebulaGraph、Neo4j |
| ChatStore | 对话历史消息 | SimpleChatStore |
一、VectorStore(向量存储)
VectorStore 是最核心的存储层,负责保存每个 Node 对应的 Embedding 向量,并支持高效的相似度检索。当用户发起查询时,系统会把查询文本也转成向量,然后在 VectorStore 中找到最相似的 Node 返回。
1. Chroma:轻量级本地向量数据库
Chroma 是一个非常适合开发和测试的轻量级向量数据库。它无需额外部署,数据可以直接存在本地磁盘上。对于中小规模的应用(几十万条向量以内),Chroma 完全够用。
安装依赖:
pip install llama-index-vector-stores-chroma chromadb
完整代码示例:
import chromadb
from llama_index.core import VectorStoreIndex, StorageContext, SimpleDirectoryReader
from llama_index.vector_stores.chroma import ChromaVectorStore

# ---- 第一步:初始化 Chroma 客户端 ----
# chromadb.PersistentClient 会将数据持久化到指定目录
# 你也可以用 chromadb.EphemeralClient() 创建纯内存实例(关闭后数据丢失)
chroma_client = chromadb.PersistentClient(path="./chroma_db")

# ---- 第二步:创建或获取 Collection ----
# Collection 类似于数据库中的"表",用于存放一组向量数据
# get_or_create_collection 表示如果不存在就创建,已存在就复用
chroma_collection = chroma_client.get_or_create_collection(
    name="my_documents",
    metadata={"description": "教程文档集合"}  # 可选的集合描述
)

# ---- 第三步:将 Chroma 适配为 LlamaIndex 的 VectorStore ----
vector_store = ChromaVectorStore(chroma_collection=chroma_collection)

# ---- 第四步:构建 StorageContext ----
# StorageContext 是 LlamaIndex 的统一存储上下文,
# 它将各种存储层组合在一起,供 Index 使用
storage_context = StorageContext.from_defaults(vector_store=vector_store)

# ---- 第五步:加载文档并构建索引 ----
# 加载数据(假设 ./data 目录下有一些文本文件)
documents = SimpleDirectoryReader("./data").load_data()

# 构建 VectorStoreIndex 时,LlamaIndex 会自动:
# 1. 将文档切分为 Node
# 2. 为每个 Node 生成 Embedding 向量
# 3. 将向量存入 Chroma
index = VectorStoreIndex.from_documents(
    documents,
    storage_context=storage_context,
    show_progress=True  # 显示进度条
)

# ---- 第六步:使用索引进行查询 ----
query_engine = index.as_query_engine()
response = query_engine.query("LlamaIndex 支持哪些存储后端?")
print(response)

# ---- 第七步:从已有的 Chroma 数据恢复索引(下次运行时) ----
# 下次运行时不需要重新构建索引,直接从持久化的 Chroma 中恢复
chroma_client_2 = chromadb.PersistentClient(path="./chroma_db")
chroma_collection_2 = chroma_client_2.get_collection("my_documents")
vector_store_2 = ChromaVectorStore(chroma_collection=chroma_collection_2)
index_restored = VectorStoreIndex.from_vector_store(vector_store_2)
query_engine_2 = index_restored.as_query_engine()
response_2 = query_engine_2.query("LlamaIndex 支持哪些存储后端?")
print(response_2)
Chroma 的距离度量:
Chroma 默认使用 L2(欧氏距离),也支持 Cosine(余弦距离)和 Inner Product(内积)。你可以在创建 Collection 时指定:
chroma_collection = chroma_client.create_collection(
    name="my_docs_cosine",
    metadata={"hnsw:space": "cosine"}  # 使用余弦距离
    # 可选值:"l2"(默认)、"cosine"、"ip"(内积)
)
2. Milvus:分布式向量数据库
Milvus(包括其轻量版 Milvus Lite)是一个专为大规模向量检索设计的分布式数据库,适合生产环境中千万级甚至亿级向量的存储与检索。
安装依赖:
pip install llama-index-vector-stores-milvus pymilvus
完整代码示例:
from llama_index.core import VectorStoreIndex, StorageContext, SimpleDirectoryReader
from llama_index.vector_stores.milvus import MilvusVectorStore

# ---- 第一步:初始化 MilvusVectorStore ----
# uri 参数:
#   - "./milvus_demo.db"  :使用 Milvus Lite(本地文件模式,适合开发)
#   - "http://localhost:19530" :连接本地部署的 Milvus 服务
#   - "https://xxx.cloud.zilliz.com:19530" :连接 Zilliz Cloud(托管服务)
#
# token 参数:
#   - Milvus Lite 不需要 token
#   - 生产环境需要提供认证 token
#
# dim 参数:
#   - 必须与你的 Embedding 模型输出维度一致
#   - OpenAI text-embedding-3-small: 1536 维
#   - BAAI/bge-small-zh-v1.5: 512 维
vector_store = MilvusVectorStore(
    uri="./milvus_demo.db",       # Milvus Lite 本地模式
    token="",                     # 本地模式不需要 token
    collection_name="llama_docs", # 集合名称
    dim=1536,                     # Embedding 维度(与模型匹配)
    overwrite=False,              # False = 复用已有数据;True = 清空重建
    # 高级索引参数(可选)
    index_config={"index_type": "AUTOINDEX"},  # 自动选择索引类型
    search_config={"nprobe": 10},              # 搜索时探测的聚类数(越大越精确,越慢)
)

# ---- 第二步:构建存储上下文并创建索引 ----
storage_context = StorageContext.from_defaults(vector_store=vector_store)

documents = SimpleDirectoryReader("./data").load_data()
index = VectorStoreIndex.from_documents(
    documents,
    storage_context=storage_context,
    show_progress=True
)

# ---- 第三步:查询 ----
query_engine = index.as_query_engine(similarity_top_k=5)
response = query_engine.query("Milvus 和 Chroma 有什么区别?")
print(response)

# ---- 附加:生产环境连接示例(Zilliz Cloud) ----
# from llama_index.vector_stores.milvus import MilvusVectorStore
# production_store = MilvusVectorStore(
#     uri="https://your-instance.cloud.zilliz.com:19530",
#     token="your-api-token-here",
#     collection_name="production_docs",
#     dim=1536,
#     overwrite=False,
# )
3. Pinecone:云原生向量数据库
Pinecone 是一个完全托管的云原生向量数据库服务,无需运维,提供高可用和自动扩缩容。适合希望减少运维负担的团队。
安装依赖:
pip install llama-index-vector-stores-pinecone pinecone-client
完整代码示例:
import os
from pinecone import Pinecone, ServerlessSpec
from llama_index.core import VectorStoreIndex, StorageContext, SimpleDirectoryReader
from llama_index.vector_stores.pinecone import PineconeVectorStore

# ---- 第一步:初始化 Pinecone 客户端 ----
# 从环境变量读取 API Key(安全实践,不要硬编码)
# 设置方式:export PINECONE_API_KEY="your-api-key"(Linux/Mac)
# 或:set PINECONE_API_KEY=your-api-key(Windows)
pc = Pinecone(api_key=os.environ.get("PINECONE_API_KEY"))

# ---- 第二步:创建索引(如果不存在) ----
INDEX_NAME = "llama-tutorial"
EMBEDDING_DIM = 1536  # 与你的 Embedding 模型维度一致

if INDEX_NAME not in [idx.name for idx in pc.list_indexes()]:
    pc.create_index(
        name=INDEX_NAME,
        dimension=EMBEDDING_DIM,
        metric="cosine",  # 距离度量:cosine / euclidean / dotproduct
        spec=ServerlessSpec(
            cloud="aws",       # 云服务商:aws / gcp / azure
            region="us-west-2" # 区域
        )
    )

# ---- 第三步:获取索引引用并适配为 LlamaIndex VectorStore ----
pinecone_index = pc.Index(INDEX_NAME)
vector_store = PineconeVectorStore(
    pinecone_index=pinecone_index,
    namespace="tutorial-ns"  # 命名空间,用于在同一个索引中隔离不同数据集
)

# ---- 第四步:构建索引 ----
storage_context = StorageContext.from_defaults(vector_store=vector_store)
documents = SimpleDirectoryReader("./data").load_data()
index = VectorStoreIndex.from_documents(
    documents,
    storage_context=storage_context,
    show_progress=True
)

# ---- 第五步:查询 ----
query_engine = index.as_query_engine()
response = query_engine.query("Pinecone 的优势是什么?")
print(response)
4. 其他向量存储引擎简介
| 引擎 | 特点 | 安装命令 | 适用场景 |
|---|---|---|---|
| Qdrant | Rust 编写,高性能,支持丰富的过滤条件 | pip install llama-index-vector-stores-qdrant |
需要复杂元数据过滤的场景 |
| Weaviate | 内置模块化向量化、GraphQL 接口 | pip install llama-index-vector-stores-weaviate |
需要多模态搜索的场景 |
| FAISS | Facebook 开源,纯内存计算,极快 | pip install llama-index-vector-stores-faiss |
离线实验、对延迟要求极高的场景 |
| PostgreSQL + pgvector | 复用已有 PG 数据库 | pip install llama-index-vector-stores-postgres |
已有 PG 生态的团队 |
| Elasticsearch | 全文搜索 + 向量混合 | pip install llama-index-vector-stores-elasticsearch |
需要全文搜索+向量混合检索 |
FAISS 快速示例(纯内存向量存储,速度极快):
import faiss
from llama_index.core import VectorStoreIndex, StorageContext, SimpleDirectoryReader
from llama_index.vector_stores.faiss import FaissVectorStore

# 创建 FAISS 索引
# faiss.IndexFlatL2 是精确 L2 距离搜索(暴力搜索,适合小数据集)
# 对于大数据集,可以使用 faiss.IndexIVFFlat 等近似索引
d = 1536  # Embedding 维度
faiss_index = faiss.IndexFlatL2(d)

vector_store = FaissVectorStore(faiss_index=faiss_index)
storage_context = StorageContext.from_defaults(vector_store=vector_store)

documents = SimpleDirectoryReader("./data").load_data()
index = VectorStoreIndex.from_documents(
    documents,
    storage_context=storage_context,
    show_progress=True
)

# 查询
query_engine = index.as_query_engine()
response = query_engine.query("FAISS 的性能特点是什么?")
print(response)

# FAISS 索引持久化(FAISS 自身的方法)
faiss.write_index(faiss_index, "faiss_index.bin")

# 下次加载
loaded_faiss_index = faiss.read_index("faiss_index.bin")
loaded_vector_store = FaissVectorStore(faiss_index=loaded_faiss_index)
Qdrant 快速示例:
import qdrant_client
from llama_index.core import VectorStoreIndex, StorageContext, SimpleDirectoryReader
from llama_index.vector_stores.qdrant import QdrantVectorStore

# 本地模式(数据存在磁盘上)
client = qdrant_client.QdrantClient(path="./qdrant_data")

# 或者连接远程 Qdrant 服务
# client = qdrant_client.QdrantClient(
#     url="http://localhost:6333",
#     api_key="your-api-key"  # 如果需要认证
# )

vector_store = QdrantVectorStore(
    client=client,
    collection_name="my_collection"
)

storage_context = StorageContext.from_defaults(vector_store=vector_store)
documents = SimpleDirectoryReader("./data").load_data()
index = VectorStoreIndex.from_documents(
    documents,
    storage_context=storage_context,
    show_progress=True
)
5. 性能优化:批量写入、索引参数调优与距离度量选择
批量写入优化
当你有大量文档需要索引时,逐条写入会非常慢。LlamaIndex 支持批量写入来提升吞吐量:
from llama_index.core import VectorStoreIndex, StorageContext
from llama_index.core.node_parser import SentenceSplitter
from llama_index.core import SimpleDirectoryReader

# 加载并切分文档
documents = SimpleDirectoryReader("./data").load_data()
splitter = SentenceSplitter(chunk_size=512, chunk_overlap=50)
nodes = splitter.get_nodes_from_documents(documents)

# 使用 insert_nodes 批量写入(内部会自动分批处理)
# 对于 Pinecone/Milvus 等外部服务,LlamaIndex 会自动使用批量 API
index = VectorStoreIndex(
    nodes=nodes,
    storage_context=storage_context,
    insert_batch_size=100,  # 每批写入 100 个 Node(部分 VectorStore 支持此参数)
    show_progress=True
)
索引参数调优
不同的向量数据库支持不同的索引类型,选择正确的索引类型对检索性能至关重要:
| 索引类型 | 特点 | 适用数据量 |
|---|---|---|
| Flat(暴力搜索) | 100% 精确,但速度慢 | < 10 万条 |
| IVF(倒排文件) | 近似搜索,速度快 | 10 万 ~ 1000 万条 |
| HNSW(分层导航小世界图) | 高召回率,内存占用大 | 100 万 ~ 5000 万条 |
| AUTOINDEX | 让数据库自动选择 | 不确定时 |
距离度量选择指南
| 度量方式 | 数学公式 | 适用场景 |
|---|---|---|
| Cosine(余弦相似度) | 1 - cos(θ) | 最常用,只关注方向不关注长度,适合文本语义匹配 |
| L2(欧氏距离) | √Σ(xi-yi)² | 关注绝对距离,适合归一化后的向量 |
| Inner Product(内积) | Σ(xi*yi) | 向量已归一化时等价于 Cosine,计算更快 |
经验法则:如果你不确定该选哪个,选 Cosine。大多数文本 Embedding 模型(如 OpenAI、BGE 系列)的输出向量都适合用余弦相似度来衡量。
二、DocStore(文档存储)
DocStore 负责存储原始的 Document 和 Node 对象(不是向量,而是文本本身)。为什么需要单独存储文档?因为向量检索只能返回最相似的向量,但有时你需要获取完整的原始文档内容,或者在检索后进行"重排"时需要访问原始文本。
SimpleDocumentStore(默认内置):
from llama_index.core.storage.docstore import SimpleDocumentStore
from llama_index.core import StorageContext, VectorStoreIndex, SimpleDirectoryReader

# 创建内存文档存储
docstore = SimpleDocumentStore()

# 也可以通过本地目录持久化
# 数据会以 JSON 文件的形式保存到指定目录
docstore = SimpleDocumentStore.from_persist_dir("./storage")

# 手动向 DocStore 中添加文档
documents = SimpleDirectoryReader("./data").load_data()
docstore.add_documents(documents)

# 构建包含 DocStore 的存储上下文
storage_context = StorageContext.from_defaults(docstore=docstore)

# 构建索引(此时 Node 的原始文本会存储在 DocStore 中)
index = VectorStoreIndex.from_documents(
    documents,
    storage_context=storage_context
)

# 持久化整个存储上下文
storage_context.persist(persist_dir="./storage")
MongoDB 作为 DocStore 后端(适合大规模生产环境):
pip install llama-index-storage-docstore-mongodb
from llama_index.storage.docstore.mongodb import MongoDocumentStore
from llama_index.core import StorageContext, VectorStoreIndex, SimpleDirectoryReader

# 连接 MongoDB(请替换为你自己的连接字符串)
docstore = MongoDocumentStore.from_uri(
    uri="mongodb://localhost:27017",
    db_name="llama_index_db",
    namespace="my_app_docs"
)

storage_context = StorageContext.from_defaults(docstore=docstore)
documents = SimpleDirectoryReader("./data").load_data()
index = VectorStoreIndex.from_documents(
    documents,
    storage_context=storage_context
)
Redis 作为 DocStore 后端(高性能内存存储):
pip install llama-index-storage-docstore-redis
from llama_index.storage.docstore.redis import RedisDocumentStore
from llama_index.core import StorageContext, VectorStoreIndex, SimpleDirectoryReader

docstore = RedisDocumentStore.from_host_and_port(
    host="localhost",
    port=6379,
    namespace="llama_docs"
)

storage_context = StorageContext.from_defaults(docstore=docstore)
documents = SimpleDirectoryReader("./data").load_data()
index = VectorStoreIndex.from_documents(
    documents,
    storage_context=storage_context
)
三、IndexStore(索引存储)
IndexStore 存储的是索引的结构元数据。例如,对于 TreeIndex(树索引),它需要存储树的层级结构信息;对于 KeywordTableIndex,它需要存储关键词到 Node 的映射关系。
from llama_index.core.storage.index_store import SimpleIndexStore
from llama_index.core import StorageContext

# 创建内存索引存储
index_store = SimpleIndexStore()

# 从持久化目录加载
index_store = SimpleIndexStore.from_persist_dir("./storage")

# 集成到 StorageContext
storage_context = StorageContext.from_defaults(
    index_store=index_store
)

# 持久化
storage_context.persist(persist_dir="./storage")
说明:对于最常用的
VectorStoreIndex,IndexStore 的作用相对较小(因为向量本身已经存储在 VectorStore 中了)。但如果你使用TreeIndex、KeywordTableIndex或KnowledgeGraphIndex,IndexStore 就变得很重要。
四、GraphStore(图存储)
GraphStore 用于存储知识图谱数据——实体(Entity)和关系(Relation)。当你使用 KnowledgeGraphIndex 时,数据会被存储到 GraphStore 中。
pip install llama-index-graph-stores-nebula
from llama_index.graph_stores.nebula import NebulaGraphStore
from llama_index.core import KnowledgeGraphIndex, StorageContext, SimpleDirectoryReader

# 连接 NebulaGraph 集群
# NebulaGraph 是一个开源的分布式图数据库
graph_store = NebulaGraphStore(
    space_name="llama_graph",           # 图空间名称
    edge_types=["relationship"],         # 边类型
    rel_prop_names=["name"],             # 关系属性名
    tags=["entity"],                     # 节点标签
)

storage_context = StorageContext.from_defaults(graph_store=graph_store)

documents = SimpleDirectoryReader("./data").load_data()

# 构建知识图谱索引
# LLM 会自动从文档中提取实体和关系
kg_index = KnowledgeGraphIndex.from_documents(
    documents,
    storage_context=storage_context,
    max_triplets_per_chunk=10,  # 每个文本块最多提取的三元组数量
    include_embeddings=True,    # 同时生成向量(支持向量+图混合检索)
    show_progress=True
)

# 查询知识图谱
query_engine = kg_index.as_query_engine()
response = query_engine.query("张三和李四之间有什么关系?")
print(response)
五、ChatStore(聊天存储)
ChatStore 专门存储对话历史消息,供 ChatEngine 在多轮对话中使用。
from llama_index.core.storage.chat_store import SimpleChatStore
from llama_index.core.memory import ChatMemoryBuffer

# 创建内存聊天存储
chat_store = SimpleChatStore()

# 从持久化目录加载
# chat_store = SimpleChatStore.from_persist_path("./chat_store.json")

# 将 ChatStore 与 ChatMemoryBuffer 结合使用
memory = ChatMemoryBuffer.from_defaults(
    token_limit=3000,       # 记忆窗口大小(以 token 计)
    chat_store=chat_store,  # 指定底层的 ChatStore
    chat_store_key="user_1" # 用户标识(用于多用户场景)
)

# 使用 ChatEngine 时传入 memory
chat_engine = index.as_chat_engine(memory=memory)

# 多轮对话
response1 = chat_engine.chat("LlamaIndex 是什么?")
print(f"AI: {response1}")

response2 = chat_engine.chat("它支持哪些向量数据库?")  # 会自动携带上文
print(f"AI: {response2}")

# 持久化聊天记录
chat_store.persist(persist_path="./chat_store.json")
六、StorageContext:统一存储上下文管理
StorageContext 是把所有存储层粘合在一起的"胶水"。通过 StorageContext.from_defaults(),你可以一次性配置所有存储层。
完整配置示例:
import chromadb
from llama_index.core import (
    VectorStoreIndex, StorageContext, SimpleDirectoryReader,
    Settings
)
from llama_index.core.storage.docstore import SimpleDocumentStore
from llama_index.core.storage.index_store import SimpleIndexStore
from llama_index.core.storage.chat_store import SimpleChatStore
from llama_index.vector_stores.chroma import ChromaVectorStore

# ---- 分别创建各个存储层 ----

# 1. VectorStore:使用 Chroma
chroma_client = chromadb.PersistentClient(path="./chroma_db")
chroma_collection = chroma_client.get_or_create_collection("my_docs")
vector_store = ChromaVectorStore(chroma_collection=chroma_collection)

# 2. DocStore:使用本地持久化的 SimpleDocumentStore
docstore = SimpleDocumentStore()

# 3. IndexStore:使用本地持久化的 SimpleIndexStore
index_store = SimpleIndexStore()

# 4. ChatStore:使用 SimpleChatStore
chat_store = SimpleChatStore()

# ---- 组装 StorageContext ----
storage_context = StorageContext.from_defaults(
    vector_store=vector_store,
    docstore=docstore,
    index_store=index_store,
    chat_store=chat_store,
)

# ---- 构建索引 ----
documents = SimpleDirectoryReader("./data").load_data()
index = VectorStoreIndex.from_documents(
    documents,
    storage_context=storage_context,
    show_progress=True
)

# ---- 一次性持久化所有存储层 ----
storage_context.persist(persist_dir="./full_storage")
print("所有存储层已持久化到 ./full_storage 目录")

# ---- 下次运行时从持久化目录恢复 ----
# from llama_index.core import load_index_from_storage
# restored_storage_context = StorageContext.from_defaults(
#     docstore=SimpleDocumentStore.from_persist_dir("./full_storage"),
#     vector_store=ChromaVectorStore(
#         chroma_collection=chromadb.PersistentClient(path="./chroma_db")
#             .get_collection("my_docs")
#     ),
#     index_store=SimpleIndexStore.from_persist_dir("./full_storage"),
# )
# restored_index = load_index_from_storage(restored_storage_context)
2.3.2 企业级扩展
一、自定义存储接口开发
在某些场景下,你可能需要将向量存储到自己的专有系统中(比如公司内部的数据库)。LlamaIndex 提供了清晰的接口让你快速接入。
继承 BasePydanticVectorStore 实现自定义 VectorStore:
from typing import Any, Dict, List, Optional
from llama_index.core.vector_stores.types import (
    BasePydanticVectorStore,
    VectorStoreQuery,
    VectorStoreQueryResult,
)
from llama_index.core.schema import TextNode, BaseNode
import numpy as np


class MyCustomVectorStore(BasePydanticVectorStore):
    """
    自定义向量存储示例。
    这里用一个简单的内存字典来模拟,实际项目中你可以替换为任何后端。
    """

    # stores_text 表明此 VectorStore 是否同时存储原始文本
    # True = 不需要额外的 DocStore;False = 需要配合 DocStore 使用
    stores_text: bool = True

    # 内部数据结构
    _data: Dict[str, dict] = {}  # node_id -> {embedding, text, metadata}

    def __init__(self, **kwargs: Any) -> None:
        """初始化自定义 VectorStore"""
        super().__init__(**kwargs)
        self._data = {}

    @classmethod
    def class_name(cls) -> str:
        """返回类名,用于序列化"""
        return "MyCustomVectorStore"

    def add(
        self,
        nodes: List[BaseNode],
        **add_kwargs: Any,
    ) -> List[str]:
        """
        将一批 Node 添加到向量存储中。

        参数:
            nodes: 要添加的 Node 列表(每个 Node 包含 text、embedding、metadata 等)
            add_kwargs: 额外参数

        返回:
            添加的 Node ID 列表
        """
        ids = []
        for node in nodes:
            node_id = node.node_id
            self._data[node_id] = {
                "embedding": node.embedding,       # Embedding 向量(list of float)
                "text": node.get_content(),         # 原始文本内容
                "metadata": node.metadata,          # 元数据字典
                "ref_doc_id": node.ref_doc_id,      # 关联的原始文档 ID
            }
            ids.append(node_id)
        return ids

    def delete(self, ref_doc_id: str, **delete_kwargs: Any) -> None:
        """
        删除指定文档关联的所有 Node。

        参数:
            ref_doc_id: 原始文档的 ID(删除该文档产生的所有 Node)
        """
        ids_to_delete = [
            node_id for node_id, data in self._data.items()
            if data.get("ref_doc_id") == ref_doc_id
        ]
        for node_id in ids_to_delete:
            del self._data[node_id]

    def query(
        self,
        query: VectorStoreQuery,
        **kwargs: Any,
    ) -> VectorStoreQueryResult:
        """
        执行向量相似度查询。

        参数:
            query: 查询对象,包含:
                - query_embedding: 查询向量
                - similarity_top_k: 返回最相似的 top_k 个结果
                - filters: 元数据过滤条件(可选)
            kwargs: 额外参数

        返回:
            VectorStoreQueryResult,包含 nodes、similarities、ids
        """
        query_embedding = np.array(query.query_embedding)
        top_k = query.similarity_top_k or 5

        # 计算查询向量与所有存储向量的余弦相似度
        similarities = []
        ids = []
        nodes = []

        for node_id, data in self._data.items():
            if data["embedding"] is None:
                continue

            # 余弦相似度计算
            stored_embedding = np.array(data["embedding"])
            dot_product = np.dot(query_embedding, stored_embedding)
            norm_product = np.linalg.norm(query_embedding) * np.linalg.norm(stored_embedding)
            similarity = float(dot_product / norm_product) if norm_product > 0 else 0.0

            similarities.append(similarity)
            ids.append(node_id)

            # 构建返回的 Node 对象
            node = TextNode(
                id_=node_id,
                text=data["text"],
                metadata=data["metadata"],
                embedding=data["embedding"],
            )
            nodes.append(node)

        # 按相似度降序排列,取 top_k
        if similarities:
            sorted_indices = np.argsort(similarities)[::-1][:top_k]
            similarities = [similarities[i] for i in sorted_indices]
            ids = [ids[i] for i in sorted_indices]
            nodes = [nodes[i] for i in sorted_indices]

        return VectorStoreQueryResult(
            nodes=nodes,
            similarities=similarities,
            ids=ids,
        )


# ---- 使用自定义 VectorStore ----
from llama_index.core import VectorStoreIndex, StorageContext, SimpleDirectoryReader

custom_vector_store = MyCustomVectorStore()
storage_context = StorageContext.from_defaults(vector_store=custom_vector_store)

documents = SimpleDirectoryReader("./data").load_data()
index = VectorStoreIndex.from_documents(
    documents,
    storage_context=storage_context,
    show_progress=True
)

query_engine = index.as_query_engine()
response = query_engine.query("测试自定义向量存储")
print(response)
二、多租户隔离方案
在 SaaS 应用中,你需要确保不同租户(客户)的数据互相隔离。以下是两种常见方案:
方案一:元数据过滤实现租户隔离
from llama_index.core import VectorStoreIndex, SimpleDirectoryReader
from llama_index.core.schema import TextNode
from llama_index.core.vector_stores.types import MetadataFilter, MetadataFilters

# 假设你已经有了一个全局索引
documents = SimpleDirectoryReader("./data").load_data()
index = VectorStoreIndex.from_documents(documents)

# ---- 写入时:为每个 Node 添加 tenant_id 元数据 ----
# 在实际应用中,你可以在数据接入阶段就为文档打上租户标签
nodes = []
for doc in documents:
    doc.metadata["tenant_id"] = "tenant_001"  # 标记所属租户
    node = TextNode(text=doc.text, metadata=doc.metadata)
    nodes.append(node)

# ---- 查询时:通过 MetadataFilters 过滤租户数据 ----
# 这样只会检索属于 tenant_001 的数据
filters = MetadataFilters(
    filters=[
        MetadataFilter(
            key="tenant_id",       # 元数据字段名
            value="tenant_001",    # 目标租户 ID
            operator="eq"          # 操作符:eq(等于)、ne(不等于)、in(包含于列表)
        )
    ]
)

# 在查询引擎中应用过滤条件
query_engine = index.as_query_engine(
    filters=filters,
    similarity_top_k=5
)
response = query_engine.query("查找租户相关的文档")
print(response)
方案二:独立索引空间方案
import chromadb
from llama_index.core import VectorStoreIndex, StorageContext, SimpleDirectoryReader
from llama_index.vector_stores.chroma import ChromaVectorStore

# 为每个租户创建独立的 Collection
chroma_client = chromadb.PersistentClient(path="./chroma_db")

def get_tenant_index(tenant_id: str, documents=None):
    """
    获取指定租户的索引。
    每个租户使用独立的 Chroma Collection,实现物理隔离。

    参数:
        tenant_id: 租户唯一标识
        documents: 要索引的文档列表(仅在首次创建时需要)
    返回:
        VectorStoreIndex 实例
    """
    collection_name = f"tenant_{tenant_id}"
    collection = chroma_client.get_or_create_collection(collection_name)
    vector_store = ChromaVectorStore(chroma_collection=collection)
    storage_context = StorageContext.from_defaults(vector_store=vector_store)

    if documents:
        index = VectorStoreIndex.from_documents(
            documents,
            storage_context=storage_context,
            show_progress=True
        )
    else:
        index = VectorStoreIndex.from_vector_store(vector_store)

    return index


# 租户 A 的索引
tenant_a_docs = SimpleDirectoryReader("./tenant_a_data").load_data()
tenant_a_index = get_tenant_index("A", tenant_a_docs)

# 租户 B 的索引
tenant_b_docs = SimpleDirectoryReader("./tenant_b_data").load_data()
tenant_b_index = get_tenant_index("B", tenant_b_docs)

# 各自查询互不干扰
response_a = tenant_a_index.as_query_engine().query("租户 A 的问题")
response_b = tenant_b_index.as_query_engine().query("租户 B 的问题")
三、数据安全管控
向量加密存储与访问控制策略:
import os
import hashlib
from typing import Optional
from llama_index.core import VectorStoreIndex, SimpleDirectoryReader
from llama_index.core.schema import TextNode


class AccessControlManager:
    """
    访问控制管理器示例。
    在生产环境中,你应该使用成熟的权限管理框架(如 Casbin、OPA)。
    """

    def __init__(self):
        # 模拟用户权限映射:user_id -> 允许访问的 doc_categories
        self.user_permissions = {
            "user_admin": ["public", "internal", "confidential"],
            "user_employee": ["public", "internal"],
            "user_guest": ["public"],
        }

    def get_allowed_categories(self, user_id: str) -> list:
        """获取用户允许访问的文档类别"""
        return self.user_permissions.get(user_id, [])

    def can_access(self, user_id: str, doc_category: str) -> bool:
        """检查用户是否有权访问某个文档类别"""
        allowed = self.get_allowed_categories(user_id)
        return doc_category in allowed


# 使用元数据标记文档的安全级别
documents = SimpleDirectoryReader("./data").load_data()

# 为文档添加安全级别标签
for doc in documents:
    # 在实际应用中,安全级别可以从文档属性、文件路径等推断
    doc.metadata["security_level"] = "internal"  # public / internal / confidential
    doc.metadata["department"] = "engineering"

# 构建索引
index = VectorStoreIndex.from_documents(documents)

# 查询时根据用户权限过滤
acl = AccessControlManager()
user_id = "user_employee"
allowed_levels = acl.get_allowed_categories(user_id)

from llama_index.core.vector_stores.types import MetadataFilter, MetadataFilters

# 只允许用户访问其权限范围内的文档
security_filters = MetadataFilters(
    filters=[
        MetadataFilter(
            key="security_level",
            value=allowed_levels,
            operator="in"  # security_level 在允许列表中
        )
    ]
)

query_engine = index.as_query_engine(filters=security_filters)
response = query_engine.query("公司内部技术规范是什么?")
print(response)
四、持久化与恢复
完整的持久化与恢复流程:
from llama_index.core import (
    VectorStoreIndex, StorageContext, SimpleDirectoryReader,
    load_index_from_storage, Settings
)
from llama_index.core.storage.docstore import SimpleDocumentStore
from llama_index.core.storage.index_store import SimpleIndexStore
from llama_index.embeddings.openai import OpenAIEmbedding

PERSIST_DIR = "./my_index_storage"

# ==========================================
# 第一次运行:构建索引并持久化
# ==========================================
def build_and_persist():
    """构建索引并保存到磁盘"""
    documents = SimpleDirectoryReader("./data").load_data()

    # 构建索引
    index = VectorStoreIndex.from_documents(
        documents,
        show_progress=True
    )

    # 持久化到指定目录
    # 这会保存 DocStore、IndexStore 和 VectorStore(如果使用默认的 InMemoryVectorStore)
    index.storage_context.persist(persist_dir=PERSIST_DIR)
    print(f"索引已持久化到 {PERSIST_DIR}")
    return index


# ==========================================
# 后续运行:从磁盘恢复索引
# ==========================================
def load_from_disk():
    """从持久化目录恢复索引"""
    # 恢复存储上下文
    storage_context = StorageContext.from_defaults(
        persist_dir=PERSIST_DIR
    )

    # 从存储上下文恢复索引
    index = load_index_from_storage(storage_context)
    print(f"索引已从 {PERSIST_DIR} 恢复")
    return index


# 运行逻辑
if not os.path.exists(PERSIST_DIR):
    index = build_and_persist()
else:
    index = load_from_disk()

# 使用恢复的索引查询
query_engine = index.as_query_engine()
response = query_engine.query("测试恢复后的索引")
print(response)
云端存储集成(以 AWS S3 为例):
pip install fsspec s3fs
import os
from llama_index.core import VectorStoreIndex, StorageContext, SimpleDirectoryReader

# ---- 方法一:先本地持久化,再上传到 S3 ----
PERSIST_DIR = "./local_storage"
S3_BUCKET = "s3://my-llamaindex-bucket/index_storage"

# 1. 构建并本地持久化
documents = SimpleDirectoryReader("./data").load_data()
index = VectorStoreIndex.from_documents(documents, show_progress=True)
index.storage_context.persist(persist_dir=PERSIST_DIR)

# 2. 上传到 S3(使用 AWS CLI 或 boto3)
import subprocess
subprocess.run([
    "aws", "s3", "sync", PERSIST_DIR, S3_BUCKET
], check=True)
print(f"索引已上传到 {S3_BUCKET}")

# ---- 方法二:从 S3 下载并恢复 ----
# 1. 从 S3 下载到本地临时目录
LOCAL_RESTORE_DIR = "./restored_storage"
os.makedirs(LOCAL_RESTORE_DIR, exist_ok=True)
subprocess.run([
    "aws", "s3", "sync", S3_BUCKET, LOCAL_RESTORE_DIR
], check=True)

# 2. 恢复索引
from llama_index.core import load_index_from_storage
storage_context = StorageContext.from_defaults(persist_dir=LOCAL_RESTORE_DIR)
restored_index = load_index_from_storage(storage_context)

query_engine = restored_index.as_query_engine()
response = query_engine.query("从 S3 恢复的索引测试")
print(response)
2.4 查询与生成(Querying & Synthesis)
查询与生成是 RAG 管线的"最后一公里"——将用户的自然语言问题转化为基于文档知识的精准回答。LlamaIndex 提供了两大核心引擎:
- QueryEngine(查询引擎):适合单轮问答场景,一个查询对应一个回答
- ChatEngine(聊天引擎):适合多轮对话场景,能理解和维护对话上下文
2.4.1 引擎核心能力
查询引擎(QueryEngine)
QueryEngine 的完整工作流程如下:
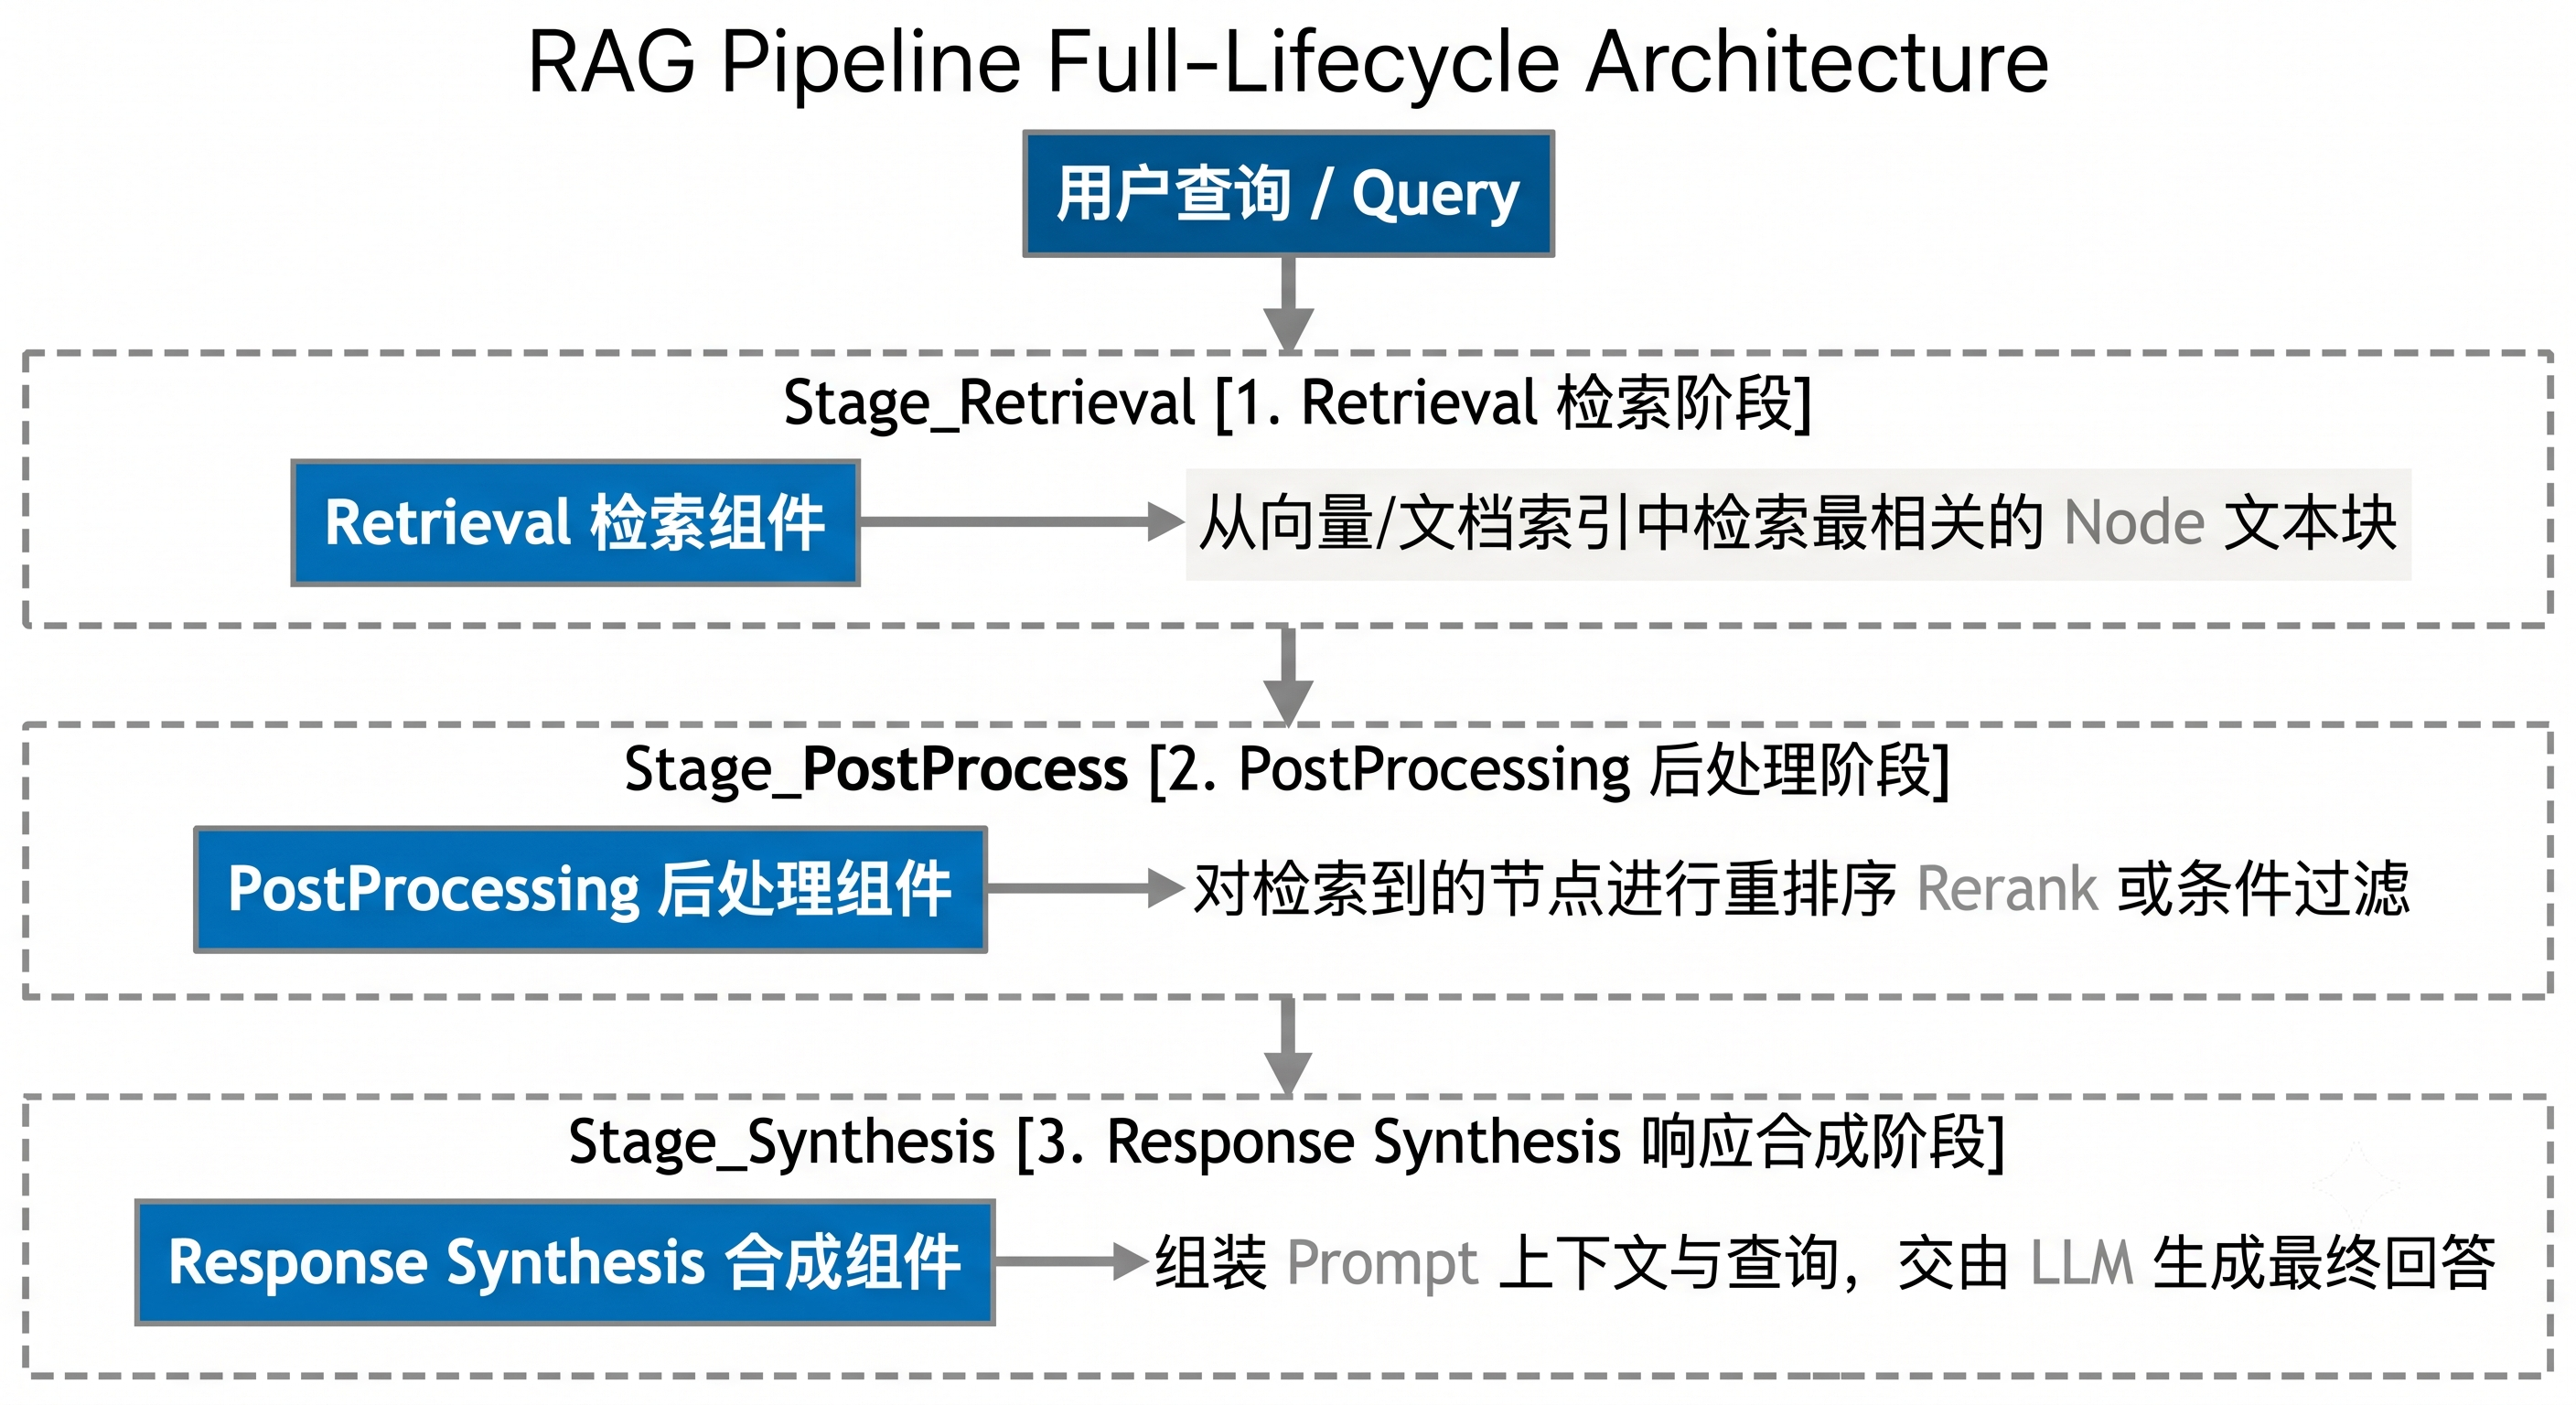
基本使用方式:
from llama_index.core import VectorStoreIndex, SimpleDirectoryReader

# 构建索引
documents = SimpleDirectoryReader("./data").load_data()
index = VectorStoreIndex.from_documents(documents, show_progress=True)

# 创建查询引擎(最简单的用法)
query_engine = index.as_query_engine()

# 执行查询
response = query_engine.query("LlamaIndex 的核心组件有哪些?")
print(f"回答:{response}")

# 获取响应中的源文档信息
print("\n来源文档:")
for node_with_score in response.source_nodes:
    print(f"  - 相似度: {node_with_score.score:.4f}")
    print(f"    文本: {node_with_score.node.get_content()[:100]}...")
主要 QueryEngine 类型
1. RetrieverQueryEngine(默认查询引擎)
这是最常用的查询引擎,也是 index.as_query_engine() 默认返回的类型。它的工作流程就是上面描述的"检索 → 后处理 → 合成"三步走。
from llama_index.core import VectorStoreIndex, SimpleDirectoryReader
from llama_index.core.query_engine import RetrieverQueryEngine
from llama_index.core.response_synthesizers import get_response_synthesizer

documents = SimpleDirectoryReader("./data").load_data()
index = VectorStoreIndex.from_documents(documents)

# 显式创建 RetrieverQueryEngine
# 第一步:创建 Retriever
retriever = index.as_retriever(similarity_top_k=5)

# 第二步:创建 ResponseSynthesizer
response_synthesizer = get_response_synthesizer(
    response_mode="compact"  # 使用紧凑模式
)

# 第三步:组装 QueryEngine
query_engine = RetrieverQueryEngine(
    retriever=retriever,
    response_synthesizer=response_synthesizer,
    # node_postprocessors=[...],  # 可选的后处理器列表
)

response = query_engine.query("默认查询引擎的工作流程是什么?")
print(response)
2. TransformQueryEngine:查询改写
有时候用户的问题写得不够好,直接拿去检索效果差。TransformQueryEngine 可以先对查询进行改写/扩展,再执行检索。
from llama_index.core import VectorStoreIndex, SimpleDirectoryReader
from llama_index.core.query_engine import TransformQueryEngine
from llama_index.core.indices.query.query_transform.base import StepDecomposeQueryTransform

documents = SimpleDirectoryReader("./data").load_data()
index = VectorStoreIndex.from_documents(documents)

# 先创建基础查询引擎
base_query_engine = index.as_query_engine()

# 使用 StepDecomposeQueryTransform 将复杂问题分解为子问题
# 例如:"LlamaIndex 的存储和查询有什么区别?"
# 会被分解为:
#   子问题1:"LlamaIndex 的存储系统是什么?"
#   子问题2:"LlamaIndex 的查询系统是什么?"
query_transform = StepDecomposeQueryTransform()

transform_query_engine = TransformQueryEngine(
    query_engine=base_query_engine,
    query_transform=query_transform,
)

response = transform_query_engine.query(
    "LlamaIndex 的存储系统和查询系统各自的设计目标是什么?它们是如何协同工作的?"
)
print(response)
3. RouterQueryEngine:多索引路由
当你有多个不同主题的索引时,RouterQueryEngine 可以根据问题自动选择合适的索引来回答。
pip install llama-index-tools-llama-hub
from llama_index.core import VectorStoreIndex, SimpleDirectoryReader, SummaryIndex
from llama_index.core.tools import QueryEngineTool, ToolMetadata
from llama_index.core.query_engine import RouterQueryEngine
from llama_index.core.selectors import LLMSingleSelector

# ---- 创建不同主题的索引 ----
# 假设你有两组不同主题的文档
tech_docs = SimpleDirectoryReader("./tech_docs").load_data()
business_docs = SimpleDirectoryReader("./business_docs").load_data()

tech_index = VectorStoreIndex.from_documents(tech_docs)
business_index = VectorStoreIndex.from_documents(business_docs)

# ---- 为每个索引创建查询工具 ----
tech_engine = tech_index.as_query_engine()
business_engine = business_index.as_query_engine()

query_tools = [
    QueryEngineTool(
        query_engine=tech_engine,
        metadata=ToolMetadata(
            name="tech_docs_engine",
            description="用于查询技术文档,包括架构设计、API 文档、技术规范等",
        ),
    ),
    QueryEngineTool(
        query_engine=business_engine,
        metadata=ToolMetadata(
            name="business_docs_engine",
            description="用于查询商业文档,包括市场分析、财务报告、商业计划等",
        ),
    ),
]

# ---- 创建 RouterQueryEngine ----
# LLMSingleSelector:使用 LLM 来选择最合适的工具
router_engine = RouterQueryEngine(
    selector=LLMSingleSelector.from_defaults(),
    query_engine_tools=query_tools,
    verbose=True  # 打印路由决策过程
)

# LLM 会自动判断问题类型并路由到对应的索引
response = router_engine.query("我们的系统采用了哪些核心技术?")
# → 路由到 tech_docs_engine

response = router_engine.query("第三季度的营收增长了多少?")
# → 路由到 business_docs_engine

print(response)
4. SubQuestionQueryEngine:子问题分解
当一个复杂问题需要从多个索引中获取信息并综合分析时,SubQuestionQueryEngine 会将大问题拆分为多个子问题,分别查询不同的索引,最后合并结果。
from llama_index.core import VectorStoreIndex, SimpleDirectoryReader
from llama_index.core.tools import QueryEngineTool, ToolMetadata
from llama_index.core.query_engine import SubQuestionQueryEngine

# ---- 创建多个索引和查询引擎 ----
tech_docs = SimpleDirectoryReader("./tech_docs").load_data()
business_docs = SimpleDirectoryReader("./business_docs").load_data()

tech_index = VectorStoreIndex.from_documents(tech_docs)
business_index = VectorStoreIndex.from_documents(business_docs)

tech_engine = tech_index.as_query_engine()
business_engine = business_index.as_query_engine()

query_tools = [
    QueryEngineTool(
        query_engine=tech_engine,
        metadata=ToolMetadata(
            name="tech_engine",
            description="技术文档查询引擎",
        ),
    ),
    QueryEngineTool(
        query_engine=business_engine,
        metadata=ToolMetadata(
            name="business_engine",
            description="商业文档查询引擎",
        ),
    ),
]

# ---- 创建 SubQuestionQueryEngine ----
sub_qa_engine = SubQuestionQueryEngine.from_defaults(
    query_engine_tools=query_tools,
    verbose=True  # 打印子问题分解过程
)

# 这个复杂问题会被自动拆分为多个子问题:
# 子问题1(tech_engine):"系统使用了哪些核心技术?"
# 子问题2(business_engine):"这些技术的商业价值是什么?"
response = sub_qa_engine.query(
    "我们的系统采用了哪些核心技术?这些技术带来了怎样的商业价值?"
)
print(response)
5. SQLAutoVectorQueryEngine:SQL + 向量混合查询
当你的数据既有结构化表格又有非结构化文本时,这个引擎可以智能地在 SQL 查询和向量检索之间切换。
pip install llama-index-readers-database sqlalchemy
import sqlalchemy
from llama_index.core import VectorStoreIndex, SimpleDirectoryReader
from llama_index.core.query_engine import SQLAutoVectorQueryEngine, NLSQLTableQueryEngine
from llama_index.core.tools import QueryEngineTool, ToolMetadata
from llama_index.core.objects import ObjectIndex, SQLTableNodeMapping, SQLTableSchema

# ---- 连接数据库 ----
engine = sqlalchemy.create_engine("sqlite:///./my_database.db")

# ---- 创建 SQL 查询引擎 ----
# NLSQLTableQueryEngine 可以将自然语言转换为 SQL 查询
sql_engine = NLSQLTableQueryEngine(
    sql_database=engine,
    tables=["employees", "departments"],  # 指定可查询的表
    verbose=True
)

# ---- 创建向量查询引擎(用于非结构化文档) ----
docs = SimpleDirectoryReader("./text_docs").load_data()
vector_index = VectorStoreIndex.from_documents(docs)
vector_engine = vector_index.as_query_engine()

# ---- 创建 SQLAutoVectorQueryEngine ----
# 它会根据问题类型自动选择 SQL 查询还是向量检索
sql_tool = QueryEngineTool(
    query_engine=sql_engine,
    metadata=ToolMetadata(
        name="sql_engine",
        description="用于查询结构化数据库中的员工和部门信息",
    ),
)
vector_tool = QueryEngineTool(
    query_engine=vector_engine,
    metadata=ToolMetadata(
        name="vector_engine",
        description="用于查询非结构化的公司文档和知识库",
    ),
)

hybrid_engine = SQLAutoVectorQueryEngine(
    sql_query_tool=sql_tool,
    vector_query_tool=vector_tool,
    verbose=True
)

# 自动路由到 SQL 查询
response1 = hybrid_engine.query("工程部门有多少员工?")

# 自动路由到向量检索
response2 = hybrid_engine.query("公司的技术愿景是什么?")
6. 流式输出(Streaming)配置
流式输出可以让 LLM 的回答像"打字机"一样逐字显示,大大改善用户体验(用户不用等整个回答都生成完才能看到内容)。
from llama_index.core import VectorStoreIndex, SimpleDirectoryReader

documents = SimpleDirectoryReader("./data").load_data()
index = VectorStoreIndex.from_documents(documents)

# 启用流式输出:设置 streaming=True
query_engine = index.as_query_engine(streaming=True)

# query() 返回的不再是简单的字符串,而是一个 StreamingResponse 对象
streaming_response = query_engine.query("请详细介绍 LlamaIndex 的架构设计")

# 逐块获取生成的文本
print("回答:", end="", flush=True)
for text_chunk in streaming_response.response_gen:
    print(text_chunk, end="", flush=True)  # 逐块输出
print()  # 换行

# 也可以获取来源信息
print("\n来源文档:")
for source_node in streaming_response.source_nodes:
    print(f"  - [{source_node.score:.3f}] {source_node.node.get_content()[:80]}...")
聊天引擎(ChatEngine)
QueryEngine 适合单轮问答,但现实中的 AI 应用往往需要多轮对话。ChatEngine 在 QueryEngine 的基础上增加了对话记忆(Memory)能力,能够理解"它"、"前面提到的那个"等指代词,也能记住用户之前说过的内容。
ChatEngine vs QueryEngine 的核心区别:
| 特性 | QueryEngine | ChatEngine |
|---|---|---|
| 对话轮次 | 单轮 | 多轮 |
| 上下文记忆 | 无 | 有(ChatMemoryBuffer) |
| 指代消解 | 不支持 | 支持(“它是什么”→ 知道"它"指什么) |
| 适用场景 | 文档 Q&A | 对话式 AI 助手 |
from llama_index.core import VectorStoreIndex, SimpleDirectoryReader
from llama_index.core.memory import ChatMemoryBuffer

# 构建索引
documents = SimpleDirectoryReader("./data").load_data()
index = VectorStoreIndex.from_documents(documents)

# 创建聊天记忆缓冲区
# token_limit 控制记忆的窗口大小:
# 超过这个限制的早期对话会被自动丢弃或摘要化
memory = ChatMemoryBuffer.from_defaults(token_limit=4000)

# 创建聊天引擎
chat_engine = index.as_chat_engine(
    memory=memory,
    verbose=True  # 打印内部处理过程
)

# 多轮对话示例
print("=== 多轮对话演示 ===\n")

# 第一轮
response1 = chat_engine.chat("LlamaIndex 是什么框架?")
print(f"用户: LlamaIndex 是什么框架?")
print(f"AI: {response1}\n")

# 第二轮 —— 使用"它"来指代 LlamaIndex
response2 = chat_engine.chat("它支持哪些存储后端?")
print(f"用户: 它支持哪些存储后端?")
print(f"AI: {response2}\n")

# 第三轮 —— 追问细节
response3 = chat_engine.chat("Chroma 和 Milvus 分别适合什么场景?")
print(f"用户: Chroma 和 Milvus 分别适合什么场景?")
print(f"AI: {response3}\n")

# 第四轮 —— 跨轮次引用
response4 = chat_engine.chat("请帮我总结一下上面讨论的所有内容")
print(f"用户: 请帮我总结一下上面讨论的所有内容")
print(f"AI: {response4}\n")

# 查看对话历史
print("=== 对话历史 ===")
for msg in memory.get_all():
    role = "用户" if msg.role == "user" else "AI"
    print(f"[{role}]: {msg.content[:80]}...")

# 重置对话(清空记忆)
chat_engine.reset()
print("\n对话已重置")
主要 ChatEngine 类型
1. CondenseQuestionChatEngine:问题压缩
工作原理:将用户的新问题结合对话历史,压缩成一个独立的、无歧义的查询,然后交给 QueryEngine 处理。
from llama_index.core import VectorStoreIndex, SimpleDirectoryReader
from llama_index.core.chat_engine import CondenseQuestionChatEngine
from llama_index.core.memory import ChatMemoryBuffer

documents = SimpleDirectoryReader("./data").load_data()
index = VectorStoreIndex.from_documents(documents)

memory = ChatMemoryBuffer.from_defaults(token_limit=4000)

# 创建 CondenseQuestionChatEngine
# 它会先将 "它的最新版本是什么?" 压缩为 "LlamaIndex 的最新版本是什么?"
# 然后再执行检索和生成
chat_engine = CondenseQuestionChatEngine.from_defaults(
    query_engine=index.as_query_engine(),
    memory=memory,
    verbose=True
)

# 对话示例
chat_engine.chat("LlamaIndex 是什么?")
chat_engine.chat("它的最新版本是什么?")  # 会被压缩为独立查询
response = chat_engine.chat("和 LangChain 比有什么优势?")
print(response)
2. ContextChatEngine:上下文注入
工作原理:每次对话时先检索相关文档作为上下文,然后将上下文和用户消息一起发给 LLM。
from llama_index.core import VectorStoreIndex, SimpleDirectoryReader
from llama_index.core.chat_engine import ContextChatEngine
from llama_index.core.memory import ChatMemoryBuffer

documents = SimpleDirectoryReader("./data").load_data()
index = VectorStoreIndex.from_documents(documents)

memory = ChatMemoryBuffer.from_defaults(token_limit=4000)

# ContextChatEngine 在每次对话前都会执行检索
# 适合需要频繁引用文档知识的场景
chat_engine = ContextChatEngine.from_defaults(
    retriever=index.as_retriever(similarity_top_k=3),
    memory=memory,
    system_prompt=(
        "你是一个专业的技术助手。请基于提供的文档内容来回答用户的问题。"
        "如果文档中没有相关信息,请如实告知。"
    ),
    verbose=True
)

response = chat_engine.chat("请介绍一下 LlamaIndex 的存储系统设计")
print(response)
3. CondensePlusContextChatEngine:混合策略(推荐)
结合了问题压缩和上下文注入的优点——既压缩问题消除歧义,又注入检索到的文档上下文。
from llama_index.core import VectorStoreIndex, SimpleDirectoryReader
from llama_index.core.chat_engine import CondensePlusContextChatEngine
from llama_index.core.memory import ChatMemoryBuffer

documents = SimpleDirectoryReader("./data").load_data()
index = VectorStoreIndex.from_documents(documents)

memory = ChatMemoryBuffer.from_defaults(token_limit=4000)

# CondensePlusContextChatEngine 是功能最全面的聊天引擎
# 工作流程:
# 1. 将用户问题 + 对话历史压缩为独立查询
# 2. 使用压缩后的查询检索相关文档
# 3. 将检索到的文档上下文 + 用户消息发给 LLM
chat_engine = CondensePlusContextChatEngine.from_defaults(
    retriever=index.as_retriever(similarity_top_k=3),
    memory=memory,
    system_prompt="你是一个技术文档助手,请基于文档内容准确回答问题。",
    verbose=True
)

# 多轮对话
chat_engine.chat("LlamaIndex 有哪些核心组件?")
chat_engine.chat("存储组件具体支持哪些后端?")
response = chat_engine.chat("帮我对比一下这些后端的优缺点")
print(response)
4. SimpleChatEngine:简单对话
不使用任何文档检索,纯粹的 LLM 对话。适合闲聊或通用问答。
from llama_index.core.chat_engine import SimpleChatEngine
from llama_index.core.memory import ChatMemoryBuffer

memory = ChatMemoryBuffer.from_defaults(token_limit=4000)

# SimpleChatEngine 不依赖任何索引
# 直接使用 LLM 进行对话
chat_engine = SimpleChatEngine.from_defaults(
    memory=memory,
    system_prompt="你是一个友好的 AI 助手,擅长解答编程问题。",
)

response = chat_engine.chat("Python 中列表和元组有什么区别?")
print(response)
聊天历史(ChatHistory)管理
ChatMemoryBuffer 深入配置:
from llama_index.core.memory import ChatMemoryBuffer
from llama_index.core.llms import ChatMessage, MessageRole

# ---- 基本配置 ----
memory = ChatMemoryBuffer.from_defaults(
    token_limit=3000,          # 记忆窗口大小(以 token 计)
    # 超过 token_limit 的早期消息会被自动丢弃
    # 建议值:3000~6000(取决于你的 LLM 上下文窗口大小)
)

# ---- 手动添加消息 ----
memory.put(ChatMessage(role=MessageRole.USER, content="我叫张三"))
memory.put(ChatMessage(role=MessageRole.ASSISTANT, content="你好,张三!有什么可以帮你的?"))

# ---- 获取所有消息 ----
all_messages = memory.get_all()
for msg in all_messages:
    print(f"[{msg.role}]: {msg.content}")

# ---- 获取指定数量的最近消息 ----
recent = memory.get(last_n=5)  # 获取最近 5 条消息

# ---- 重置记忆 ----
memory.reset()

# ---- 与持久化 ChatStore 结合使用 ----
from llama_index.core.storage.chat_store import SimpleChatStore

chat_store = SimpleChatStore()

# 为不同用户创建独立的记忆
user_memories = {}
for user_id in ["user_001", "user_002"]:
    user_memories[user_id] = ChatMemoryBuffer.from_defaults(
        token_limit=3000,
        chat_store=chat_store,
        chat_store_key=user_id  # 每个用户独立的存储 key
    )

# 用户 A 的对话
user_memories["user_001"].put(
    ChatMessage(role=MessageRole.USER, content="我是用户 A")
)

# 用户 B 的对话(完全独立)
user_memories["user_002"].put(
    ChatMessage(role=MessageRole.USER, content="我是用户 B")
)

# 持久化聊天存储
chat_store.persist(persist_path="./chat_history.json")
2.4.2 高级检索增强
检索器(Retriever)
Retriever 是 RAG 管线中负责"找到相关内容"的核心组件。QueryEngine 内部使用的就是 Retriever 来执行检索。你也可以直接使用 Retriever 而不经过 QueryEngine——比如当你只想检索内容、不需要 LLM 生成回答时。
从索引创建 Retriever:
from llama_index.core import VectorStoreIndex, SimpleDirectoryReader

documents = SimpleDirectoryReader("./data").load_data()
index = VectorStoreIndex.from_documents(documents)

# 方式一:从索引创建(最常用)
retriever = index.as_retriever(
    similarity_top_k=5,   # 返回最相似的 5 个 Node
    # 可选参数:
    # filters=MetadataFilters(...)  # 元数据过滤
)

# 执行检索
query_str = "LlamaIndex 的存储架构"
retrieved_nodes = retriever.retrieve(query_str)

# 处理检索结果
print(f"查询: {query_str}")
print(f"检索到 {len(retrieved_nodes)} 个相关 Node:\n")
for i, node_with_score in enumerate(retrieved_nodes):
    print(f"--- Node {i+1} (相似度: {node_with_score.score:.4f}) ---")
    print(f"{node_with_score.node.get_content()[:200]}")
    print(f"元数据: {node_with_score.node.metadata}")
    print()
主要 Retriever 类型
1. VectorIndexRetriever(向量索引检索器)
基于向量相似度进行检索,是最常用的检索方式。
from llama_index.core import VectorStoreIndex, SimpleDirectoryReader

documents = SimpleDirectoryReader("./data").load_data()
index = VectorStoreIndex.from_documents(documents)

# 显式创建 VectorIndexRetriever
from llama_index.core.indices.vector_store.retrievers import VectorIndexRetriever

retriever = VectorIndexRetriever(
    index=index,
    similarity_top_k=5,      # 返回最相似的 5 个结果
    # 高级参数:
    # vector_store_info: 可选的 VectorStoreInfo(用于自动过滤)
    # filters: MetadataFilters  # 元数据过滤条件
)

nodes = retriever.retrieve("向量检索的工作原理")
for node in nodes:
    print(f"[{node.score:.3f}] {node.node.get_content()[:100]}")
2. SummaryIndexRetriever(摘要索引检索器)
返回索引中的所有 Node,适合需要对全部文档做总结的场景。
from llama_index.core import SummaryIndex, SimpleDirectoryReader

documents = SimpleDirectoryReader("./data").load_data()
summary_index = SummaryIndex.from_documents(documents)

# 默认返回所有 Node
retriever = summary_index.as_retriever()
all_nodes = retriever.retrieve("总结所有文档内容")

print(f"总共检索到 {len(all_nodes)} 个 Node")

# SummaryIndexRetriever 常用于"全文总结"场景
# 配合 tree_summarize 响应模式效果最佳
query_engine = summary_index.as_query_engine(
    response_mode="tree_summarize"
)
response = query_engine.query("请对所有文档内容做一个综合总结")
print(response)
3. BM25Retriever(关键词检索)
BM25 是一种经典的基于关键词的检索算法(TF-IDF 的改进版),不需要向量模型,速度快,对精确关键词匹配效果好。
pip install llama-index-retrievers-bm25
from llama_index.core import SimpleDirectoryReader
from llama_index.core.node_parser import SentenceSplitter
from llama_index.retrievers.bm25 import BM25Retriever

# 加载文档并切分为 Node
documents = SimpleDirectoryReader("./data").load_data()
splitter = SentenceSplitter(chunk_size=512, chunk_overlap=50)
nodes = splitter.get_nodes_from_documents(documents)

# 创建 BM25 检索器
bm25_retriever = BM25Retriever.from_defaults(
    nodes=nodes,
    similarity_top_k=5,
    # language="chinese"  # 如果是中文文档,可以指定语言以使用正确的分词器
)

# 关键词检索
results = bm25_retriever.retrieve("LlamaIndex VectorStore Chroma")
print("BM25 关键词检索结果:")
for i, node in enumerate(results):
    print(f"\n--- 结果 {i+1} (分数: {node.score:.3f}) ---")
    print(node.node.get_content()[:200])
4. QueryFusionRetriever(混合检索:向量 + 关键词)
混合检索结合了向量语义检索和 BM25 关键词检索的优势,通过 Reciprocal Rank Fusion(RRF)算法合并两路结果,通常能获得比单一检索更好的效果。
from llama_index.core import VectorStoreIndex, SimpleDirectoryReader
from llama_index.core.node_parser import SentenceSplitter
from llama_index.retrievers.bm25 import BM25Retriever
from llama_index.core.retrievers import QueryFusionRetriever

# 加载和切分文档
documents = SimpleDirectoryReader("./data").load_data()
splitter = SentenceSplitter(chunk_size=512, chunk_overlap=50)
nodes = splitter.get_nodes_from_documents(documents)

# 创建向量索引和检索器
vector_index = VectorStoreIndex(nodes)
vector_retriever = vector_index.as_retriever(similarity_top_k=10)

# 创建 BM25 检索器
bm25_retriever = BM25Retriever.from_defaults(
    nodes=nodes,
    similarity_top_k=10,
)

# 创建混合检索器
fusion_retriever = QueryFusionRetriever(
    retrievers=[
        vector_retriever,   # 第一路:向量语义检索
        bm25_retriever,     # 第二路:BM25 关键词检索
    ],
    retriever_weights=[0.6, 0.4],   # 两路的权重(向量 60%,关键词 40%)
    similarity_top_k=5,             # 最终返回的 top_k
    num_queries=1,                  # 查询改写次数(>1 时会改写查询做多路检索)
    mode="reciprocal_rerank",       # 融合策略:
                                    # "reciprocal_rerank" - RRF 算法(推荐)
                                    # "relative_score" - 相对分数融合
                                    # "dist_based_score" - 距离分数融合
                                    # "simple" - 简单去重合并
    verbose=True,
)

# 执行混合检索
results = fusion_retriever.retrieve("LlamaIndex 的存储系统")
print("混合检索结果:")
for i, node in enumerate(results):
    print(f"\n--- 结果 {i+1} (分数: {node.score:.4f}) ---")
    print(node.node.get_content()[:200])
5. RecursiveRetriever(递归检索)
RecursiveRetriever 实现了"先查索引,再查详情"的两阶段检索策略。适合文档层级较深的场景(比如先找到相关章节,再定位到具体段落)。
from llama_index.core import VectorStoreIndex, SimpleDirectoryReader
from llama_index.core.node_parser import SentenceSplitter
from llama_index.core.retrievers import RecursiveRetriever
from llama_index.core.schema import IndexNode

# ---- 模拟文档层级结构 ----
# 假设有 3 篇长文档,每篇文档有一个摘要 Node 和若干详情 Node

documents = SimpleDirectoryReader("./data").load_data()

# 切分为小粒度 Node(详情 Node)
splitter = SentenceSplitter(chunk_size=256, chunk_overlap=30)
detail_nodes = splitter.get_nodes_from_documents(documents)

# 为每篇文档创建摘要 Node
summary_nodes = []
for i, doc in enumerate(documents):
    summary_text = f"文档 {i+1} 摘要:{doc.text[:200]}"
    summary_node = IndexNode(
        text=summary_text,
        metadata=doc.metadata,
        index_id=f"doc_summary_{i}",  # 用于关联详情 Node
    )
    summary_nodes.append(summary_node)

# 构建摘要索引(第一层:粗略检索)
summary_index = VectorStoreIndex(nodes=summary_nodes)
summary_retriever = summary_index.as_retriever(similarity_top_k=2)

# 构建详情索引(第二层:精确检索)
detail_index = VectorStoreIndex(nodes=detail_nodes)
detail_retriever = detail_index.as_retriever(similarity_top_k=3)

# ---- 创建 RecursiveRetriever ----
# retriever_dict 定义了递归检索的路径
# 当摘要检索器返回一个 IndexNode 时,会自动跳转到对应的详情检索器
recursive_retriever = RecursiveRetriever(
    root_id="summary",  # 根检索器 ID
    retriever_dict={
        "summary": summary_retriever,  # 第一层:摘要检索
        "detail": detail_retriever,    # 第二层:详情检索
    },
    node_dict={
        # IndexNode 的 index_id 到检索器 ID 的映射
        # 当检索到 index_id 为 "doc_summary_X" 的节点时,
        # 会自动使用 "detail" 检索器进行第二层检索
    },
    verbose=True,
)

# 执行递归检索
results = recursive_retriever.retrieve("查找特定技术细节")
for node in results:
    print(f"[{node.score:.3f}] {node.node.get_content()[:150]}")
6. AutoMergingRetriever(自动合并检索)
AutoMergingRetriever 是一个非常智能的检索器:它先用小粒度 Node 检索(精确匹配),然后自动判断是否应该将多个小 Node 合并为父 Node 返回(获取更完整的上下文)。
from llama_index.core import SimpleDirectoryReader
from llama_index.core.node_parser import HierarchicalNodeParser, SentenceSplitter
from llama_index.core.retrievers import AutoMergingRetriever
from llama_index.core import VectorStoreIndex
from llama_index.core.storage.docstore import SimpleDocumentStore

# ---- 第一步:加载文档 ----
documents = SimpleDirectoryReader("./data").load_data()

# ---- 第二步:使用 HierarchicalNodeParser 创建层级节点 ----
# HierarchicalNodeParser 会自动创建多层粒度的 Node:
# 第一层:大粒度(chunk_size ~2048)- 父节点
# 第二层:中粒度(chunk_size ~512) - 子节点
# 第三层:小粒度(chunk_size ~128) - 孙节点
hierarchical_parser = HierarchicalNodeParser.from_defaults(
    chunk_sizes=[2048, 512, 128],  # 三层粒度配置
    chunk_overlap=50,
)
hierarchical_nodes = hierarchical_parser.get_nodes_from_documents(documents)

# ---- 第三步:将最细粒度的 Node 构建索引 ----
# leaf_nodes 是最小粒度的节点(最后一层)
from llama_index.core.node_parser import get_leaf_nodes, get_root_nodes

leaf_nodes = get_leaf_nodes(hierarchical_nodes)
root_nodes = get_root_nodes(hierarchical_nodes)

print(f"总节点数: {len(hierarchical_nodes)}")
print(f"叶子节点数: {len(leaf_nodes)}")
print(f"根节点数: {len(root_nodes)}")

# ---- 第四步:构建 DocStore(存储所有层级的 Node) ----
docstore = SimpleDocumentStore()
docstore.add_documents(hierarchical_nodes)

# ---- 第五步:用叶子节点构建向量索引 ----
vector_index = VectorStoreIndex(leaf_nodes)
base_retriever = vector_index.as_retriever(similarity_top_k=10)

# ---- 第六步:创建 AutoMergingRetriever ----
auto_merging_retriever = AutoMergingRetriever(
    vector_retriever=base_retriever,
    docstore=docstore,
    synthetic_ratio=0.5,  # 合并比例阈值:
                          # 当超过 50% 的子节点被检索到时,
                          # 自动合并为父节点返回
    verbose=True,
)

# ---- 第七步:使用 AutoMergingRetriever 检索 ----
results = auto_merging_retriever.retrieve("请详细解释存储架构的设计原理")
print(f"\n自动合并检索返回了 {len(results)} 个结果")
for i, node in enumerate(results):
    content = node.node.get_content()
    print(f"\n--- 结果 {i+1} ---")
    print(f"文本长度: {len(content)} 字符")
    print(f"内容: {content[:200]}...")
similarity_top_k 参数调优指南
similarity_top_k 决定了检索返回多少个 Node,是影响 RAG 效果的关键参数:
| top_k 值 | 适用场景 | 优缺点 |
|---|---|---|
| 1~3 | 问题很具体,答案在某一段落中 | 精确但可能遗漏相关信息 |
| 4~8 | 通用推荐范围 | 平衡精确度和召回率 |
| 9~15 | 需要综合多个段落的信息 | 上下文更丰富,但可能引入噪声 |
| 15+ | 全文总结类任务 | 成本高,可能超出 LLM 上下文窗口 |
调优建议:
# 实际调优时,可以这样测试不同 top_k 的效果
for top_k in [3, 5, 8, 10]:
    retriever = index.as_retriever(similarity_top_k=top_k)
    results = retriever.retrieve("测试查询")

    # 分析检索结果
    scores = [r.score for r in results]
    print(f"top_k={top_k}: 平均分={sum(scores)/len(scores):.4f}, "
          f"最低分={min(scores):.4f}, 最高分={max(scores):.4f}")
节点后处理器(NodePostprocessor)
后处理器对检索结果进行"二次加工"——在 Retriever 返回 Node 列表后、发送给 LLM 之前,对结果进行重排序、过滤、增强等操作。这是提升 RAG 效果的利器。
Retriever 结果 (top_k=10)
    │
    ▼
┌──────────────────┐
│  Rerank 重排序    │ ← 用更精确的模型重新评分
└──────┬───────────┘
       │
       ▼
┌──────────────────┐
│  关键词过滤       │ ← 过滤掉不包含特定关键词的结果
└──────┬───────────┘
       │
       ▼
┌──────────────────┐
│  相似度过滤       │ ← 去掉相似度太低的结果
└──────┬───────────┘
       │
       ▼
最终结果 (top_n=5)
1. SentenceTransformerRerank(本地模型重排序)
使用轻量级的 Cross-Encoder 模型对检索结果进行重新评分。Cross-Encoder 比 Bi-Encoder(用于初始检索的模型)更精确,但计算成本更高,所以适合对小批量结果做精排。
pip install sentence-transformers
from llama_index.core import VectorStoreIndex, SimpleDirectoryReader
from llama_index.core.postprocessor import SentenceTransformerRerank

documents = SimpleDirectoryReader("./data").load_data()
index = VectorStoreIndex.from_documents(documents)

# 创建重排序后处理器
reranker = SentenceTransformerRerank(
    model="cross-encoder/ms-marco-MiniLM-L-6-v2",  # 重排序模型
    # 常用的重排序模型:
    # - "cross-encoder/ms-marco-MiniLM-L-6-v2"  (英文,轻量)
    # - "cross-encoder/ms-marco-electra-base"    (英文,更精确)
    # - "BAAI/bge-reranker-v2-m3"                (多语言,支持中文)
    top_n=3,  # 重排序后只保留前 3 个结果
)

# 使用重排序器创建查询引擎
query_engine = index.as_query_engine(
    similarity_top_k=10,   # 先检索 10 个
    node_postprocessors=[reranker],  # 再重排为 3 个
)

response = query_engine.query("LlamaIndex 支持哪些后处理器?")
print(response)

# 也可以单独使用重排序器
retriever = index.as_retriever(similarity_top_k=10)
retrieved_nodes = retriever.retrieve("LlamaIndex 后处理器")

# 手动执行重排序
from llama_index.core.schema import QueryBundle
query_bundle = QueryBundle(query_str="LlamaIndex 后处理器")
reranked_nodes = reranker.postprocess_nodes(
    retrieved_nodes,
    query_bundle=query_bundle
)

print(f"重排序前: {len(retrieved_nodes)} 个结果")
print(f"重排序后: {len(reranked_nodes)} 个结果")
for node in reranked_nodes:
    print(f"  [{node.score:.4f}] {node.node.get_content()[:100]}")
2. LLM Rerank(LLM 重排序)
使用大语言模型来判断每个检索结果与查询的相关性。精度最高,但成本也最高。
from llama_index.core import VectorStoreIndex, SimpleDirectoryReader
from llama_index.core.postprocessor import LLMRerank

documents = SimpleDirectoryReader("./data").load_data()
index = VectorStoreIndex.from_documents(documents)

# 使用 LLM 进行重排序
llm_reranker = LLMRerank(
    top_n=3,           # 重排序后保留的结果数
    # choice_batch_size: 每次让 LLM 评估多少个 Node
    # 值越小,LLM 判断越准确,但调用次数越多
    choice_batch_size=5,
)

query_engine = index.as_query_engine(
    similarity_top_k=10,
    node_postprocessors=[llm_reranker],
)

response = query_engine.query("使用 LLM 重排序的效果如何?")
print(response)
3. KeywordNodePostprocessor(关键词过滤)
根据关键词对检索结果进行过滤——可以要求结果必须包含某些词,或者排除包含某些词的结果。
from llama_index.core import VectorStoreIndex, SimpleDirectoryReader
from llama_index.core.postprocessor import KeywordNodePostprocessor

documents = SimpleDirectoryReader("./data").load_data()
index = VectorStoreIndex.from_documents(documents)

# 关键词过滤后处理器
keyword_filter = KeywordNodePostprocessor(
    required_keywords=["LlamaIndex", "存储"],  # 结果中必须包含这些关键词之一
    exclude_keywords=["deprecated", "已废弃"],  # 排除包含这些关键词的结果
    # lang="chinese"  # 中文分词支持
)

query_engine = index.as_query_engine(
    similarity_top_k=10,
    node_postprocessors=[keyword_filter],
)

response = query_engine.query("LlamaIndex 的存储方案有哪些?")
print(response)
4. SimilarityPostprocessor(相似度过滤)
过滤掉相似度低于阈值的结果,避免将不相关的内容发给 LLM。
from llama_index.core import VectorStoreIndex, SimpleDirectoryReader
from llama_index.core.postprocessor import SimilarityPostprocessor

documents = SimpleDirectoryReader("./data").load_data()
index = VectorStoreIndex.from_documents(documents)

# 相似度过滤器
similarity_filter = SimilarityPostprocessor(
    similarity_cutoff=0.7  # 相似度低于 0.7 的结果会被丢弃
    # 阈值设置建议:
    # 0.5 - 宽松,保留较多结果
    # 0.7 - 适中(推荐起始值)
    # 0.85 - 严格,只保留高度相关的结果
)

query_engine = index.as_query_engine(
    similarity_top_k=10,
    node_postprocessors=[similarity_filter],
)

response = query_engine.query("高度相关的存储方案")
print(response)
print(f"通过过滤的源文档数: {len(response.source_nodes)}")
5. MetadataReplacementPostProcessor(元数据替换)
将 Node 的文本内容替换为其元数据中的某个字段值。常见用法:用"窗口文本"(上下文更完整的文本)替换检索时用的短文本。
from llama_index.core import VectorStoreIndex, SimpleDirectoryReader
from llama_index.core.postprocessor import MetadataReplacementPostProcessor
from llama_index.core.node_parser import SentenceWindowNodeParser

documents = SimpleDirectoryReader("./data").load_data()

# SentenceWindowNodeParser 会为每个 Node 创建一个"窗口"
# Node 本身的文本是当前句子(用于精确检索)
# metadata["window_text"] 包含前后若干句的完整上下文(用于生成回答)
window_parser = SentenceWindowNodeParser.from_defaults(
    window_size=3,         # 窗口大小:前后各 3 句
    window_metadata_key="window_text",    # 窗口文本存储的元数据 key
    original_text_metadata_key="original_text",  # 原始文本存储的元数据 key
)
nodes = window_parser.get_nodes_from_documents(documents)

index = VectorStoreIndex(nodes)

# MetadataReplacementPostProcessor 会在检索后将 Node 文本替换为窗口文本
# 这样检索用的是精确的短句,而 LLM 看到的是更完整的上下文
metadata_replacer = MetadataReplacementPostProcessor(
    target_metadata_key="window_text"  # 替换为窗口文本
)

query_engine = index.as_query_engine(
    similarity_top_k=5,
    node_postprocessors=[metadata_replacer],
)

response = query_engine.query("详细描述存储架构的设计")
print(response)
6. LongContextReorder(长上下文重排)
研究表明,LLM 对输入上下文的开头和结尾部分的注意力更强,中间部分容易被忽略。LongContextReorder 将最相关的结果放在开头和结尾,相关性较低的放在中间。
from llama_index.core import VectorStoreIndex, SimpleDirectoryReader
from llama_index.core.postprocessor import LongContextReorder

documents = SimpleDirectoryReader("./data").load_data()
index = VectorStoreIndex.from_documents(documents)

long_context_reorder = LongContextReorder()

query_engine = index.as_query_engine(
    similarity_top_k=8,
    node_postprocessors=[long_context_reorder],
)

response = query_engine.query("LlamaIndex 的所有核心特性")
print(response)
7. 组合多个后处理器(后处理管道)
from llama_index.core import VectorStoreIndex, SimpleDirectoryReader
from llama_index.core.postprocessor import (
    SentenceTransformerRerank,
    SimilarityPostprocessor,
    KeywordNodePostprocessor,
    LongContextReorder,
)

documents = SimpleDirectoryReader("./data").load_data()
index = VectorStoreIndex.from_documents(documents)

# 构建后处理管道(按顺序执行)
postprocessors = [
    # 第一步:相似度过滤(粗筛,去掉明显不相关的)
    SimilarityPostprocessor(similarity_cutoff=0.6),

    # 第二步:重排序(用 Cross-Encoder 精确评分)
    SentenceTransformerRerank(
        model="cross-encoder/ms-marco-MiniLM-L-6-v2",
        top_n=5,
    ),

    # 第三步:关键词过滤(确保结果包含相关术语)
    KeywordNodePostprocessor(
        required_keywords=["LlamaIndex"],
    ),

    # 第四步:长上下文重排(优化给 LLM 的上下文排列顺序)
    LongContextReorder(),
]

# 将后处理管道应用到查询引擎
query_engine = index.as_query_engine(
    similarity_top_k=15,        # 先多检索一些
    node_postprocessors=postprocessors,  # 再层层过滤和精排
)

response = query_engine.query("LlamaIndex 的存储系统设计")
print(f"最终使用的源文档数: {len(response.source_nodes)}")
print(response)
响应合成器(ResponseSynthesizer)
响应合成器是 RAG 管线的最后一步:它将 Retriever 检索到的上下文(经过后处理)和用户的查询一起发送给 LLM,生成最终的回答。不同的响应模式决定了"如何组织和发送这些上下文"。
主要响应模式对比:
| 模式 | 工作原理 | 优点 | 缺点 | 适用场景 |
|---|---|---|---|---|
compact |
将所有 Node 文本合并后一次性发给 LLM | 快速,LLM 调用次数少 | 可能超出上下文窗口 | 默认模式,适合大多数场景 |
refine |
逐个 Node 迭代生成,每次在上一次的基础上优化 | 能充分利用每个 Node 的信息 | 慢(多次 LLM 调用) | 需要详细、全面回答的场景 |
tree_summarize |
构建树形结构,自底向上逐层摘要 | 适合大量 Node | 可能丢失细节 | 全文总结、长文档摘要 |
simple_summarize |
将所有 Node 文本直接拼接后生成一个摘要 | 简单直接 | 可能截断 | 快速摘要 |
generation |
不使用检索结果,仅让 LLM 生成回答 | 不依赖文档 | 可能产生幻觉 | 闲聊、通用问答 |
代码示例:
from llama_index.core import VectorStoreIndex, SimpleDirectoryReader
from llama_index.core.response_synthesizers import get_response_synthesizer

documents = SimpleDirectoryReader("./data").load_data()
index = VectorStoreIndex.from_documents(documents)

# =============================
# 1. Compact 模式(默认,推荐)
# =============================
compact_synthesizer = get_response_synthesizer(
    response_mode="compact",
    # text_qa_template: 可选,自定义 QA 提示词模板
    # refine_template: 可选,自定义精化提示词模板
)

compact_engine = index.as_query_engine(
    response_synthesizer=compact_synthesizer,
    similarity_top_k=5,
)
response = compact_engine.query("LlamaIndex 的存储架构是什么?")
print(f"[Compact] {response}\n")

# =============================
# 2. Refine 模式(迭代精化)
# =============================
# 工作流程:
# 第 1 轮:用 Node1 + 查询 → 生成初始回答
# 第 2 轮:用 Node2 + 初始回答 + 查询 → 精化回答
# 第 3 轮:用 Node3 + 精化回答 + 查询 → 进一步精化
# ...以此类推
refine_synthesizer = get_response_synthesizer(
    response_mode="refine",
    # 可以自定义精化模板
    # refine_template=PromptTemplate(
    #     "基于以下新信息,优化你的回答。\n"
    #     "新问题: {query_str}\n"
    #     "现有回答: {existing_answer}\n"
    #     "新信息: {context_msg}\n"
    #     "优化后的回答: "
    # ),
)

refine_engine = index.as_query_engine(
    response_synthesizer=refine_synthesizer,
    similarity_top_k=5,
)
response = refine_engine.query("请详细介绍 LlamaIndex 的各种存储后端及其适用场景")
print(f"[Refine] {response}\n")

# =============================
# 3. Tree Summarize 模式(树形摘要)
# =============================
# 工作流程:
# 将所有 Node 分组 → 每组生成摘要 → 合并摘要再摘要 → 最终回答
# 类似于 MapReduce 的思想
tree_synthesizer = get_response_synthesizer(
    response_mode="tree_summarize",
    summary_template=None,  # 可选:自定义摘要模板
    # max_tokens: 每次 LLM 调用的最大 token 数
    # num_children: 树结构中每个父节点包含的子节点数(默认 10)
)

tree_engine = index.as_query_engine(
    response_synthesizer=tree_synthesizer,
    similarity_top_k=20,  # 树形摘要适合处理大量 Node
)
response = tree_engine.query("请对所有文档内容做一个全面的总结")
print(f"[Tree Summarize] {response}\n")

# =============================
# 4. Simple Summarize 模式
# =============================
simple_synthesizer = get_response_synthesizer(
    response_mode="simple_summarize",
)

simple_engine = index.as_query_engine(
    response_synthesizer=simple_synthesizer,
    similarity_top_k=5,
)
response = simple_engine.query("简要总结 LlamaIndex 的存储系统")
print(f"[Simple Summarize] {response}\n")

# =============================
# 5. Generation 模式(仅生成,不用检索结果)
# =============================
gen_synthesizer = get_response_synthesizer(
    response_mode="generation",
)

gen_engine = index.as_query_engine(
    response_synthesizer=gen_synthesizer,
)
# 注意:这个模式下 LLM 不会看到任何检索结果
# 完全依赖 LLM 自身的知识来回答
response = gen_engine.query("Python 有哪些优点?")
print(f"[Generation] {response}\n")
流式响应合成:
from llama_index.core import VectorStoreIndex, SimpleDirectoryReader
from llama_index.core.response_synthesizers import get_response_synthesizer

documents = SimpleDirectoryReader("./data").load_data()
index = VectorStoreIndex.from_documents(documents)

# 流式响应合成器
streaming_synthesizer = get_response_synthesizer(
    response_mode="compact",
    streaming=True,  # 启用流式输出
)

streaming_engine = index.as_query_engine(
    response_synthesizer=streaming_synthesizer,
)

# 获取流式响应
streaming_response = streaming_engine.query("请详细介绍 LlamaIndex")

# 逐块输出
print("流式输出:", end="", flush=True)
for text_chunk in streaming_response.response_gen:
    print(text_chunk, end="", flush=True)
print()
自定义提示词模板:
from llama_index.core import VectorStoreIndex, SimpleDirectoryReader
from llama_index.core.prompts import PromptTemplate
from llama_index.core.response_synthesizers import get_response_synthesizer

documents = SimpleDirectoryReader("./data").load_data()
index = VectorStoreIndex.from_documents(documents)

# 自定义 QA 模板
# 可用的变量:
#   {context_str} - 检索到的上下文文本
#   {query_str} - 用户的查询
custom_qa_template = PromptTemplate(
    "你是一个专业的技术文档助手。\n"
    "请基于以下参考文档来回答用户的问题。\n"
    "如果参考文档中没有足够的信息,请明确说明。\n"
    "回答时请引用具体的文档来源。\n\n"
    "参考文档:\n{context_str}\n\n"
    "用户问题:{query_str}\n\n"
    "请给出详细且准确的回答:"
)

# 自定义 Refine 模板(仅 refine 模式需要)
custom_refine_template = PromptTemplate(
    "你是一个专业的技术文档助手。\n"
    "基于以下新信息和已有的回答,优化你的回答。\n"
    "如果新信息没有提供额外价值,保持原回答不变。\n\n"
    "已有回答:{existing_answer}\n\n"
    "新的参考文档:{context_msg}\n\n"
    "用户问题:{query_str}\n\n"
    "优化后的回答:"
)

# 使用自定义模板创建响应合成器
synthesizer = get_response_synthesizer(
    response_mode="refine",
    text_qa_template=custom_qa_template,
    refine_template=custom_refine_template,
)

engine = index.as_query_engine(response_synthesizer=synthesizer)
response = engine.query("LlamaIndex 的存储架构有什么特点?")
print(response)
本章小结
本章深入讲解了 LlamaIndex 的两大核心系统:
存储系统(2.3) 提供了五层分层存储架构,让你可以灵活选择不同的存储后端。从轻量级的 Chroma 到分布式的 Milvus,再到云原生的 Pinecone,每种方案都有其适用场景。通过 StorageContext,你可以将不同的存储层组合在一起,并通过自定义接口扩展到任何专有系统。
查询与生成系统(2.4) 提供了丰富的查询引擎、检索器、后处理器和响应合成器。QueryEngine 适合单轮问答,ChatEngine 适合多轮对话;Retriever 负责找到相关内容,后处理器负责精筛结果,响应合成器负责生成最终回答。通过灵活组合这些组件,你可以构建出适合各种场景的 RAG 应用。
下一章将进入高级主题,包括 Agent(智能体)构建、评估与调试、生产环境部署等内容。
附录:本章涉及的所有安装命令汇总
# 核心依赖
pip install llama-index

# 向量存储
pip install llama-index-vector-stores-chroma chromadb
pip install llama-index-vector-stores-milvus pymilvus
pip install llama-index-vector-stores-pinecone pinecone-client
pip install llama-index-vector-stores-qdrant qdrant-client
pip install llama-index-vector-stores-faiss faiss-cpu

# 文档存储
pip install llama-index-storage-docstore-mongodb
pip install llama-index-storage-docstore-redis

# 图存储
pip install llama-index-graph-stores-nebula

# 检索器
pip install llama-index-retrievers-bm25

# 重排序模型
pip install sentence-transformers

# 云服务
pip install fsspec s3fs
第三章:LlamaIndex 工作流(Workflow)深度开发
LlamaIndex Workflow 是 LlamaIndex 生态中专门用于构建复杂 AI 应用的轻量级事件驱动框架。它不是传统意义上的 DAG(有向无环图)编排工具,而是一套专门为 LLM 应用设计的、支持循环、分支、并发、人机协同的事件驱动系统。
在传统的 LLM 应用中,我们通常使用线性的调用链(Chain)或固定的 DAG 图来组织逻辑。但现实业务往往更加复杂——你可能需要让 LLM 反复自我纠错直到结果满意,或者并行地从多个数据源采集信息再汇聚,又或者在关键节点暂停等待人工审批。这些场景用传统的 Chain/DAG 方式很难优雅地实现,而 LlamaIndex Workflow 正是为了解决这些问题而生的。
核心特性一览:
| 特性 | 说明 |
|---|---|
| 事件驱动 | Step 接收事件 → 处理 → 输出新事件 → 驱动下一步 |
| 状态管理 | Context 对象提供跨 Step 的安全状态共享 |
| 并发执行 | 一个 Step 可发出多个事件,触发多个下游 Step 并行运行 |
| 循环支持 | 天然支持自纠错循环、迭代优化等模式 |
| 人机协同 | 内置 InputRequiredEvent/HumanResponseEvent 暂停/恢复机制 |
| 可观测性 | 支持流式事件输出、可视化流程图、检查点追踪 |
| 轻量简洁 | 纯 Python 实现,无外部依赖,上手极快 |
3.1 工作流核心架构
3.1.1 事件驱动模型
事件驱动 vs 传统 DAG 编排的区别
传统 DAG 编排(如 Airflow、Prefect)将任务定义为节点,用有向边连接形成有向无环图。这种方式有几个限制:
- 不能有环:无法直接实现"生成→评估→不满意就重新生成"这样的循环逻辑
- 静态拓扑:图的结构在运行前就已经确定,无法根据运行时的数据动态决定下一步
- 耦合度高:节点之间通过明确的边连接,增删节点需要修改图结构
LlamaIndex Workflow 采用事件驱动架构,Step 之间没有显式的连接,而是通过事件类型自动路由:
- 一个 Step 声明"我接收 A 类型事件",框架就自动把所有 A 类型事件路由给它
- 一个 Step 返回 B 类型事件,框架就自动找到所有声明接收 B 类型事件的 Step
- 想新增一条分支?只需新增一个 Step 声明接收对应事件即可,无需修改已有代码
核心三要素:Event(事件)、Step(步骤)、Context(上下文)
这三者的关系可以类比为一个现代化的快递系统:
- Event(事件) 就像一个个包裹,里面装着需要传递的数据和指令
- Step(步骤) 就像分拣中心,接收特定类型的包裹,处理后发出新的包裹
- Context(上下文) 就像一个共享的仓库,所有分拣中心都可以向里面存取物品
Event 定义
Event 是工作流中数据流动的载体。所有自定义 Event 都需要继承自 Event 基类(底层基于 Pydantic BaseModel),这保证了事件数据的类型安全。
from llama_index.core.workflow import Event

# ============================================================
# 自定义 Event 类
# ============================================================

class QueryEvent(Event):
    """查询事件:携带用户问题"""
    query: str                      # 用户原始查询
    session_id: str = "default"     # 会话 ID(带默认值)

class RetrievalEvent(Event):
    """检索事件:携带检索到的文档"""
    documents: list                 # 检索到的文档列表
    relevance_scores: list[float]   # 相关性分数列表

class GenerationEvent(Event):
    """生成事件:携带 LLM 生成的结果"""
    generated_text: str             # 生成的文本
    source_documents: list          # 来源文档
    confidence: float               # 置信度分数

class ErrorEvent(Event):
    """错误事件:携带错误信息"""
    error_message: str              # 错误描述
    step_name: str                  # 发生错误的 Step 名称
    retry_count: int = 0            # 重试次数
说明:Event 类本质上就是一个 Pydantic BaseModel,所以你可以使用 Pydantic 的所有特性——默认值、验证器、可选字段等。
内置 Event 类型
框架提供了几个特殊的内置事件,它们在工作流中扮演着关键角色:
| 内置 Event | 说明 |
|---|---|
StartEvent |
工作流的入口事件。当你调用 workflow.run(query="xxx") 时,传入的参数会自动成为 StartEvent 的属性。每个工作流运行都从 StartEvent 开始。 |
StopEvent |
工作流的终止事件。当某个 Step 返回 StopEvent 时,工作流结束,StopEvent.result 的值作为 workflow.run() 的返回值。 |
InputRequiredEvent |
人机协同事件。当 Step 返回此事件时,工作流会暂停,等待外部人工输入。 |
HumanResponseEvent |
人工响应事件。外部完成输入后,通过此事件恢复工作流的执行。 |
from llama_index.core.workflow import (
    Event,
    StartEvent,
    StopEvent,
    InputRequiredEvent,
    HumanResponseEvent,
)

# StartEvent 的用法:
# 调用 workflow.run(query="什么是机器学习?") 后,
# 在接收 StartEvent 的 Step 中可以通过 ev.query 获取参数

# StopEvent 的用法:
# return StopEvent(result="这是最终结果")
# workflow.run() 的返回值就是 "这是最终结果"
Step 定义
Step 是工作流中的处理单元,使用 @step 装饰器标记。一个 Step 本质上是一个异步函数,它接收一个事件作为输入,处理后返回一个新的事件。
from llama_index.core.workflow import Workflow, step, Event, StartEvent, StopEvent

# ============================================================
# @step 装饰器详解
# ============================================================
#
# 基本语法:
#   @step
#   async def step_name(self, ev: InputEventType) -> OutputEventType:
#       ...
#       return OutputEventType(...)
#
# 关键规则:
# 1. 必须用 async def 定义(异步函数)
# 2. 第一个参数(self 之后)是事件参数,类型注解决定了该 Step 接收哪种事件
# 3. 返回值类型注解决定了该 Step 输出哪种事件
# 4. 框架通过类型注解自动完成事件路由,无需手动连接

class SimpleWorkflow(Workflow):
    @step
    async def greet(self, ev: StartEvent) -> StopEvent:
        """
        最简单的 Step:接收 StartEvent,返回 StopEvent
        - ev.name 来自 workflow.run(name="Alice") 的调用参数
        - 返回 StopEvent,工作流结束
        """
        name = ev.get("name", "World")  # 安全获取参数,提供默认值
        greeting = f"Hello, {name}!"
        return StopEvent(result=greeting)


# 运行工作流
import asyncio

async def main():
    w = SimpleWorkflow(timeout=30, verbose=False)
    result = await w.run(name="Alice")
    print(result)  # 输出: Hello, Alice!

asyncio.run(main())
Step 函数的参数规范:
# 标准签名:(self, ev: InputEvent) -> OutputEvent
@step
async def my_step(self, ev: MyEvent) -> ResultEvent:
    ...

# 带 Context 参数:Context 可以放在任意位置(通常在 ev 之前)
@step
async def my_step(self, ctx: Context, ev: MyEvent) -> ResultEvent:
    ...

# 一个 Step 可以发出多种事件(用 Union 或 | 语法)
from typing import Union

@step
async def classifier(self, ev: StartEvent) -> Union[TextEvent, ImageEvent]:
    """根据输入类型返回不同的事件"""
    if ev.get("input_type") == "text":
        return TextEvent(content=ev.get("content"))
    else:
        return ImageEvent(image_path=ev.get("content"))
一个 Step 可以发出多个事件(驱动多个下游):
一个 Step 可以通过 ctx.send_event() 在一次执行中发出多个事件,这些事件会分别触发对应的下游 Step 并行执行。这在并发采集、多路分发等场景中非常有用(详见 3.2.1 并发工作流部分)。
代码示例:最简工作流(2 个 Step + 1 个自定义 Event)
下面是一个完整的、可直接运行的最简工作流示例,展示了事件驱动的核心流程:
"""
最简工作流示例:文本翻译器
流程:StartEvent -> translate_step -> TranslatedEvent -> format_step -> StopEvent
"""
import asyncio
from llama_index.core.workflow import Workflow, step, Event, StartEvent, StopEvent


# 第一步:定义自定义事件
class TranslatedEvent(Event):
    """翻译完成事件"""
    original_text: str   # 原始文本
    translated_text: str # 翻译后的文本
    source_lang: str     # 源语言
    target_lang: str     # 目标语言


# 第二步:定义工作流
class TranslationWorkflow(Workflow):
    """翻译工作流:接收文本 -> 翻译 -> 格式化输出"""

    @step
    async def translate_step(self, ev: StartEvent) -> TranslatedEvent:
        """
        翻译步骤:接收 StartEvent,执行翻译,返回 TranslatedEvent
        注意:实际项目中这里应该调用 LLM 或翻译 API
        """
        text = ev.get("text", "")
        source_lang = ev.get("source_lang", "英文")
        target_lang = ev.get("target_lang", "中文")

        # 模拟翻译逻辑(实际项目中替换为 LLM 调用)
        # 这里用一个简单的字典模拟翻译结果
        mock_translations = {
            "Hello World": "你好,世界",
            "Machine Learning": "机器学习",
            "Event-Driven Architecture": "事件驱动架构",
        }
        translated = mock_translations.get(text, f"[已翻译] {text}")

        print(f"[翻译步骤] 正在将 {source_lang} 翻译为 {target_lang}...")
        print(f"  原文: {text}")
        print(f"  译文: {translated}")

        return TranslatedEvent(
            original_text=text,
            translated_text=translated,
            source_lang=source_lang,
            target_lang=target_lang,
        )

    @step
    async def format_step(self, ev: TranslatedEvent) -> StopEvent:
        """
        格式化步骤:接收 TranslatedEvent,生成格式化输出,返回 StopEvent
        """
        formatted = (
            f"=== 翻译结果 ===\n"
            f"源语言: {ev.source_lang}\n"
            f"目标语言: {ev.target_lang}\n"
            f"原文: {ev.original_text}\n"
            f"译文: {ev.translated_text}\n"
            f"================"
        )

        print(f"[格式化步骤] 生成最终输出")
        return StopEvent(result=formatted)


# 第三步:运行工作流
async def main():
    # 创建工作流实例
    # timeout: 超时时间(秒),超时后工作流会抛出异常
    # verbose: 是否打印详细的运行日志
    workflow = TranslationWorkflow(timeout=60, verbose=False)

    # 运行工作流,传入的参数会成为 StartEvent 的属性
    result = await workflow.run(
        text="Event-Driven Architecture",
        source_lang="英文",
        target_lang="中文",
    )

    print("\n" + result)


if __name__ == "__main__":
    asyncio.run(main())

# 预期输出:
# [翻译步骤] 正在将 英文 翻译为 中文...
#   原文: Event-Driven Architecture
#   译文: 事件驱动架构
# [格式化步骤] 生成最终输出
#
# === 翻译结果 ===
# 源语言: 英文
# 目标语言: 中文
# 原文: Event-Driven Architecture
# 译文: 事件驱动架构
# ================
运行流程解析:
workflow.run(text="...", source_lang="英文", target_lang="中文")创建一个 StartEvent- 框架发现
translate_step接收 StartEvent,自动将事件路由给它translate_step返回 TranslatedEvent- 框架发现
format_step接收 TranslatedEvent,自动路由format_step返回 StopEvent,工作流结束StopEvent.result作为workflow.run()的返回值
3.1.2 核心能力详解
多事件等待(wait_for_event)
在某些场景中,一个 Step 需要等待多个不同类型的事件都到达后才能继续执行。LlamaIndex Workflow 提供了 ctx.wait_for_event() 方法来实现这一点。
"""
多事件等待示例:等待所有数据源就绪后再合并
"""
import asyncio
from llama_index.core.workflow import Workflow, step, Event, StartEvent, StopEvent, Context


class DataSourceReadyEvent(Event):
    """数据源就绪事件"""
    source_name: str
    data: dict

class AllSourcesReadyEvent(Event):
    """所有数据源就绪事件"""
    sources: list

class MergeWorkflow(Workflow):
    @step
    async def load_db(self, ev: StartEvent) -> DataSourceReadyEvent:
        """模拟加载数据库数据"""
        await asyncio.sleep(1)  # 模拟 I/O 延迟
        return DataSourceReadyEvent(
            source_name="database",
            data={"users": 1000, "orders": 5000},
        )

    @step
    async def load_api(self, ev: StartEvent) -> DataSourceReadyEvent:
        """模拟加载 API 数据"""
        await asyncio.sleep(2)  # 模拟更长的 I/O 延迟
        return DataSourceReadyEvent(
            source_name="external_api",
            data={"weather": "sunny", "temperature": 25},
        )

    @step
    async def collect_and_merge(self, ctx: Context, ev: DataSourceReadyEvent) -> StopEvent:
        """
        收集所有数据源的结果并合并。
        使用 Context 累积到达的事件,当所有数据源都就绪后才执行合并。
        """
        # 从 Context 中获取已收集的数据源列表
        collected = await ctx.get("collected_sources", default=[])
        collected.append({
            "source": ev.source_name,
            "data": ev.data,
        })
        await ctx.set("collected_sources", collected)

        # 检查是否已收集到所有数据源(本例中预期 2 个)
        expected_count = 2
        if len(collected) < expected_count:
            # 还没收齐,不返回事件,等待下一个 DataSourceReadyEvent
            return None

        # 所有数据源都已就绪,执行合并
        merged_data = {}
        for source in collected:
            merged_data[source["source"]] = source["data"]

        return StopEvent(result=f"合并完成:{merged_data}")


async def main():
    w = MergeWorkflow(timeout=30, verbose=False)
    result = await w.run()
    print(result)

asyncio.run(main())
手动触发事件:ctx.send_event()
除了通过返回值发出事件,你还可以使用 ctx.send_event() 手动向工作流发送事件。这在需要一次触发多个下游事件时特别有用。
from llama_index.core.workflow import Workflow, step, Event, StartEvent, StopEvent, Context


class TaskEvent(Event):
    """任务事件"""
    task_id: int
    task_name: str

class TaskCompleteEvent(Event):
    """任务完成事件"""
    task_id: int
    result: str


class ParallelTaskWorkflow(Workflow):
    @step
    async def dispatch_tasks(self, ctx: Context, ev: StartEvent) -> None:
        """
        分发任务:一次性发出多个 TaskEvent
        使用 ctx.send_event() 手动发送事件
        返回 None 表示不通过返回值发出事件
        """
        tasks = [
            {"task_id": 1, "task_name": "数据清洗"},
            {"task_id": 2, "task_name": "特征提取"},
            {"task_id": 3, "task_name": "模型训练"},
        ]

        for task in tasks:
            # 手动发送事件到工作流
            ctx.send_event(TaskEvent(**task))

        print(f"[分发步骤] 已发送 {len(tasks)} 个任务事件")
        # 返回 None,不产生返回事件

    @step
    async def process_task(self, ev: TaskEvent) -> TaskCompleteEvent:
        """处理单个任务"""
        print(f"[处理步骤] 正在执行任务 {ev.task_id}: {ev.task_name}")
        # 模拟任务处理
        await asyncio.sleep(0.5)
        return TaskCompleteEvent(
            task_id=ev.task_id,
            result=f"任务 '{ev.task_name}' 已完成",
        )

    @step
    async def collect_results(self, ctx: Context, ev: TaskCompleteEvent) -> StopEvent:
        """收集所有任务结果"""
        results = await ctx.get("results", default=[])
        results.append(ev.result)
        await ctx.set("results", results)

        if len(results) < 3:
            return None  # 等待更多结果

        return StopEvent(result=f"所有任务完成:\n" + "\n".join(results))
人机协同(Human-in-the-loop)
人机协同是 LlamaIndex Workflow 最强大的特性之一。它允许工作流在关键节点暂停,等待人工输入后再继续执行。这在审批流程、内容审核、关键决策等场景中至关重要。
核心机制:
- 某个 Step 返回
InputRequiredEvent→ 工作流自动暂停 - 外部系统获取到
InputRequiredEvent中的信息,展示给用户 - 用户完成输入后,外部系统通过
HumanResponseEvent恢复工作流
"""
人机协同示例:文档发布审批流程
流程:
  撰写文档 -> 需要人工审批 -> (暂停等待) -> 收到审批结果 -> 发布或退回修改
"""
import asyncio
from llama_index.core.workflow import (
    Workflow, step, Event, StartEvent, StopEvent,
    InputRequiredEvent, HumanResponseEvent, Context
)


class DraftReadyEvent(Event):
    """草稿完成事件"""
    draft_content: str
    author: str

class ApprovalResultEvent(Event):
    """审批结果事件"""
    approved: bool          # 是否批准
    reviewer_comment: str   # 审核意见


class DocumentPublishWorkflow(Workflow):
    """文档发布工作流(含人工审批)"""

    @step
    async def write_draft(self, ev: StartEvent) -> DraftReadyEvent:
        """第一步:撰写文档草稿"""
        topic = ev.get("topic", "LlamaIndex 工作流")
        draft = f"《{topic}》\n\n这是一篇关于 {topic} 的深度技术文章..."
        print(f"[撰写步骤] 草稿已完成")
        return DraftReadyEvent(draft=draft, author="AI 助手")

    @step
    async def request_approval(self, ev: DraftReadyEvent) -> InputRequiredEvent:
        """
        第二步:请求人工审批
        返回 InputRequiredEvent 后,工作流会自动暂停
        等待外部通过 HumanResponseEvent 提供审批结果
        """
        print(f"[审批步骤] 等待人工审核...")
        print(f"  文档作者: {ev.author}")
        print(f"  文档内容: {ev.draft_content[:50]}...")

        return InputRequiredEvent(
            prefix="请审核以下文档是否发布",
            # 你可以携带任意额外信息供审核者参考
        )

    @step
    async def handle_approval(self, ctx: Context, ev: HumanResponseEvent) -> StopEvent:
        """
        第三步:处理审批结果
        接收 HumanResponseEvent 后继续执行
        ev.response 包含人工输入的内容
        """
        response = ev.response.strip().lower()

        if response in ("批准", "通过", "yes", "approve"):
            return StopEvent(result="文档已批准并发布!")
        else:
            return StopEvent(result=f"文档被退回,审核意见:{ev.response}")


async def main():
    workflow = DocumentPublishWorkflow(timeout=300, verbose=False)

    # 启动工作流
    handler = workflow.run(topic="LlamaIndex 最佳实践")

    # 监听事件流,等待 InputRequiredEvent
    async for event in handler.stream_events():
        if isinstance(event, InputRequiredEvent):
            print(f"\n[系统] 收到审批请求: {event.prefix}")
            print("[系统] 等待用户输入...")

            # 模拟人工输入(实际项目中可以是 Web 表单、API 调用等)
            user_input = "批准"  # 实际中通过 input() 或 API 获取

            # 通过 handler 发送 HumanResponseEvent 恢复工作流
            handler.ctx.send_event(
                HumanResponseEvent(response=user_input)
            )

    # 获取最终结果
    result = await handler
    print(f"\n最终结果: {result}")


asyncio.run(main())
关键点:
InputRequiredEvent让工作流暂停,而不是阻塞线程handler.stream_events()返回一个异步迭代器,可以实时监听工作流发出的事件- 通过
handler.ctx.send_event(HumanResponseEvent(...))恢复工作流- 超时时间
timeout=300给了人工输入足够的等待时间
逐步执行(Step-by-step Execution)
在调试复杂工作流时,你可能希望一次只执行一个 Step,观察每一步的输入输出。LlamaIndex Workflow 提供了 run_step() 方法来实现逐步调试。
"""
逐步执行示例:用于调试和测试
"""
import asyncio
from llama_index.core.workflow import Workflow, step, Event, StartEvent, StopEvent


class IntermediateEvent(Event):
    """中间事件"""
    data: str
    step_number: int


class DebugWorkflow(Workflow):
    @step
    async def step_a(self, ev: StartEvent) -> IntermediateEvent:
        print("[Step A] 执行中...")
        return IntermediateEvent(data="Step A 的输出", step_number=1)

    @step
    async def step_b(self, ev: IntermediateEvent) -> IntermediateEvent:
        print(f"[Step B] 收到: {ev.data}")
        return IntermediateEvent(data="Step B 的输出", step_number=2)

    @step
    async def step_c(self, ev: IntermediateEvent) -> StopEvent:
        print(f"[Step C] 收到: {ev.data}")
        return StopEvent(result=f"最终结果: {ev.data}")


async def main():
    workflow = DebugWorkflow(timeout=60, verbose=True)

    # ============================================================
    # 方式一:逐步执行(用于调试)
    # ============================================================
    # run_step() 每次只执行一个 Step,返回执行结果
    # 你可以检查每一步的输入和输出

    handler = workflow.run()  # 获取运行处理器

    # 逐步执行
    print("=== 逐步执行模式 ===")
    step_result_1 = await handler.run_step("step_a")
    print(f"Step A 完成: {step_result_1}")

    step_result_2 = await handler.run_step("step_b")
    print(f"Step B 完成: {step_result_2}")

    step_result_3 = await handler.run_step("step_c")
    print(f"Step C 完成: {step_result_3}")

    # 获取最终结果
    final_result = await handler
    print(f"最终结果: {final_result}")


asyncio.run(main())
检查点(Checkpoint)与可追溯性
对于长运行的工作流(如需要数小时甚至数天的处理流程),检查点机制至关重要。它允许你在工作流执行过程中定期保存状态快照,当系统崩溃或需要手动干预时,可以从最近的检查点恢复,而不是从头开始。
"""
检查点示例:带状态持久化的长运行工作流
"""
import asyncio
import json
from pathlib import Path
from llama_index.core.workflow import (
    Workflow, step, Event, StartEvent, StopEvent, Context
)
from llama_index.core.workflow.checkpoint import (
    WorkflowCheckpointer,
)


class ProcessingEvent(Event):
    """处理阶段事件"""
    stage: str       # 当前阶段
    progress: float  # 进度百分比
    data: dict       # 阶段数据


# ============================================================
# 配置检查点器
# ============================================================
# 方式一:使用内存检查点(适合开发/测试)
checkpointer = WorkflowCheckpointer(
    # 内存存储,进程结束后丢失
    checkpoint_store="memory"
)

# 方式二:使用文件检查点(适合单机持久化)
# checkpointer = WorkflowCheckpointer(
#     checkpoint_store="file",
#     checkpoint_dir="./checkpoints"
# )


class LongRunningWorkflow(Workflow):
    """长运行工作流:多阶段数据处理管道"""

    @step
    async def stage_extract(self, ctx: Context, ev: StartEvent) -> ProcessingEvent:
        """阶段一:数据提取"""
        print("[阶段一] 正在提取数据...")
        await asyncio.sleep(1)  # 模拟耗时操作

        # 保存阶段结果到 Context
        await ctx.set("extract_result", {"records": 10000})
        await ctx.set("current_stage", "extract")

        return ProcessingEvent(
            stage="extract",
            progress=33.3,
            data={"records": 10000},
        )

    @step
    async def stage_transform(self, ctx: Context, ev: ProcessingEvent) -> ProcessingEvent:
        """阶段二:数据转换"""
        print(f"[阶段二] 正在转换 {ev.data['records']} 条数据...")
        await asyncio.sleep(2)  # 模拟耗时操作

        extract_result = await ctx.get("extract_result")
        transformed_count = extract_result["records"] * 0.95  # 模拟 5% 数据过滤

        await ctx.set("transform_result", {"transformed": transformed_count})
        await ctx.set("current_stage", "transform")

        return ProcessingEvent(
            stage="transform",
            progress=66.6,
            data={"transformed": transformed_count},
        )

    @step
    async def stage_load(self, ctx: Context, ev: ProcessingEvent) -> StopEvent:
        """阶段三:数据加载"""
        print(f"[阶段三] 正在加载 {ev.data['transformed']:.0f} 条数据...")
        await asyncio.sleep(1)  # 模拟耗时操作

        await ctx.set("current_stage", "load")
        await ctx.set("completed", True)

        return StopEvent(
            result=f"ETL 管道完成!共处理 {ev.data['transformed']:.0f} 条数据"
        )


async def main():
    # 创建带检查点的工作流
    workflow = LongRunningWorkflow(
        timeout=300,
        verbose=True,
    )

    # 运行工作流(检查点会自动保存)
    result = await workflow.run(source="production_db")
    print(f"最终结果: {result}")


asyncio.run(main())
检查点的核心价值:
- 故障恢复:进程崩溃后,可以从最近的检查点继续执行
- 可追溯性:随时查看工作流在任意时间点的状态快照
- 调试便利:可以回放某个特定检查点的状态来复现问题
全局状态管理(Context)
Context 是工作流中的共享状态容器。它为所有 Step 提供了一个安全的读写空间,避免了在事件之间传递大量数据的不便。
"""
Context 状态管理详解
"""
import asyncio
from llama_index.core.workflow import Workflow, step, Event, StartEvent, StopEvent, Context


class AnalyzeEvent(Event):
    """分析事件"""
    text: str

class SummaryEvent(Event):
    """摘要事件"""
    summary: str


class ContextDemoWorkflow(Workflow):
    """Context 使用示例"""

    @step
    async def collect_data(self, ctx: Context, ev: StartEvent) -> AnalyzeEvent:
        """
        Context 写入操作:
        - ctx.set(key, value):存储键值对
        - 支持任意 Python 对象(列表、字典、自定义对象等)
        - 状态在整个工作流运行期间持久存在
        """
        # 存储简单值
        await ctx.set("start_time", "2026-06-06T10:00:00")
        await ctx.set("request_id", "req-001")

        # 存储复杂数据结构
        await ctx.set("statistics", {
            "total_documents": 0,
            "processed_documents": 0,
            "error_count": 0,
        })

        # 存储列表
        await ctx.set("processing_log", [])

        text = ev.get("text", "需要分析的文本内容")
        print(f"[数据采集] 已初始化上下文状态")

        return AnalyzeEvent(text=text)

    @step
    async def analyze_data(self, ctx: Context, ev: AnalyzeEvent) -> SummaryEvent:
        """
        Context 读写操作:
        - ctx.get(key):读取值(不存在时抛出异常)
        - ctx.get(key, default):读取值(不存在时返回默认值)
        """
        # 读取状态
        stats = await ctx.get("statistics")
        log = await ctx.get("processing_log")

        # 更新状态(先读后写模式)
        stats["total_documents"] = 1
        stats["processed_documents"] = 1
        await ctx.set("statistics", stats)

        log.append(f"分析文本: {ev.text[:20]}...")
        await ctx.set("processing_log", log)

        summary = f"分析完成:文本长度 {len(ev.text)} 字符"
        return SummaryEvent(summary=summary)

    @step
    async def generate_report(self, ctx: Context, ev: SummaryEvent) -> StopEvent:
        """
        Context 最终汇总:读取所有状态,生成最终报告
        """
        stats = await ctx.get("statistics")
        log = await ctx.get("processing_log")
        start_time = await ctx.get("start_time")
        request_id = await ctx.get("request_id")

        report = (
            f"=== 执行报告 ===\n"
            f"请求 ID: {request_id}\n"
            f"开始时间: {start_time}\n"
            f"摘要: {ev.summary}\n"
            f"统计: {stats}\n"
            f"日志: {log}\n"
            f"================"
        )

        return StopEvent(result=report)


async def main():
    w = ContextDemoWorkflow(timeout=30, verbose=False)
    result = await w.run(text="这是一段用于演示 Context 状态管理的示例文本")
    print(result)


asyncio.run(main())
Context 状态隔离与作用域
每次调用 workflow.run() 都会创建一个独立的 Context 实例。这意味着:
- 多次并行运行同一个工作流不会互相干扰
- 每个运行实例有自己的状态空间
- Context 不是全局单例,而是运行级别的隔离存储
# 两次独立运行,各自有独立的 Context
result1 = await workflow.run(text="第一篇文档")  # Context 1
result2 = await workflow.run(text="第二篇文档")  # Context 2(完全独立)
3.2 复杂工作流编排
3.2.1 基础到高级场景
线性工作流:A -> B -> C
最简单的模式,Step 依次执行,前一个的输出事件是后一个的输入事件。
"""
线性工作流:数据清洗 -> 特征提取 -> 模型推理
"""
import asyncio
from llama_index.core.workflow import Workflow, step, Event, StartEvent, StopEvent


class CleanedDataEvent(Event):
    """清洗后的数据"""
    clean_text: str
    word_count: int

class FeatureEvent(Event):
    """特征提取结果"""
    features: dict
    clean_text: str


class LinearPipeline(Workflow):
    """线性处理管道"""

    @step
    async def clean_data(self, ev: StartEvent) -> CleanedDataEvent:
        """第一步:数据清洗"""
        raw_text = ev.get("raw_text", "")
        # 模拟数据清洗:去除多余空白、特殊字符
        clean = " ".join(raw_text.split())
        clean = clean.replace("\t", " ").replace("\n", " ")
        print(f"[清洗] 原始长度={len(raw_text)}, 清洗后长度={len(clean)}")
        return CleanedDataEvent(clean_text=clean, word_count=len(clean.split()))

    @step
    async def extract_features(self, ev: CleanedDataEvent) -> FeatureEvent:
        """第二步:特征提取"""
        text = ev.clean_text
        features = {
            "length": len(text),
            "word_count": ev.word_count,
            "has_numbers": any(c.isdigit() for c in text),
            "avg_word_length": sum(len(w) for w in text.split()) / max(ev.word_count, 1),
        }
        print(f"[特征] 提取完成: {features}")
        return FeatureEvent(features=features, clean_text=text)

    @step
    async def predict(self, ev: FeatureEvent) -> StopEvent:
        """第三步:模型推理(模拟)"""
        # 模拟基于特征的简单预测
        score = ev.features["avg_word_length"] * 0.3 + ev.features["word_count"] * 0.01
        label = "正面" if score > 3 else "中性" if score > 1 else "负面"
        result = f"预测结果: {label} (得分: {score:.2f})\n特征: {ev.features}"
        return StopEvent(result=result)


async def main():
    w = LinearPipeline(timeout=30, verbose=False)
    result = await w.run(raw_text="  这是一段   需要清洗的  文本数据!包含123数字。  ")
    print(result)


asyncio.run(main())
分支工作流:根据条件走不同路径
一个 Step 可以根据运行时数据返回不同类型的事件,从而触发不同的下游分支。
"""
分支工作流:文档分类后的差异化处理
根据文档类型(技术文档/商务邮件/其他)走不同的处理分支
"""
import asyncio
from typing import Union
from llama_index.core.workflow import Workflow, step, Event, StartEvent, StopEvent


# 定义不同分支的事件
class TechDocEvent(Event):
    """技术文档事件"""
    content: str
    language: str

class BusinessEmailEvent(Event):
    """商务邮件事件"""
    content: str
    sender: str

class GeneralDocEvent(Event):
    """通用文档事件"""
    content: str


class BranchingWorkflow(Workflow):
    """文档分类与分支处理工作流"""

    @step
    async def classify_document(
        self, ev: StartEvent
    ) -> Union[TechDocEvent, BusinessEmailEvent, GeneralDocEvent]:
        """
        文档分类步骤:根据内容特征判断文档类型
        返回不同类型的事件触发不同的下游分支
        """
        content = ev.get("content", "")
        doc_type = ev.get("doc_type", "auto")

        # 简单规则分类(实际项目中可用 LLM 分类)
        if doc_type == "tech" or any(
            kw in content for kw in ["API", "代码", "函数", "class", "def", "import"]
        ):
            print("[分类] 判定为技术文档")
            return TechDocEvent(content=content, language="Python")

        elif doc_type == "email" or any(
            kw in content for kw in ["尊敬的", "此致", "敬礼", "Dear", "Best regards"]
        ):
            print("[分类] 判定为商务邮件")
            return BusinessEmailEvent(content=content, sender="unknown")

        else:
            print("[分类] 判定为通用文档")
            return GeneralDocEvent(content=content)

    # ============ 技术文档分支 ============
    @step
    async def process_tech_doc(self, ev: TechDocEvent) -> StopEvent:
        """技术文档处理:提取代码块、生成文档注释"""
        code_blocks = [line for line in ev.content.split("\n")
                       if line.strip().startswith(("def ", "class ", "import "))]
        summary = (
            f"[技术文档处理报告]\n"
            f"编程语言: {ev.language}\n"
            f"发现代码定义: {len(code_blocks)} 处\n"
            f"代码行: {code_blocks[:3]}"  # 只显示前 3 个
        )
        return StopEvent(result=summary)

    # ============ 商务邮件分支 ============
    @step
    async def process_email(self, ev: BusinessEmailEvent) -> StopEvent:
        """商务邮件处理:提取关键信息、生成回复建议"""
        has_greeting = any(kw in ev.content for kw in ["尊敬的", "Dear"])
        has_closing = any(kw in ev.content for kw in ["此致", "Best regards"])
        summary = (
            f"[商务邮件处理报告]\n"
            f"发件人: {ev.sender}\n"
            f"包含称呼: {has_greeting}\n"
            f"包含落款: {has_closing}\n"
            f"建议: 已分析邮件结构,可自动生成回复"
        )
        return StopEvent(result=summary)

    # ============ 通用文档分支 ============
    @step
    async def process_general(self, ev: GeneralDocEvent) -> StopEvent:
        """通用文档处理:生成摘要、提取关键词"""
        words = ev.content.split()
        summary = (
            f"[通用文档处理报告]\n"
            f"文档长度: {len(words)} 词\n"
            f"前 20 字: {ev.content[:20]}...\n"
            f"建议: 使用 LLM 生成详细摘要"
        )
        return StopEvent(result=summary)


async def main():
    w = BranchingWorkflow(timeout=30, verbose=False)

    # 测试不同分支
    print("=== 测试技术文档分支 ===")
    result1 = await w.run(content="import os\ndef main():\n    print('Hello')\nclass App:\n    pass")
    print(result1)

    print("\n=== 测试商务邮件分支 ===")
    result2 = await w.run(content="尊敬的张总,\n\n感谢您的合作。\n\n此致敬礼")
    print(result2)

    print("\n=== 测试通用文档分支 ===")
    result3 = await w.run(content="这是一篇普通的说明文档,介绍产品的基本功能和使用方法。")
    print(result3)


asyncio.run(main())
循环工作流:LLM 输出的自纠错循环
这是 LlamaIndex Workflow 相比传统 DAG 编排的核心优势——天然支持循环。以下是一个经典的"生成→评估→不满意就重新生成"的自纠错循环。
"""
循环工作流:LLM 自纠错循环
流程:生成内容 -> 评估质量 -> 不合格则带着反馈重新生成 -> 合格则输出
"""
import asyncio
from llama_index.core.workflow import (
    Workflow, step, Event, StartEvent, StopEvent, Context
)
# from llama_index.llms.openai import OpenAI


class GenerateEvent(Event):
    """生成请求事件"""
    prompt: str           # 生成提示
    feedback: str = ""    # 上轮评估反馈(首次为空)
    attempt: int = 1      # 当前尝试次数

class EvaluateEvent(Event):
    """评估事件"""
    generated_text: str   # 待评估的文本
    attempt: int          # 当前尝试次数

class RetryEvent(Event):
    """重试事件(评估不合格时触发)"""
    original_prompt: str  # 原始提示
    feedback: str         # 评估反馈
    attempt: int          # 已尝试次数


class SelfCorrectionWorkflow(Workflow):
    """LLM 自纠错工作流"""

    # 配置参数
    max_retries: int = 3           # 最大重试次数
    quality_threshold: float = 0.7 # 质量阈值(0-1)

    @step
    async def generate(self, ctx: Context, ev: GenerateEvent) -> EvaluateEvent:
        """
        生成步骤:根据提示和反馈生成内容
        如果有上轮反馈,会在提示中加入改进要求
        """
        prompt = ev.prompt
        if ev.feedback:
            prompt = (
                f"{ev.prompt}\n\n"
                f"[上次生成结果的反馈]:{ev.feedback}\n"
                f"请根据以上反馈改进你的输出。"
            )

        # 实际项目中替换为 LLM 调用:
        # llm = OpenAI(model="gpt-4.1")
        # response = await llm.acomplete(prompt)
        # generated_text = str(response)

        # 模拟生成(演示循环逻辑)
        quality_by_attempt = {1: "较差", 2: "一般", 3: "优秀"}
        quality = quality_by_attempt.get(ev.attempt, "未知")
        generated_text = f"第 {ev.attempt} 次生成的内容(质量:{quality})"

        print(f"[生成步骤] 第 {ev.attempt} 次尝试")
        print(f"  提示: {prompt[:60]}...")

        # 记录到 Context
        await ctx.set(f"attempt_{ev.attempt}", generated_text)

        return EvaluateEvent(generated_text=generated_text, attempt=ev.attempt)

    @step
    async def evaluate(self, ctx: Context, ev: EvaluateEvent) -> StopEvent | GenerateEvent:
        """
        评估步骤:判断生成质量是否达标
        - 达标 -> 返回 StopEvent(结束工作流)
        - 不达标 -> 返回 GenerateEvent(触发重新生成,形成循环)
        """
        # 模拟质量评分(实际项目中可用另一个 LLM 评估)
        quality_scores = {1: 0.3, 2: 0.6, 3: 0.85}
        score = quality_scores.get(ev.attempt, 0.5)

        print(f"[评估步骤] 质量得分: {score:.2f} (阈值: {self.quality_threshold})")

        if score >= self.quality_threshold:
            # 质量达标,结束工作流
            print(f"[评估步骤] 质量达标!")
            return StopEvent(
                result=f"最终输出(第 {ev.attempt} 次尝试,得分 {score:.2f}):\n{ev.generated_text}"
            )

        if ev.attempt >= self.max_retries:
            # 超过最大重试次数
            print(f"[评估步骤] 已达最大重试次数,返回最佳结果")
            return StopEvent(
                result=f"达到最大重试次数,返回最后结果:\n{ev.generated_text}"
            )

        # 质量不达标,发出重新生成事件(形成循环!)
        feedback = f"质量得分 {score:.2f},低于阈值 {self.quality_threshold}。需要更详细、更准确的内容。"
        print(f"[评估步骤] 质量不达标,请求重新生成")
        return GenerateEvent(
            prompt=await ctx.get("original_prompt", "请生成高质量的技术文章"),
            feedback=feedback,
            attempt=ev.attempt + 1,
        )

    @step
    async def init_workflow(self, ctx: Context, ev: StartEvent) -> GenerateEvent:
        """初始化:保存原始提示,发出首次生成事件"""
        prompt = ev.get("prompt", "请生成一篇关于 LlamaIndex 的技术文章")
        await ctx.set("original_prompt", prompt)
        return GenerateEvent(prompt=prompt, feedback="", attempt=1)


async def main():
    w = SelfCorrectionWorkflow(timeout=60, verbose=False)
    result = await w.run(prompt="请写一篇关于 LlamaIndex Workflow 的深度教程")
    print(f"\n{'='*50}")
    print(result)


asyncio.run(main())

# 预期输出:
# [初始化] 保存原始提示
# [生成步骤] 第 1 次尝试
# [评估步骤] 质量得分: 0.30 (阈值: 0.7)
# [评估步骤] 质量不达标,请求重新生成
# [生成步骤] 第 2 次尝试
# [评估步骤] 质量得分: 0.60 (阈值: 0.7)
# [评估步骤] 质量不达标,请求重新生成
# [生成步骤] 第 3 次尝试
# [评估步骤] 质量得分: 0.85 (阈值: 0.7)
# [评估步骤] 质量达标!
并发工作流:多源数据并行采集
一个 Step 发出多个事件,触发多个下游 Step 并行执行,然后通过收集机制汇总结果。
"""
并发工作流:多源数据并行采集与汇总
流程:
  分发采集任务 -> 多个采集器并行运行 -> 汇总所有结果
"""
import asyncio
from llama_index.core.workflow import (
    Workflow, step, Event, StartEvent, StopEvent, Context
)


class CollectTaskEvent(Event):
    """采集任务事件"""
    source_name: str
    source_url: str

class CollectResultEvent(Event):
    """采集结果事件"""
    source_name: str
    data: list
    record_count: int


class ParallelCollectWorkflow(Workflow):
    """多源并行采集工作流"""

    # 预期的数据源数量(用于判断是否全部完成)
    expected_sources: int = 3

    @step
    async def dispatch(self, ctx: Context, ev: StartEvent) -> None:
        """
        分发步骤:向多个数据源发出采集任务
        使用 ctx.send_event() 发出多个事件,触发并行执行
        返回 None 表示不通过返回值发出事件
        """
        sources = [
            {"source_name": "新闻网站", "source_url": "https://news.example.com"},
            {"source_name": "技术博客", "source_url": "https://blog.example.com"},
            {"source_name": "学术论文", "source_url": "https://papers.example.com"},
        ]

        await ctx.set("expected_count", len(sources))

        for source in sources:
            # 每个 send_event 都会触发一个 process_source Step 并行执行
            ctx.send_event(CollectTaskEvent(**source))

        print(f"[分发] 已向 {len(sources)} 个数据源发出采集任务")

    @step(num_workers=3)
    async def process_source(self, ev: CollectTaskEvent) -> CollectResultEvent:
        """
        采集步骤:并行采集各数据源
        num_workers=3 表示最多同时运行 3 个此 Step 的实例
        """
        print(f"[采集] 正在从 {ev.source_name} ({ev.source_url}) 采集数据...")

        # 模拟不同数据源的采集延迟
        delays = {"新闻网站": 1, "技术博客": 2, "学术论文": 3}
        await asyncio.sleep(delays.get(ev.source_name, 1))

        # 模拟采集结果
        mock_data = {
            "新闻网站": ["AI 新突破", "量子计算进展", "太空探索"],
            "技术博客": ["LlamaIndex 教程", "RAG 最佳实践", "Agent 设计模式"],
            "学术论文": ["Attention Is All You Need", "BERT 论文", "GPT 技术报告"],
        }
        data = mock_data.get(ev.source_name, [])

        print(f"[采集] {ev.source_name} 采集完成,获取 {len(data)} 条记录")
        return CollectResultEvent(
            source_name=ev.source_name,
            data=data,
            record_count=len(data),
        )

    @step
    async def aggregate(self, ctx: Context, ev: CollectResultEvent) -> StopEvent:
        """
        汇总步骤:等待所有采集结果到达后汇总
        """
        # 累积已收到的结果
        results = await ctx.get("all_results", default=[])
        results.append({
            "source": ev.source_name,
            "data": ev.data,
            "count": ev.record_count,
        })
        await ctx.set("all_results", results)

        expected = await ctx.get("expected_count", 3)

        if len(results) < expected:
            # 还没收齐所有结果,等待下一个 CollectResultEvent
            print(f"[汇总] 已收到 {len(results)}/{expected} 个数据源的结果")
            return None  # 返回 None,不发出事件,继续等待

        # 所有数据源采集完成,汇总
        print(f"[汇总] 所有 {expected} 个数据源采集完成!")
        total_records = sum(r["count"] for r in results)
        all_data = []
        for r in results:
            all_data.extend(r["data"])

        summary = (
            f"=== 采集汇总报告 ===\n"
            f"数据源数量: {len(results)}\n"
            f"总记录数: {total_records}\n"
            f"所有数据:\n"
        )
        for r in results:
            summary += f"  [{r['source']}] {r['data']}\n"

        return StopEvent(result=summary)


async def main():
    w = ParallelCollectWorkflow(timeout=60, verbose=False)
    result = await w.run()
    print(result)


asyncio.run(main())
并发执行的关键点:
ctx.send_event()可以在一个 Step 中发出多个事件@step(num_workers=N)控制同一 Step 的最大并行实例数- 通过在 Context 中累积结果并检查计数来实现"等待所有并发任务完成"
嵌套工作流:工作流作为子 Step 嵌入另一个工作流
嵌套工作流允许你将一个完整的 Workflow 作为另一个 Workflow 中的一个 Step 来使用,实现模块化和复用。
"""
嵌套工作流:主工作流调用子工作流
场景:
  主工作流负责整体协调
  子工作流负责具体的 RAG 检索和生成任务
"""
import asyncio
from llama_index.core.workflow import (
    Workflow, step, Event, StartEvent, StopEvent, Context
)


# ============================================================
# 子工作流:RAG 检索与生成
# ============================================================
class RetrievalEvent(Event):
    """检索结果事件"""
    documents: list

class RAGSubWorkflow(Workflow):
    """RAG 子工作流:检索 -> 生成"""

    @step
    async def retrieve(self, ev: StartEvent) -> RetrievalEvent:
        """检索步骤"""
        query = ev.get("query", "")
        # 模拟检索(实际项目中使用 VectorStoreIndex 等)
        mock_docs = [
            f"文档1: 关于 {query} 的基础知识",
            f"文档2: {query} 的高级应用",
            f"文档3: {query} 的最佳实践",
        ]
        print(f"  [子工作流-检索] 查询 '{query}',找到 {len(mock_docs)} 个文档")
        return RetrievalEvent(documents=mock_docs)

    @step
    async def generate(self, ev: RetrievalEvent) -> StopEvent:
        """生成步骤"""
        # 模拟 LLM 生成
        context = "\n".join(ev.documents)
        answer = f"基于检索到的 {len(ev.documents)} 个文档,生成的回答如下..."
        print(f"  [子工作流-生成] 回答已生成")
        return StopEvent(result=answer)


# ============================================================
# 主工作流:协调多个子任务
# ============================================================
class SubTaskEvent(Event):
    """子任务事件"""
    task_type: str
    query: str

class SubTaskResultEvent(Event):
    """子任务结果事件"""
    task_type: str
    result: str


class MainWorkflow(Workflow):
    """主工作流:协调多个子工作流"""

    def __init__(self, **kwargs):
        super().__init__(**kwargs)
        # 在主工作流中实例化子工作流
        self.rag_workflow = RAGSubWorkflow(timeout=30, verbose=False)

    @step
    async def plan_tasks(self, ctx: Context, ev: StartEvent) -> SubTaskEvent:
        """
        规划步骤:分解用户请求为多个子任务
        返回多个 SubTaskEvent 触发并行处理
        """
        user_query = ev.get("query", "")
        print(f"[主工作流-规划] 分解查询: {user_query}")

        # 发送多个子任务事件
        ctx.send_event(SubTaskEvent(task_type="rag", query=f"{user_query} 技术概述"))
        ctx.send_event(SubTaskEvent(task_type="rag", query=f"{user_query} 应用案例"))

        await ctx.set("expected_tasks", 2)
        # 第一个通过返回值发出,第二个通过 send_event 发出
        return SubTaskEvent(task_type="rag", query=f"{user_query} 未来趋势")

    @step
    async def execute_subtask(self, ev: SubTaskEvent) -> SubTaskResultEvent:
        """
        执行子任务:调用子工作流完成具体任务
        """
        print(f"[主工作流-执行] 开始子任务: {ev.task_type} - {ev.query}")

        # 调用子工作流
        sub_result = await self.rag_workflow.run(query=ev.query)

        return SubTaskResultEvent(task_type=ev.task_type, result=str(sub_result))

    @step
    async def synthesize(self, ctx: Context, ev: SubTaskResultEvent) -> StopEvent:
        """汇总所有子任务结果"""
        results = await ctx.get("sub_results", default=[])
        results.append({"type": ev.task_type, "result": ev.result})
        await ctx.set("sub_results", results)

        expected = await ctx.get("expected_tasks", 3)
        if len(results) < expected:
            return None

        # 汇总所有结果
        final = "=== 综合研究报告 ===\n"
        for i, r in enumerate(results, 1):
            final += f"\n[部分 {i}] ({r['type']})\n{r['result']}\n"

        return StopEvent(result=final)


async def main():
    w = MainWorkflow(timeout=60, verbose=False)
    result = await w.run(query="LlamaIndex Workflow")
    print(result)


asyncio.run(main())
条件循环(While Loop):带终止条件的循环工作流
"""
条件循环工作流:迭代式文档优化
不断修改文档直到满足所有质量标准
"""
import asyncio
from llama_index.core.workflow import (
    Workflow, step, Event, StartEvent, StopEvent, Context
)


class RevisionEvent(Event):
    """修订事件"""
    document: str
    issues: list       # 当前存在的问题
    revision_number: int


class QualityCheckEvent(Event):
    """质量检查事件"""
    document: str
    revision_number: int
    score: float
    remaining_issues: list


class IterativeRefinementWorkflow(Workflow):
    """迭代优化工作流"""

    max_iterations: int = 5
    target_score: float = 0.9

    @step
    async def init_revision(self, ctx: Context, ev: StartEvent) -> RevisionEvent:
        """初始化修订"""
        document = ev.get("document", "这是一份初稿文档。")
        await ctx.set("original_document", document)
        return RevisionEvent(
            document=document,
            issues=["缺少标题", "内容过短", "缺乏数据支撑"],
            revision_number=0,
        )

    @step
    async def revise_document(self, ev: RevisionEvent) -> QualityCheckEvent:
        """修订文档步骤"""
        doc = ev.document
        issues = ev.issues

        # 模拟根据问题修订文档
        improvements = []
        if "缺少标题" in issues:
            doc = "# 完整标题\n\n" + doc
            improvements.append("已添加标题")
        if "内容过短" in issues:
            doc += "\n\n补充内容:更多详细信息和分析..."
            improvements.append("已扩充内容")
        if "缺乏数据支撑" in issues:
            doc += "\n\n数据:根据统计,效率提升 40%..."
            improvements.append("已添加数据")

        print(f"[修订 #{ev.revision_number + 1}] 改进: {improvements}")

        # 模拟质量评分(每次递增)
        score = min(0.5 + ev.revision_number * 0.2, 1.0)
        remaining = issues[1:] if issues else []  # 每次解决一个问题

        return QualityCheckEvent(
            document=doc,
            revision_number=ev.revision_number + 1,
            score=score,
            remaining_issues=remaining,
        )

    @step
    async def check_quality(
        self, ev: QualityCheckEvent
    ) -> StopEvent | RevisionEvent:
        """
        质量检查步骤:决定是否继续循环
        """
        print(
            f"[质量检查] 第 {ev.revision_number} 版,"
            f"得分: {ev.score:.2f},"
            f"剩余问题: {len(ev.remaining_issues)}"
        )

        # 终止条件 1:分数达标
        if ev.score >= self.target_score:
            return StopEvent(
                result=f"文档优化完成!最终得分: {ev.score:.2f}\n{ev.document}"
            )

        # 终止条件 2:达到最大迭代次数
        if ev.revision_number >= self.max_iterations:
            return StopEvent(
                result=f"达到最大迭代次数 ({self.max_iterations}),"
                       f"最终得分: {ev.score:.2f}\n{ev.document}"
            )

        # 继续循环:发出新的 RevisionEvent
        return RevisionEvent(
            document=ev.document,
            issues=ev.remaining_issues,
            revision_number=ev.revision_number,
        )


async def main():
    w = IterativeRefinementWorkflow(timeout=60, verbose=False)
    result = await w.run(document="这是一份简单的初稿。")
    print(f"\n{'='*50}")
    print(result)


asyncio.run(main())
3.2.2 状态维护与流媒体事件处理
复杂状态管理
在实际项目中,你需要在 Context 中维护各种复杂的数据结构。以下是几种常用的模式:
"""
复杂状态管理模式示例
"""
from llama_index.core.workflow import Context


async def complex_state_example(ctx: Context):
    # ============================================================
    # 模式 1:列表追加(先读-修改-写回)
    # ============================================================
    logs = await ctx.get("processing_logs", default=[])
    logs.append({"step": "analyze", "status": "success", "timestamp": "2026-06-06T10:00:00"})
    await ctx.set("processing_logs", logs)

    # ============================================================
    # 模式 2:字典更新(部分更新)
    # ============================================================
    config = await ctx.get("config", default={})
    config.update({
        "max_tokens": 4096,
        "temperature": 0.7,
        "model": "gpt-4.1",
    })
    await ctx.set("config", config)

    # ============================================================
    # 模式 3:计数器(原子递增)
    # ============================================================
    count = await ctx.get("retry_count", default=0)
    await ctx.set("retry_count", count + 1)

    # ============================================================
    # 模式 4:嵌套结构
    # ============================================================
    pipeline_state = {
        "stages": {
            "extraction": {"status": "completed", "records": 1000},
            "transformation": {"status": "running", "records": 0},
            "loading": {"status": "pending", "records": 0},
        },
        "errors": [],
        "warnings": [],
    }
    await ctx.set("pipeline_state", pipeline_state)
最佳实践:
- 使用
default参数避免 KeyError- 对于复杂对象,建议封装为专门的类或 dataclass
- 注意先读后写的操作不是原子的,在高并发场景下可能需要注意竞态条件
流式事件处理
工作流的流式事件处理允许你实时获取工作流执行过程中的中间事件,实现流式输出、进度展示等效果。
"""
流式事件处理示例:实时输出 RAG 工作流的中间结果
"""
import asyncio
from llama_index.core.workflow import (
    Workflow, step, Event, StartEvent, StopEvent, Context
)


class StreamTokenEvent(Event):
    """流式 Token 事件(用于实时输出)"""
    token: str
    is_complete: bool = False

class ProgressEvent(Event):
    """进度事件"""
    stage: str
    progress: float  # 0.0 - 1.0
    message: str


class StreamingRAGWorkflow(Workflow):
    """支持流式输出的 RAG 工作流"""

    @step
    async def retrieve(self, ctx: Context, ev: StartEvent) -> ProgressEvent:
        """检索步骤"""
        query = ev.get("query", "")
        print(f"[检索] 查询: {query}")
        await asyncio.sleep(0.5)  # 模拟检索延迟

        # 保存检索结果到 Context
        await ctx.set("retrieved_docs", [
            "文档1: LlamaIndex 是一个数据框架...",
            "文档2: 工作流使用事件驱动模型...",
            "文档3: Context 提供状态管理...",
        ])

        return ProgressEvent(stage="retrieve", progress=0.3, message="检索完成")

    @step
    async def generate_stream(self, ctx: Context, ev: ProgressEvent) -> StopEvent:
        """
        流式生成步骤:模拟逐 Token 生成
        通过 ctx.send_event() 发送中间事件
        """
        docs = await ctx.get("retrieved_docs", [])
        ctx.send_event(ProgressEvent(
            stage="generate", progress=0.5, message="开始生成回答..."
        ))

        # 模拟流式生成(实际项目中使用 LLM streaming API)
        tokens = ["根据", "检索", "到的", "文档,", "LlamaIndex", " 工作流",
                  "的核心", "特点", "包括:", "事件", "驱动、", "状态", "管理",
                  "和", "并发", "执行。"]

        full_response = ""
        for i, token in enumerate(tokens):
            full_response += token
            # 发送流式 Token 事件
            ctx.send_event(StreamTokenEvent(
                token=token,
                is_complete=(i == len(tokens) - 1),
            ))
            await asyncio.sleep(0.05)  # 模拟生成延迟

        return StopEvent(result=full_response)


async def main():
    workflow = StreamingRAGWorkflow(timeout=30, verbose=False)

    # 使用 stream_events() 获取实时事件流
    handler = workflow.run(query="LlamaIndex 工作流有什么特点?")

    print("=== 实时事件流 ===")
    async for event in handler.stream_events():
        if isinstance(event, ProgressEvent):
            progress_bar = "█" * int(event.progress * 20) + "░" * (20 - int(event.progress * 20))
            print(f"[{event.stage}] {progress_bar} {event.progress*100:.0f}% - {event.message}")
        elif isinstance(event, StreamTokenEvent):
            # 实时输出 Token(不换行)
            print(event.token, end="", flush=True)
            if event.is_complete:
                print()  # 生成完成后换行

    # 获取最终结果
    result = await handler
    print(f"\n最终结果: {result}")


asyncio.run(main())
错误处理与重试
在 Step 中使用标准的 try/except 进行错误处理,并通过自定义错误事件传递错误信息。
"""
错误处理与重试示例
"""
import asyncio
from llama_index.core.workflow import (
    Workflow, step, Event, StartEvent, StopEvent, Context
)


class ProcessingEvent(Event):
    """处理事件"""
    data: str
    attempt: int = 1

class ErrorEvent(Event):
    """错误事件"""
    error_type: str
    error_message: str
    original_data: str
    attempt: int


class RobustWorkflow(Workflow):
    """带错误处理和重试的工作流"""

    max_retries: int = 3

    @step
    async def process_data(self, ev: StartEvent) -> ProcessingEvent:
        """数据处理步骤"""
        data = ev.get("data", "")
        return ProcessingEvent(data=data, attempt=1)

    @step
    async def risky_operation(
        self, ctx: Context, ev: ProcessingEvent
    ) -> StopEvent | ErrorEvent:
        """
        风险操作步骤:可能失败的操作
        使用 try/except 捕获异常,返回 ErrorEvent
        """
        try:
            # 模拟可能失败的操作
            if ev.attempt <= 2:
                raise ConnectionError(f"网络连接失败(第 {ev.attempt} 次尝试)")

            # 成功路径
            result = f"数据处理成功: {ev.data}"
            print(f"[处理] {result}")
            return StopEvent(result=result)

        except ConnectionError as e:
            print(f"[错误] {e}")
            return ErrorEvent(
                error_type="ConnectionError",
                error_message=str(e),
                original_data=ev.data,
                attempt=ev.attempt,
            )
        except Exception as e:
            print(f"[未知错误] {e}")
            return ErrorEvent(
                error_type=type(e).__name__,
                error_message=str(e),
                original_data=ev.data,
                attempt=ev.attempt,
            )

    @step
    async def handle_error(
        self, ev: ErrorEvent
    ) -> ProcessingEvent | StopEvent:
        """
        错误处理步骤:决定重试还是终止
        """
        if ev.attempt >= self.max_retries:
            return StopEvent(
                result=f"操作失败,已达最大重试次数 ({self.max_retries})。"
                       f"最后错误: {ev.error_message}"
            )

        # 重试:增加等待时间(指数退避)
        wait_time = 2 ** ev.attempt * 0.1
        print(f"[重试] 等待 {wait_time:.1f}s 后重试(第 {ev.attempt + 1} 次)...")
        await asyncio.sleep(wait_time)

        return ProcessingEvent(data=ev.original_data, attempt=ev.attempt + 1)


async def main():
    w = RobustWorkflow(timeout=60, verbose=False)
    result = await w.run(data="重要数据")
    print(f"最终结果: {result}")


asyncio.run(main())
3.2.3 子类化与自定义工作流
继承 Workflow 类实现可复用的工作流模板
通过子类化 Workflow,你可以封装通用的工作流模板,在不同项目中复用。
"""
可复用的 RAG 工作流模板
支持自定义 LLM、向量存储、提示模板等
"""
import asyncio
from typing import Optional, Any
from llama_index.core.workflow import (
    Workflow, step, Event, StartEvent, StopEvent, Context
)


# ============================================================
# 定义通用事件
# ============================================================
class QueryEvent(Event):
    """查询事件"""
    query: str
    filters: dict = {}

class RetrievedDocsEvent(Event):
    """检索结果事件"""
    documents: list
    query: str

class RerankedDocsEvent(Event):
    """重排后文档事件"""
    documents: list
    query: str

class GeneratedAnswerEvent(Event):
    """生成回答事件"""
    answer: str
    source_documents: list
    query: str


# ============================================================
# 可复用的 RAG 工作流模板
# ============================================================
class BaseRAGWorkflow(Workflow):
    """
    基础 RAG 工作流模板
    支持自定义检索器、重排器、LLM、提示模板
    """

    def __init__(
        self,
        retriever: Any = None,          # 检索器实例
        reranker: Any = None,           # 重排器实例(可选)
        llm: Any = None,                # LLM 实例
        system_prompt: str = "",        # 系统提示
        top_k: int = 5,                 # 检索文档数
        rerank_top_n: int = 3,          # 重排后保留文档数
        enable_reranking: bool = False, # 是否启用重排
        **kwargs,
    ):
        super().__init__(**kwargs)
        self.retriever = retriever
        self.reranker = reranker
        self.llm = llm
        self.system_prompt = system_prompt
        self.top_k = top_k
        self.rerank_top_n = rerank_top_n
        self.enable_reranking = enable_reranking

    @step
    async def retrieve(self, ctx: Context, ev: StartEvent) -> RetrievedDocsEvent:
        """检索步骤"""
        query = ev.get("query", "")
        print(f"[RAG-检索] 查询: {query}, top_k={self.top_k}")

        if self.retriever:
            # 使用真实检索器
            documents = await self.retriever.aretrieve(query)
        else:
            # 模拟检索
            documents = [
                {"content": f"文档 {i}: 关于 {query} 的信息...", "score": 0.9 - i * 0.1}
                for i in range(1, self.top_k + 1)
            ]

        # 保存查询到 Context
        await ctx.set("query", query)

        return RetrievedDocsEvent(documents=documents, query=query)

    @step
    async def maybe_rerank(self, ev: RetrievedDocsEvent) -> RerankedDocsEvent:
        """可选的重排步骤"""
        if self.enable_reranking and self.reranker:
            print(f"[RAG-重排] 重排 {len(ev.documents)} 个文档...")
            # 使用真实重排器
            reranked = await self.reranker.aretrieve(ev.documents, ev.query)
            documents = reranked[:self.rerank_top_n]
        else:
            # 跳过重排,直接使用检索结果
            documents = ev.documents[:self.rerank_top_n] if self.rerank_top_n else ev.documents

        return RerankedDocsEvent(documents=documents, query=ev.query)

    @step
    async def generate(self, ev: RerankedDocsEvent) -> StopEvent:
        """生成步骤"""
        print(f"[RAG-生成] 基于 {len(ev.documents)} 个文档生成回答...")

        # 构建上下文
        context = "\n---\n".join(
            doc.get("content", str(doc)) if isinstance(doc, dict) else str(doc)
            for doc in ev.documents
        )

        if self.llm:
            # 使用真实 LLM
            prompt = f"{self.system_prompt}\n\n上下文:\n{context}\n\n问题: {ev.query}\n\n回答:"
            response = await self.llm.acomplete(prompt)
            answer = str(response)
        else:
            # 模拟生成
            answer = f"基于 {len(ev.documents)} 个检索文档,针对 '{ev.query}' 的回答如下..."

        return StopEvent(result=answer)


# ============================================================
# 使用示例:基于模板创建具体的 RAG 工作流
# ============================================================
class TechDocRAGWorkflow(BaseRAGWorkflow):
    """技术文档 RAG 工作流(继承模板,添加自定义逻辑)"""

    def __init__(self, **kwargs):
        # 设置技术文档专用的默认参数
        kwargs.setdefault("system_prompt", "你是一个技术文档助手,请基于提供的文档准确回答问题。")
        kwargs.setdefault("top_k", 10)
        kwargs.setdefault("enable_reranking", True)
        kwargs.setdefault("rerank_top_n", 5)
        super().__init__(**kwargs)


async def main():
    # 方式一:使用基础模板(模拟模式)
    print("=== 基础 RAG(模拟模式)===")
    basic_rag = BaseRAGWorkflow(timeout=30, verbose=False)
    result = await basic_rag.run(query="什么是事件驱动架构?")
    print(f"结果: {result}\n")

    # 方式二:使用专用子类
    print("=== 技术文档 RAG ===")
    tech_rag = TechDocRAGWorkflow(timeout=30, verbose=False)
    result = await tech_rag.run(query="LlamaIndex Workflow 的核心特性")
    print(f"结果: {result}")


asyncio.run(main())
3.3 可视化与部署
3.3.1 工作流可视化与调试工具
LlamaIndex 提供了强大的可视化工具,帮助你理解和调试复杂的工作流。
"""
工作流可视化工具详解
"""
from llama_index.core.workflow import Workflow, step, Event, StartEvent, StopEvent
from llama_index.utils.workflow import (
    draw_all_possible_flows,     # 绘制所有可能的流程图
    draw_most_likely_execution,  # 绘制最可能的执行路径
)


# 定义一个有分支和循环的工作流用于演示
class ReviewEvent(Event):
    content: str
    score: float

class ReviseEvent(Event):
    content: str
    feedback: str
    attempt: int


class DemoWorkflow(Workflow):
    @step
    async def generate(self, ev: StartEvent) -> ReviewEvent:
        """生成内容"""
        return ReviewEvent(content="初始内容", score=0.5)

    @step
    async def review(self, ev: ReviewEvent) -> StopEvent | ReviseEvent:
        """评审内容"""
        if ev.score >= 0.8:
            return StopEvent(result=ev.content)
        return ReviseEvent(
            content=ev.content,
            feedback="需要改进",
            attempt=1,
        )

    @step
    async def revise(self, ev: ReviseEvent) -> ReviewEvent:
        """修订内容"""
        return ReviewEvent(content=f"修订版: {ev.content}", score=0.85)


# ============================================================
# 可视化方法 1:绘制所有可能的流程图
# ============================================================
# 这会生成一个包含所有可能执行路径的流程图
# 输出格式支持:PNG、PDF、SVG 等

draw_all_possible_flows(
    DemoWorkflow,
    filename="workflow_all_flows.html",  # 输出文件名
)

# 也可以绘制到 Streamlit 应用
# draw_to_streamlit(DemoWorkflow)

print("流程图已生成: workflow_all_flows.html")


# ============================================================
# 工作流验证:检查连通性和潜在问题
# ============================================================
workflow = DemoWorkflow(timeout=30, verbose=False)

# validate() 检查:
# 1. 所有事件类型是否都有对应的接收 Step
# 2. 是否存在孤立 Step(无法到达的 Step)
# 3. 是否存在无法终止的路径(无限循环风险)
# 4. StartEvent 和 StopEvent 是否正确连接
try:
    # 验证工作流结构
    workflow.validate()
    print("工作流验证通过!")
except Exception as e:
    print(f"工作流验证失败: {e}")
调试技巧汇总
"""
工作流调试最佳实践
"""
import logging
from llama_index.core.workflow import Workflow, step, Event, StartEvent, StopEvent, Context

# ============================================================
# 技巧 1:启用详细日志
# ============================================================
logging.basicConfig(level=logging.DEBUG)

# 创建工作流时启用 verbose 模式
workflow = DemoWorkflow(timeout=60, verbose=True)

# ============================================================
# 技巧 2:在 Step 中添加调试输出
# ============================================================
class DebugWorkflow(Workflow):
    @step
    async def debug_step(self, ctx: Context, ev: StartEvent) -> StopEvent:
        # 打印事件内容
        print(f"[DEBUG] 收到事件: {ev.model_dump()}")

        # 打印当前 Context 状态
        # 注意:Context 的所有键可以通过 ctx 的内部属性获取
        print(f"[DEBUG] Context 状态: 已设置")

        # 使用 assert 进行断言检查
        topic = ev.get("topic", "")
        assert len(topic) > 0, "topic 不能为空"

        return StopEvent(result="调试完成")

# ============================================================
# 技巧 3:使用逐步执行模式
# ============================================================
async def debug_with_steps():
    w = DebugWorkflow(timeout=60, verbose=True)
    handler = w.run(topic="调试主题")

    # 一次执行一个 Step,检查每步的输出
    result = await handler.run_step("debug_step")
    print(f"Step 结果: {result}")

    final = await handler
    print(f"最终结果: {final}")

# asyncio.run(debug_with_steps())
3.3.2 生产级部署
容器化部署
# ============================================================
# Dockerfile:LlamaIndex Workflow 应用容器化
# ============================================================
FROM python:3.12-slim

# 设置工作目录
WORKDIR /app

# 安装系统依赖
RUN apt-get update && apt-get install -y \
    build-essential \
    && rm -rf /var/lib/apt/lists/*

# 复制依赖文件
COPY requirements.txt .

# 安装 Python 依赖
RUN pip install --no-cache-dir -r requirements.txt

# 复制应用代码
COPY . .

# 设置环境变量
ENV PYTHONUNBUFFERED=1
ENV OPENAI_API_KEY=""

# 暴露端口
EXPOSE 8000

# 启动命令
CMD ["uvicorn", "app:app", "--host", "0.0.0.0", "--port", "8000"]
# ============================================================
# docker-compose.yml:多服务编排
# ============================================================
version: "3.9"

services:
  # LlamaIndex Workflow API 服务
  llamaindex-api:
    build: .
    ports:
      - "8000:8000"
    environment:
      - OPENAI_API_KEY=${OPENAI_API_KEY}
      - VECTOR_STORE_URL=http://qdrant:6333
    depends_on:
      - qdrant
      - redis
    volumes:
      - ./data:/app/data
    restart: unless-stopped

  # Qdrant 向量数据库
  qdrant:
    image: qdrant/qdrant:latest
    ports:
      - "6333:6333"
    volumes:
      - qdrant_data:/qdrant/storage
    restart: unless-stopped

  # Redis 缓存与会话管理
  redis:
    image: redis:7-alpine
    ports:
      - "6379:6379"
    volumes:
      - redis_data:/data
    restart: unless-stopped

volumes:
  qdrant_data:
  redis_data:
# requirements.txt
llama-index-core>=0.14.0
llama-index-llms-openai>=0.4.0
llama-index-embeddings-openai>=0.3.0
llama-index-vector-stores-qdrant>=0.4.0
fastapi>=0.115.0
uvicorn[standard]>=0.34.0
pydantic>=2.0
python-dotenv>=1.0.0
redis>=5.0
API 服务化:FastAPI 集成
"""
app.py:将 LlamaIndex Workflow 封装为 FastAPI REST API
支持 REST 接口和 WebSocket 流式接口
"""
import asyncio
import uuid
from contextlib import asynccontextmanager
from typing import Optional

from fastapi import FastAPI, HTTPException, WebSocket, WebSocketDisconnect
from fastapi.middleware.cors import CORSMiddleware
from pydantic import BaseModel, Field

from llama_index.core.workflow import (
    Workflow, step, Event, StartEvent, StopEvent, Context,
    InputRequiredEvent, HumanResponseEvent,
)


# ============================================================
# 定义 API 请求/响应模型
# ============================================================
class QueryRequest(BaseModel):
    """查询请求"""
    query: str = Field(..., description="用户查询文本", min_length=1, max_length=2000)
    session_id: Optional[str] = Field(None, description="会话 ID")
    filters: Optional[dict] = Field(default_factory=dict, description="过滤条件")

class QueryResponse(BaseModel):
    """查询响应"""
    answer: str
    session_id: str
    sources: list = []
    metadata: dict = {}

class WorkflowStatusResponse(BaseModel):
    """工作流状态响应"""
    status: str       # running, completed, failed
    progress: float   # 0.0 - 1.0
    current_step: str


# ============================================================
# 定义 RAG 工作流
# ============================================================
class RAGQueryEvent(Event):
    query: str
    filters: dict

class RAGRetrieveEvent(Event):
    documents: list
    query: str

class RAGAnswerEvent(Event):
    answer: str
    sources: list


class RAGWorkflow(Workflow):
    """RAG 查询工作流"""

    @step
    async def parse_query(self, ev: StartEvent) -> RAGQueryEvent:
        """解析查询"""
        return RAGQueryEvent(
            query=ev.get("query", ""),
            filters=ev.get("filters", {}),
        )

    @step
    async def retrieve(self, ev: RAGQueryEvent) -> RAGRetrieveEvent:
        """检索相关文档"""
        # 模拟检索(实际项目中使用 VectorStoreIndex)
        docs = [
            {"content": f"关于 {ev.query} 的文档片段 1", "score": 0.95},
            {"content": f"关于 {ev.query} 的文档片段 2", "score": 0.87},
            {"content": f"关于 {ev.query} 的文档片段 3", "score": 0.82},
        ]
        return RAGRetrieveEvent(documents=docs, query=ev.query)

    @step
    async def generate_answer(self, ev: RAGRetrieveEvent) -> StopEvent:
        """生成回答"""
        context = "\n".join(d["content"] for d in ev.documents)
        # 模拟 LLM 生成
        answer = f"基于检索到的 {len(ev.documents)} 个文档,关于 '{ev.query}' 的回答..."
        return StopEvent(result={
            "answer": answer,
            "sources": [d["content"] for d in ev.documents],
        })


# ============================================================
# FastAPI 应用
# ============================================================

# 全局工作流实例
rag_workflow = RAGWorkflow(timeout=60, verbose=False)


@asynccontextmanager
async def lifespan(app: FastAPI):
    """应用生命周期管理"""
    print("应用启动中...")
    # 初始化资源(如加载索引、连接数据库等)
    yield
    print("应用关闭中...")
    # 清理资源


app = FastAPI(
    title="LlamaIndex Workflow API",
    description="基于 LlamaIndex Workflow 的智能问答 API",
    version="1.0.0",
    lifespan=lifespan,
)

# 跨域配置
app.add_middleware(
    CORSMiddleware,
    allow_origins=["*"],
    allow_credentials=True,
    allow_methods=["*"],
    allow_headers=["*"],
)


# ============================================================
# REST API 端点
# ============================================================

@app.post("/api/v1/query", response_model=QueryResponse)
async def query_endpoint(request: QueryRequest):
    """
    查询端点:接收用户问题,运行 RAG 工作流,返回回答
    """
    session_id = request.session_id or str(uuid.uuid4())

    try:
        # 运行工作流
        result = await rag_workflow.run(
            query=request.query,
            filters=request.filters,
        )

        # 解析结果
        if isinstance(result, dict):
            return QueryResponse(
                answer=result.get("answer", ""),
                session_id=session_id,
                sources=result.get("sources", []),
            )
        else:
            return QueryResponse(
                answer=str(result),
                session_id=session_id,
            )

    except Exception as e:
        raise HTTPException(status_code=500, detail=f"工作流执行失败: {str(e)}")


@app.get("/api/v1/health")
async def health_check():
    """健康检查端点"""
    return {"status": "healthy", "version": "1.0.0"}


# ============================================================
# WebSocket 流式接口
# ============================================================

@app.websocket("/ws/query")
async def websocket_query(websocket: WebSocket):
    """
    WebSocket 流式查询端点
    支持实时推送工作流执行进度和中间结果
    """
    await websocket.accept()

    try:
        while True:
            # 接收客户端消息
            data = await websocket.receive_json()
            query = data.get("query", "")

            if not query:
                await websocket.send_json({"error": "查询内容不能为空"})
                continue

            # 运行工作流并流式输出事件
            handler = rag_workflow.run(query=query)

            # 实时推送每个事件
            async for event in handler.stream_events():
                if isinstance(event, InputRequiredEvent):
                    await websocket.send_json({
                        "type": "input_required",
                        "prefix": event.prefix,
                    })
                else:
                    await websocket.send_json({
                        "type": "progress",
                        "event": event.model_dump(),
                    })

            # 获取最终结果
            result = await handler
            await websocket.send_json({
                "type": "result",
                "data": result if isinstance(result, dict) else {"answer": str(result)},
            })

    except WebSocketDisconnect:
        print("WebSocket 连接已断开")
    except Exception as e:
        await websocket.send_json({"error": str(e)})


# ============================================================
# 启动命令
# ============================================================
# uvicorn app:app --host 0.0.0.0 --port 8000 --reload
#
# API 文档: http://localhost:8000/docs
# ReDoc:    http://localhost:8000/redoc
性能优化
"""
生产环境性能优化策略
"""
import asyncio
import functools
from typing import Any
from llama_index.core.workflow import Workflow, step, Event, StartEvent, StopEvent, Context


# ============================================================
# 优化策略 1:异步并发优化
# ============================================================
# 使用 asyncio.gather() 并行执行多个独立的异步操作

class OptimizedWorkflow(Workflow):
    @step
    async def parallel_retrieve(self, ctx: Context, ev: StartEvent) -> StopEvent:
        """并行检索多个数据源"""
        queries = [
            "查询1: 技术概述",
            "查询2: 应用场景",
            "查询3: 性能对比",
        ]

        # 使用 asyncio.gather 并行执行多个检索
        results = await asyncio.gather(
            *[self._mock_retrieve(q) for q in queries],
            return_exceptions=True,  # 不让单个失败影响整体
        )

        # 处理结果(过滤掉失败的)
        valid_results = [r for r in results if not isinstance(r, Exception)]
        return StopEvent(result=valid_results)

    async def _mock_retrieve(self, query: str) -> dict:
        """模拟检索"""
        await asyncio.sleep(0.5)
        return {"query": query, "docs": ["文档1", "文档2"]}


# ============================================================
# 优化策略 2:缓存策略
# ============================================================
class CachedResult:
    """简单的内存缓存"""
    def __init__(self, ttl: int = 3600):
        self._cache: dict[str, tuple[Any, float]] = {}
        self._ttl = ttl

    async def get_or_compute(self, key: str, compute_fn):
        """获取缓存或计算"""
        import time
        now = time.time()

        if key in self._cache:
            value, expire_at = self._cache[key]
            if now < expire_at:
                return value  # 缓存命中

        # 缓存未命中或已过期
        value = await compute_fn()
        self._cache[key] = (value, now + self._ttl)
        return value


# 全局缓存实例
result_cache = CachedResult(ttl=3600)  # 1 小时 TTL


# ============================================================
# 优化策略 3:连接池管理
# ============================================================
# 对于数据库连接、HTTP 连接等,使用连接池避免频繁创建/销毁

class ConnectionPool:
    """简单的异步连接池"""

    def __init__(self, max_size: int = 10):
        self._pool: asyncio.Queue = asyncio.Queue(maxsize=max_size)
        self._max_size = max_size
        self._current_size = 0

    async def acquire(self):
        """获取连接"""
        if self._current_size < self._max_size:
            self._current_size += 1
            return self._create_connection()

        return await self._pool.get()

    async def release(self, conn):
        """归还连接"""
        await self._pool.put(conn)

    def _create_connection(self):
        """创建新连接"""
        # 实际项目中替换为真实的连接创建逻辑
        return {"id": self._current_size, "status": "connected"}

    async def __aenter__(self):
        self._conn = await self.acquire()
        return self._conn

    async def __aexit__(self, *args):
        await self.release(self._conn)


# 使用连接池
pool = ConnectionPool(max_size=10)

async def use_connection_pool():
    async with pool as conn:
        # 使用连接执行操作
        print(f"使用连接: {conn}")
        pass
可观测性
"""
可观测性:追踪(Tracing)与指标(Metrics)
"""
import time
import logging
from functools import wraps
from llama_index.core.workflow import Workflow, step, Event, StartEvent, StopEvent, Context

# ============================================================
# 方式 1:LlamaIndex 内置 Observability
# ============================================================
# LlamaIndex 提供了 Observability 模块,可以与多种追踪平台集成

# from llama_index.core import set_global_handler

# 与 Arize Phoenix 集成
# import phoenix as px
# px.launch_app()
# from llama_index.core import set_global_handler
# set_global_handler("arize_phoenix")

# 与 LangSmith 集成
# import os
# os.environ["LANGCHAIN_TRACING_V2"] = "true"
# os.environ["LANGCHAIN_API_KEY"] = "your-api-key"
# os.environ["LANGCHAIN_PROJECT"] = "llamaindex-workflow"


# ============================================================
# 方式 2:自定义追踪装饰器
# ============================================================
logger = logging.getLogger("workflow_metrics")


def trace_step(step_name: str):
    """
    Step 追踪装饰器
    记录每个 Step 的执行时间、输入输出、错误信息
    """
    def decorator(func):
        @wraps(func)
        async def wrapper(*args, **kwargs):
            start_time = time.time()
            span_id = f"{step_name}-{int(start_time * 1000)}"

            logger.info(f"[TRACE] {span_id} 开始执行: {step_name}")

            try:
                result = await func(*args, **kwargs)
                duration = time.time() - start_time

                logger.info(
                    f"[TRACE] {span_id} 执行完成: "
                    f"duration={duration:.3f}s, "
                    f"result_type={type(result).__name__}"
                )

                # 记录到指标系统(实际项目中接入 Prometheus/Grafana 等)
                # metrics.histogram("step_duration", duration, tags={"step": step_name})
                # metrics.increment("step_success", tags={"step": step_name})

                return result

            except Exception as e:
                duration = time.time() - start_time
                logger.error(
                    f"[TRACE] {span_id} 执行失败: "
                    f"duration={duration:.3f}s, "
                    f"error={type(e).__name__}: {e}"
                )
                # metrics.increment("step_error", tags={"step": step_name})
                raise

        return wrapper
    return decorator


# 使用追踪装饰器
class ObservableWorkflow(Workflow):
    @step
    @trace_step("retrieve_documents")
    async def retrieve(self, ev: StartEvent) -> StopEvent:
        """带追踪的检索步骤"""
        await asyncio.sleep(0.5)  # 模拟检索
        return StopEvent(result="检索结果")


# ============================================================
# 方式 3:工作流级别的指标收集
# ============================================================
class WorkflowMetrics:
    """工作流指标收集器"""

    def __init__(self):
        self.step_durations: dict[str, list[float]] = {}
        self.step_errors: dict[str, int] = {}
        self.workflow_runs: int = 0
        self.workflow_errors: int = 0

    def record_step(self, step_name: str, duration: float, error: bool = False):
        """记录 Step 指标"""
        if step_name not in self.step_durations:
            self.step_durations[step_name] = []
        self.step_durations[step_name].append(duration)

        if error:
            self.step_errors[step_name] = self.step_errors.get(step_name, 0) + 1

    def record_workflow(self, error: bool = False):
        """记录工作流指标"""
        self.workflow_runs += 1
        if error:
            self.workflow_errors += 1

    def get_summary(self) -> dict:
        """获取指标汇总"""
        summary = {
            "total_runs": self.workflow_runs,
            "error_rate": self.workflow_errors / max(self.workflow_runs, 1),
            "step_stats": {},
        }
        for step_name, durations in self.step_durations.items():
            summary["step_stats"][step_name] = {
                "count": len(durations),
                "avg_duration": sum(durations) / len(durations),
                "max_duration": max(durations),
                "min_duration": min(durations),
                "error_count": self.step_errors.get(step_name, 0),
            }
        return summary


# 全局指标实例
metrics = WorkflowMetrics()
第四章:综合实战项目
4.1 企业知识库问答系统
项目需求分析
构建一个企业级知识库问答系统,支持以下核心功能:
- 文档导入与管理(支持 PDF、Markdown、TXT 等多种格式)
- 智能语义检索(基于向量相似度的语义搜索)
- RAG 问答(检索增强生成,基于文档内容回答问题)
- 对话历史管理(支持多轮对话上下文)
- Web 界面(友好的用户交互界面)
技术架构设计
[用户界面 (Web UI)]
       |
       v
[FastAPI 后端服务]
       |
       v
[LlamaIndex Workflow (RAG 工作流)]
       |
       +---> [文档加载器] ---> [文本分块器] ---> [嵌入模型] ---> [向量数据库]
       |
       +---> [检索器] ---> [重排器] ---> [LLM 生成器]
       |
       +---> [对话记忆管理器]
完整代码实现
"""
企业知识库问答系统 - 完整实现
文件: knowledge_base_app.py
"""
import asyncio
import os
import uuid
from typing import Optional, List
from pathlib import Path

from fastapi import FastAPI, UploadFile, File, HTTPException
from fastapi.middleware.cors import CORSMiddleware
from fastapi.responses import HTMLResponse
from pydantic import BaseModel, Field

from llama_index.core import (
    VectorStoreIndex,
    SimpleDirectoryReader,
    Document,
    Settings,
    StorageContext,
    load_index_from_storage,
)
from llama_index.core.node_parser import SentenceSplitter
from llama_index.core.workflow import (
    Workflow, step, Event, StartEvent, StopEvent, Context,
)

# ============================================================
# 配置
# ============================================================
# 在 .env 文件或环境变量中设置
# OPENAI_API_KEY=your-api-key-here

DATA_DIR = "./knowledge_base_data"
INDEX_DIR = "./index_storage"
UPLOAD_DIR = "./uploads"

# 确保目录存在
for d in [DATA_DIR, INDEX_DIR, UPLOAD_DIR]:
    Path(d).mkdir(parents=True, exist_ok=True)


# ============================================================
# 全局设置
# ============================================================
def init_llama_index_settings():
    """初始化 LlamaIndex 全局设置"""
    # 设置嵌入模型(用于将文本转为向量)
    from llama_index.embeddings.openai import OpenAIEmbedding
    Settings.embed_model = OpenAIEmbedding(model="text-embedding-3-small")

    # 设置 LLM(用于生成回答)
    from llama_index.llms.openai import OpenAI
    Settings.llm = OpenAI(model="gpt-4.1-mini", temperature=0.1)

    # 设置文本分块器
    Settings.node_parser = SentenceSplitter(
        chunk_size=512,     # 每个块的最大 token 数
        chunk_overlap=50,   # 块之间的重叠 token 数
    )

    # 设置默认检索参数
    Settings.num_output = 512       # LLM 输出最大 token 数
    Settings.context_window = 4096  # 上下文窗口大小


# ============================================================
# 知识库管理器
# ============================================================
class KnowledgeBaseManager:
    """知识库管理器:负责文档加载、索引构建和检索"""

    def __init__(self):
        self.index: Optional[VectorStoreIndex] = None
        self._load_or_create_index()

    def _load_or_create_index(self):
        """加载已有索引或创建新索引"""
        if os.path.exists(INDEX_DIR) and os.listdir(INDEX_DIR):
            try:
                storage_context = StorageContext.from_defaults(
                    persist_dir=INDEX_DIR
                )
                self.index = load_index_from_storage(storage_context)
                print("已加载现有索引")
            except Exception as e:
                print(f"加载索引失败: {e},将创建新索引")
                self._create_empty_index()
        else:
            self._create_empty_index()

    def _create_empty_index(self):
        """创建空索引"""
        # 用一份占位文档创建初始索引
        placeholder = Document(text="知识库初始化完成。", doc_id="placeholder")
        self.index = VectorStoreIndex.from_documents([placeholder])
        self._persist_index()

    def _persist_index(self):
        """持久化索引到磁盘"""
        self.index.storage_context.persist(persist_dir=INDEX_DIR)

    async def add_documents(self, file_paths: list[str]) -> int:
        """
        添加文档到知识库
        返回添加的文档数量
        """
        documents = []

        for file_path in file_paths:
            path = Path(file_path)
            if not path.exists():
                continue

            # 根据文件类型选择加载器
            if path.suffix.lower() in (".pdf", ".md", ".txt", ".docx"):
                reader = SimpleDirectoryReader(input_files=[str(path)])
                docs = reader.load_data()
                documents.extend(docs)
            else:
                # 尝试作为纯文本读取
                try:
                    content = path.read_text(encoding="utf-8")
                    documents.append(
                        Document(
                            text=content,
                            metadata={"file_name": path.name},
                            doc_id=str(uuid.uuid4()),
                        )
                    )
                except Exception:
                    print(f"跳过不支持的文件: {path}")

        if documents:
            # 将新文档添加到索引
            for doc in documents:
                self.index.insert(doc)
            self._persist_index()

        print(f"已添加 {len(documents)} 个文档到知识库")
        return len(documents)

    def get_retriever(self, similarity_top_k: int = 5):
        """获取检索器"""
        return self.index.as_retriever(similarity_top_k=similarity_top_k)


# ============================================================
# RAG 问答工作流
# ============================================================
class QueryParsedEvent(Event):
    """查询解析事件"""
    query: str
    session_id: str
    chat_history: list

class RetrievedEvent(Event):
    """检索结果事件"""
    nodes: list
    query: str

class AugmentedEvent(Event):
    """增强事件(检索结果 + 对话历史)"""
    context: str
    query: str
    chat_history: list


class KnowledgeBaseRAGWorkflow(Workflow):
    """知识库 RAG 问答工作流"""

    def __init__(self, kb_manager: KnowledgeBaseManager, **kwargs):
        super().__init__(**kwargs)
        self.kb_manager = kb_manager

    @step
    async def parse_query(self, ctx: Context, ev: StartEvent) -> QueryParsedEvent:
        """解析查询参数"""
        query = ev.get("query", "")
        session_id = ev.get("session_id", str(uuid.uuid4()))
        chat_history = ev.get("chat_history", [])

        await ctx.set("session_id", session_id)
        print(f"[RAG] 解析查询: '{query}' (会话: {session_id[:8]}...)")

        return QueryParsedEvent(
            query=query,
            session_id=session_id,
            chat_history=chat_history,
        )

    @step
    async def retrieve_documents(self, ev: QueryParsedEvent) -> RetrievedEvent:
        """检索相关文档"""
        retriever = self.kb_manager.get_retriever(similarity_top_k=5)
        nodes = retriever.retrieve(ev.query)

        print(f"[RAG] 检索到 {len(nodes)} 个相关文档片段")
        return RetrievedEvent(nodes=nodes, query=ev.query)

    @step
    async def augment_context(self, ev: RetrievedEvent) -> AugmentedEvent:
        """构建增强上下文"""
        # 提取检索到的文档内容
        context_parts = []
        for i, node in enumerate(ev.nodes, 1):
            content = node.get_content() if hasattr(node, "get_content") else str(node)
            context_parts.append(f"[文档片段 {i}] {content}")

        context = "\n\n".join(context_parts)

        return AugmentedEvent(
            context=context,
            query=ev.query,
            chat_history=[],  # 简化处理
        )

    @step
    async def generate_answer(self, ev: AugmentedEvent) -> StopEvent:
        """生成回答"""
        # 构建提示
        chat_context = ""
        if ev.chat_history:
            chat_context = "\n对话历史:\n" + "\n".join(
                f"{msg.get('role', 'user')}: {msg.get('content', '')}"
                for msg in ev.chat_history[-4:]  # 只保留最近 4 条
            )

        prompt = f"""你是一个专业的企业知识库助手。请基于以下参考文档回答用户的问题。
如果参考文档中没有相关信息,请如实说明。

参考文档:
{ev.context}
{chat_context}

用户问题: {ev.query}

请用中文给出详细、准确的回答:"""

        # 调用 LLM 生成回答
        from llama_index.core.llms import ChatMessage
        from llama_index.llms.openai import OpenAI

        llm = OpenAI(model="gpt-4.1-mini", temperature=0.1)
        response = await llm.acomplete(prompt)
        answer = str(response)

        # 提取来源信息
        sources = []
        for node in ev.nodes[:3] if hasattr(ev, 'nodes') else []:
            meta = node.metadata if hasattr(node, "metadata") else {}
            sources.append(meta.get("file_name", "未知来源"))

        return StopEvent(result={
            "answer": answer,
            "sources": list(set(sources)),
            "doc_count": len(ev.context.split("[文档片段"))),
        })


# ============================================================
# FastAPI 应用
# ============================================================
app = FastAPI(
    title="企业知识库问答系统",
    description="基于 LlamaIndex 的企业知识库 RAG 系统",
    version="1.0.0",
)

app.add_middleware(
    CORSMiddleware,
    allow_origins=["*"],
    allow_methods=["*"],
    allow_headers=["*"],
)

# 全局实例
kb_manager = KnowledgeBaseManager()
rag_workflow = KnowledgeBaseRAGWorkflow(
    kb_manager=kb_manager,
    timeout=120,
    verbose=False,
)

# 会话存储(生产环境应使用 Redis)
sessions: dict[str, list] = {}


class ChatRequest(BaseModel):
    query: str = Field(..., min_length=1, max_length=2000)
    session_id: Optional[str] = None


class ChatResponse(BaseModel):
    answer: str
    sources: list[str] = []
    session_id: str


@app.on_event("startup")
async def startup():
    init_llama_index_settings()


@app.post("/api/upload")
async def upload_documents(files: List[UploadFile] = File(...)):
    """上传文档到知识库"""
    saved_paths = []

    for file in files:
        file_path = os.path.join(UPLOAD_DIR, file.filename)
        content = await file.read()
        with open(file_path, "wb") as f:
            f.write(content)
        saved_paths.append(file_path)

    doc_count = await kb_manager.add_documents(saved_paths)

    return {
        "message": f"成功上传并处理 {len(saved_paths)} 个文件",
        "documents_added": doc_count,
        "files": [f.filename for f in files],
    }


@app.post("/api/chat", response_model=ChatResponse)
async def chat(request: ChatRequest):
    """对话接口"""
    session_id = request.session_id or str(uuid.uuid4())

    # 获取对话历史
    chat_history = sessions.get(session_id, [])

    try:
        result = await rag_workflow.run(
            query=request.query,
            session_id=session_id,
            chat_history=chat_history,
        )

        # 更新对话历史
        if session_id not in sessions:
            sessions[session_id] = []
        sessions[session_id].append({"role": "user", "content": request.query})

        if isinstance(result, dict):
            answer = result.get("answer", "")
            sources = result.get("sources", [])
        else:
            answer = str(result)
            sources = []

        sessions[session_id].append({"role": "assistant", "content": answer})

        # 保留最近 20 条对话
        sessions[session_id] = sessions[session_id][-20:]

        return ChatResponse(
            answer=answer,
            sources=sources,
            session_id=session_id,
        )

    except Exception as e:
        raise HTTPException(status_code=500, detail=f"处理失败: {str(e)}")


@app.get("/api/sessions/{session_id}")
async def get_session(session_id: str):
    """获取会话历史"""
    history = sessions.get(session_id, [])
    return {"session_id": session_id, "messages": history}


@app.get("/", response_class=HTMLResponse)
async def index_page():
    """简单的前端页面"""
    return """
    <!DOCTYPE html>
    <html lang="zh-CN">
    <head>
        <meta charset="UTF-8">
        <meta name="viewport" content="width=device-width, initial-scale=1.0">
        <title>企业知识库问答系统</title>
        <style>
            * { margin: 0; padding: 0; box-sizing: border-box; }
            body { font-family: -apple-system, sans-serif; background: #f5f5f5; }
            .container { max-width: 800px; margin: 0 auto; padding: 20px; }
            h1 { text-align: center; margin: 20px 0; color: #333; }
            .chat-box { background: white; border-radius: 12px; padding: 20px;
                        box-shadow: 0 2px 8px rgba(0,0,0,0.1); min-height: 400px;
                        max-height: 600px; overflow-y: auto; margin-bottom: 20px; }
            .message { margin: 10px 0; padding: 10px 15px; border-radius: 8px; }
            .user-msg { background: #e3f2fd; text-align: right; }
            .bot-msg { background: #f1f8e9; }
            .input-area { display: flex; gap: 10px; }
            input[type="text"] { flex: 1; padding: 12px; border: 1px solid #ddd;
                                  border-radius: 8px; font-size: 16px; }
            button { padding: 12px 24px; background: #1976d2; color: white;
                     border: none; border-radius: 8px; cursor: pointer; font-size: 16px; }
            button:hover { background: #1565c0; }
            .sources { font-size: 12px; color: #666; margin-top: 5px; }
        </style>
    </head>
    <body>
        <div class="container">
            <h1>企业知识库问答系统</h1>
            <div class="chat-box" id="chatBox">
                <div class="message bot-msg">你好!我是知识库助手,请问有什么可以帮助你的?</div>
            </div>
            <div class="input-area">
                <input type="text" id="queryInput" placeholder="输入你的问题..."
                       onkeypress="if(event.key==='Enter')sendMessage()">
                <button onclick="sendMessage()">发送</button>
            </div>
        </div>
        <script>
            let sessionId = null;
            async function sendMessage() {
                const input = document.getElementById('queryInput');
                const query = input.value.trim();
                if (!query) return;
                input.value = '';

                const chatBox = document.getElementById('chatBox');
                chatBox.innerHTML += `<div class="message user-msg">${query}</div>`;
                chatBox.innerHTML += `<div class="message bot-msg" id="loading">思考中...</div>`;
                chatBox.scrollTop = chatBox.scrollHeight;

                try {
                    const res = await fetch('/api/chat', {
                        method: 'POST',
                        headers: {'Content-Type': 'application/json'},
                        body: JSON.stringify({query, session_id: sessionId})
                    });
                    const data = await res.json();
                    sessionId = data.session_id;
                    document.getElementById('loading').remove();
                    let msg = `<div class="message bot-msg">${data.answer}`;
                    if (data.sources && data.sources.length > 0) {
                        msg += `<div class="sources">来源: ${data.sources.join(', ')}</div>`;
                    }
                    msg += '</div>';
                    chatBox.innerHTML += msg;
                    chatBox.scrollTop = chatBox.scrollHeight;
                } catch(e) {
                    document.getElementById('loading').innerHTML = '出错了,请重试。';
                }
            }
        </script>
    </body>
    </html>
    """


# 启动命令:
# uvicorn knowledge_base_app:app --host 0.0.0.0 --port 8000 --reload
#
# 访问 http://localhost:8000 使用 Web 界面
# 访问 http://localhost:8000/docs 查看 API 文档
部署与优化建议
- 索引优化:对于大规模文档库(>10万文档),建议使用专业向量数据库(Qdrant/Milvus/Pinecone)替代默认的内存索引
- 分块策略:根据文档类型调整 chunk_size,技术文档适合较大的块(1024),FAQ 类文档适合较小的块(256)
- 混合检索:结合关键词检索(BM25)和语义检索(向量相似度)提升召回率
- 缓存:对高频查询的结果进行缓存,减少 LLM 调用成本
- 并发控制:使用
@step(num_workers=N)限制并发,避免超出 API 速率限制 - 监控告警:接入 Prometheus + Grafana 监控工作流执行时间和错误率
4.2 智能研究助手(Research Agent)
使用 Workflow 编排复杂的研究任务,实现多工具协同。
"""
智能研究助手:使用 Workflow 编排多步骤研究任务
支持:搜索 -> 摘要 -> 分析 -> 报告生成
"""
import asyncio
from typing import Union
from llama_index.core.workflow import (
    Workflow, step, Event, StartEvent, StopEvent, Context,
)


# ============================================================
# 事件定义
# ============================================================
class ResearchPlanEvent(Event):
    """研究计划事件"""
    topic: str
    subtopics: list[str]

class SearchResultEvent(Event):
    """搜索结果事件"""
    subtopic: str
    results: list[dict]

class SummaryEvent(Event):
    """摘要事件"""
    subtopic: str
    summary: str
    key_findings: list[str]

class AnalysisEvent(Event):
    """分析事件"""
    report_sections: list[dict]

class ReportReadyEvent(Event):
    """报告就绪事件"""
    full_report: str


# ============================================================
# 研究助手工作流
# ============================================================
class ResearchAssistantWorkflow(Workflow):
    """
    智能研究助手工作流
    流程:
      1. 制定研究计划(分解子主题)
      2. 并行搜索各子主题
      3. 汇总搜索结果
      4. 生成各子主题摘要
      5. 综合分析
      6. 生成完整研究报告
    """

    @step
    async def plan_research(self, ctx: Context, ev: StartEvent) -> SearchResultEvent:
        """
        步骤 1:制定研究计划
        将主题分解为多个子主题,并行搜索
        """
        topic = ev.get("topic", "")
        print(f"[研究助手] 制定研究计划: {topic}")

        # 分解子主题(实际项目中使用 LLM 分解)
        subtopics = [
            f"{topic} - 基本概念与原理",
            f"{topic} - 最新研究进展",
            f"{topic} - 实际应用场景",
            f"{topic} - 未来发展趋势",
        ]

        await ctx.set("topic", topic)
        await ctx.set("subtopics", subtopics)
        await ctx.set("expected_searches", len(subtopics))

        # 并行发出多个搜索事件
        for subtopic in subtopics[1:]:
            ctx.send_event(SearchResultEvent(
                subtopic=subtopic,
                results=[],  # 将在 search_step 中填充
            ))

        # 第一个通过返回值发出
        return SearchResultEvent(subtopic=subtopics[0], results=[])

    @step(num_workers=4)
    async def search_subtopic(self, ev: SearchResultEvent) -> SummaryEvent:
        """
        步骤 2:搜索每个子主题
        并行执行(最多 4 个并发)
        """
        print(f"[搜索] 搜索子主题: {ev.subtopic}")

        # 模拟搜索(实际项目中接入搜索 API 或 RAG)
        await asyncio.sleep(1)
        mock_results = [
            {"title": f"关于 {ev.subtopic} 的论文", "snippet": "重要发现..."},
            {"title": f"{ev.subtopic} 综述", "snippet": "综合分析..."},
            {"title": f"{ev.subtopic} 案例研究", "snippet": "实践案例..."},
        ]

        # 生成摘要(实际项目中使用 LLM)
        summary = f"关于 '{ev.subtopic}' 的研究摘要:基于 {len(mock_results)} 个来源的综合分析。"
        key_findings = [r["snippet"] for r in mock_results]

        return SummaryEvent(
            subtopic=ev.subtopic,
            summary=summary,
            key_findings=key_findings,
        )

    @step
    async def collect_summaries(self, ctx: Context, ev: SummaryEvent) -> AnalysisEvent:
        """
        步骤 3:收集所有子主题的摘要
        """
        summaries = await ctx.get("summaries", default=[])
        summaries.append({
            "subtopic": ev.subtopic,
            "summary": ev.summary,
            "key_findings": ev.key_findings,
        })
        await ctx.set("summaries", summaries)

        expected = await ctx.get("expected_searches", 4)
        if len(summaries) < expected:
            print(f"[收集] 已收到 {len(summaries)}/{expected} 个子主题的摘要")
            return None  # 等待更多摘要

        # 所有摘要已收集完成,进入分析阶段
        print(f"[收集] 所有 {expected} 个子主题摘要已就绪")
        return AnalysisEvent(report_sections=summaries)

    @step
    async def analyze_and_report(self, ctx: Context, ev: AnalysisEvent) -> StopEvent:
        """
        步骤 4:综合分析并生成完整报告
        """
        topic = await ctx.get("topic", "未知主题")
        sections = ev.report_sections

        # 生成报告(实际项目中使用 LLM)
        report = f"""# 研究报告:{topic}

## 摘要
本报告对 {topic} 进行了全面的研究和分析,涵盖基本概念、最新进展、应用场景和未来趋势四个方面。

## 详细分析
"""
        for i, section in enumerate(sections, 1):
            report += f"""
### {i}. {section['subtopic']}

{section['summary']}

**关键发现:**
"""
            for finding in section["key_findings"]:
                report += f"- {finding}\n"

        report += f"""
## 结论
综合以上分析,{topic} 领域正在快速发展,具有广阔的应用前景。
建议持续关注最新研究动态,并结合实际场景进行探索和实践。

---
*本报告由智能研究助手自动生成*
"""

        return StopEvent(result=report)


# ============================================================
# 运行研究助手
# ============================================================
async def main():
    workflow = ResearchAssistantWorkflow(timeout=120, verbose=False)

    print("=== 智能研究助手 ===")
    print("研究主题: LlamaIndex Workflow 事件驱动架构")
    print("=" * 50)

    result = await workflow.run(topic="LlamaIndex Workflow 事件驱动架构")
    print(result)


asyncio.run(main())
4.3 最佳实践与常见问题
性能优化清单
| 优化项 | 说明 | 优先级 |
|---|---|---|
| 异步并发 | 使用 @step(num_workers=N) 和 asyncio.gather() 并行执行 |
高 |
| 结果缓存 | 对重复查询缓存结果,设置合理 TTL | 高 |
| 批量处理 | 文档导入时批量分块和嵌入,减少 API 调用次数 | 高 |
| 连接池 | 数据库和 HTTP 连接使用连接池复用 | 中 |
| 流式响应 | 使用 streaming API 减少首 Token 延迟 | 中 |
| 模型选择 | 简单任务用小模型(gpt-4.1-mini),复杂任务用大模型 | 中 |
| 索引优化 | 使用专业向量数据库,避免内存索引用于大规模数据 | 高 |
| 分块策略 | 根据文档类型调整 chunk_size 和 chunk_overlap | 中 |
常见错误与解决方案
错误 1:Step 没有返回事件
# 错误示例:Step 有时不返回任何事件(忘记 return)
@step
async def my_step(self, ev: StartEvent) -> ResultEvent:
    if some_condition:
        return ResultEvent(data="ok")
    # 遗漏了 else 分支的 return!

# 正确做法:确保所有分支都有返回值,或显式返回 None
@step
async def my_step(self, ev: StartEvent) -> ResultEvent:
    if some_condition:
        return ResultEvent(data="ok")
    return None  # 显式表示不发出事件
错误 2:Context 竞态条件
# 潜在问题:多个并发 Step 同时读写同一个 Context 键
# Step A 和 Step B 同时读取 count=0,都写回 count=1,丢失一次递增

# 解决方案 1:使用收集模式(在单个 Step 中累积)
@step
async def collector(self, ctx: Context, ev: ResultEvent) -> StopEvent:
    results = await ctx.get("results", default=[])
    results.append(ev.data)
    await ctx.set("results", results)
    # 这个 Step 每次只处理一个事件,不会并发

# 解决方案 2:使用 asyncio.Lock
lock = asyncio.Lock()

@step(num_workers=4)
async def safe_step(self, ctx: Context, ev: TaskEvent) -> ResultEvent:
    async with lock:
        count = await ctx.get("count", default=0)
        await ctx.set("count", count + 1)
    return ResultEvent(data="done")
错误 3:工作流超时
# 问题:工作流 timeout 设置过短,LLM 调用还没完成就超时了

# 解决方案:根据实际耗时合理设置 timeout
workflow = MyWorkflow(
    timeout=300,   # 5 分钟(对于涉及多次 LLM 调用的工作流)
    verbose=True,  # 开发阶段开启,方便排查
)

# 或者在每个 Step 中单独设置超时
@step
async def llm_call(self, ev: InputEvent) -> OutputEvent:
    try:
        result = await asyncio.wait_for(
            self.llm.acomplete(prompt),
            timeout=30,  # 单次 LLM 调用超时 30 秒
        )
    except asyncio.TimeoutError:
        # 处理超时
        result = "生成超时,请稍后重试"
    return OutputEvent(result=result)
错误 4:事件类型路由错误
# 问题:Step 的返回类型注解与实际返回不匹配
@step
async def wrong_step(self, ev: StartEvent) -> EventA:
    return EventB(data="xxx")  # 返回了 EventB,但注解写的是 EventA!

# 正确做法:使用 Union 标注所有可能的返回类型
from typing import Union

@step
async def correct_step(self, ev: StartEvent) -> Union[EventA, EventB]:
    if condition:
        return EventA(data="路径A")
    return EventB(data="路径B")
生产环境部署 Checklist
- [ ] 所有 Step 都有完善的错误处理和日志记录
- [ ] 工作流 timeout 设置合理(根据最坏情况的执行时间)
- [ ] 敏感信息(API Key 等)使用环境变量或密钥管理服务
- [ ] 启用检查点机制(对于长运行工作流)
- [ ] 配置健康检查端点(/health)
- [ ] 接入可观测性平台(追踪、指标、日志)
- [ ] 使用 Docker 容器化,确保环境一致性
- [ ] 配置合理的并发限制(num_workers),避免资源耗尽
- [ ] 对输入数据进行验证和清理(防止注入攻击)
- [ ] 配置速率限制(Rate Limiting),防止 API 滥用
- [ ] 设置告警规则(错误率、延迟、资源使用率)
- [ ] 编写集成测试,覆盖主要工作流路径
- [ ] 文档化所有 API 端点和工作流逻辑
学习资源与社区推荐
| 资源 | 链接 | 说明 |
|---|---|---|
| LlamaIndex 官方文档 | https://docs.llamaindex.ai | 最权威的参考资料 |
| LlamaIndex GitHub | https://github.com/run-llama/llama_index | 源码和 Issue 讨论 |
| LlamaIndex Cookbook | https://github.com/run-llama/llama_index/tree/main/docs/docs/examples | 丰富的代码示例 |
| LlamaIndex Discord | https://discord.gg/llamaindex | 社区交流和问题解答 |
| Workflow 官方示例 | https://github.com/run-llama/python-workflows | 独立 Workflow 库的示例 |
| Arize Phoenix | https://github.com/Arize-ai/phoenix | 开源 LLM 可观测性平台 |
| LlamaIndex 中文社区 | 各技术论坛/公众号 | 中文教程和经验分享 |
全教程完
恭喜你完成了 LlamaIndex 框架应用实战教程的全部学习内容!通过本教程的系统学习,你已经掌握了:
- 技术认知:LlamaIndex 的核心定位、与 LangChain 的差异及场景选型
- 数据管道:Documents/Nodes 数据模型、数据连接器、文本分割策略、IngestionPipeline、元数据提取
- 索引技术:VectorStoreIndex、PropertyGraphIndex、SummaryIndex 等索引类型的原理与选型
- 存储系统:五层分层存储架构、主流向量数据库适配、企业级扩展与持久化
- 查询与生成:QueryEngine、ChatEngine、Retriever、NodePostprocessor、ResponseSynthesizer
- 工作流开发:事件驱动模型、Step/Event/Context 三要素、分支/循环/并发/嵌套编排、人机协同
- 生产部署:Docker 容器化、FastAPI 服务化、可观测性、性能优化
- 实战项目:企业知识库问答系统、智能研究助手
下一步建议:
- 结合自己的业务场景动手实践,从简单的 RAG 应用开始,逐步引入 Workflow 编排
- 持续关注 LlamaIndex 官方文档 和 GitHub 仓库 的版本更新
- 参与社区讨论,在 Discord 和论坛中与其他开发者交流经验
评论区